Advertisement
Quick Links
Installation/Operating
Instructions for Din Rail Mounting
Digital Compact Timer
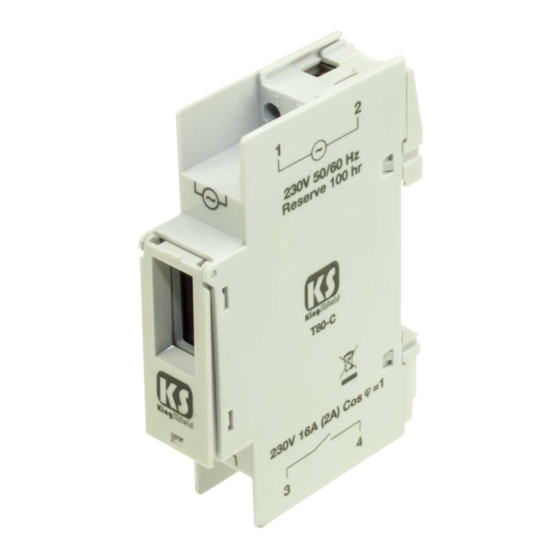
Model - T80-C
SPECIFICATIONS
No of channels
Contact rating
Shortest switching
time
Capacity
Voltage supply
Mains frequency
Possible settings
Display
Deviation
Reserve
Manual Switch
Mounting
Connections
Size
IMPORTANT
This unit should be installed by a
competent person in accordance with
the current IEE Wiring Regulations.
If in doubt consult a qualified electrician.
• Before connecting the timer to the
mains, check that the mains
voltage and frequency correspond to
the rating plate (on side of timer).
• Do not overload. Refer to the
Ampere rating (amps) on the
rating plate.
• Do not expose the timer to
extremely high or low
temperatures. Do not place the timer
in direct sunlight.
• Do not allow the timer to come
into contact with water.
• If the time switch is mounted near
equipment where heat produced raises
the local ambient temperature above
55°C, then a 1/2 module space should be
left between the time switch and the
equipment.
• If used to operate a contactor, then a 1
module space should be left between
timer and contactor.
INSTALLATION
• This timer is designed to be din rail
mounted.
• Ensure that the 230V AC supply is
connected to terminals 1 and 2.
• Terminals 3 and 4 are volt free
contacts. Live in goes to terminal 3
and Live out goes to Load.
There is no neutral switching with the
T80, ensure that maximum loading is
complied with.
1
16A, 230V AC
2A Inductive
volt free switching
1 minute
6 programme blocks
230V
50Hz
Clock time, time on/
time off, days of week,
block programme.
LCD figures 4mm high
2.5 seconds per day
100 hours
Yes
DIN rail mounted
2.5mm
2
max
Width 18mm
(1 module), projection
from DIN rail 55mm,
height 90mm
HOW TO OPERATE
When the timer is new or when it has not
been used for some time it may need to
be "charged".
To do this, connect to power.
The built-in rechargeable battery will
begin to charge.When symbols appear in
the display (after approx. 2 minutes),
press the "Reset" button (use a pencil or
pen).
Caution: this will cancel all memory
including timer settings. The timer will be
'clean' for new commands. If a power
failure should occur (or should the timer
be disconnected from the power supply
for a short time), the built-in rechargeable
battery will then provide power to the
clock and guarantee that the time and
switching programmes are retained and
not disturbed or lost.
HOW TO SET
24 HOUR CLOCK
Present time and day
1) Keep
button depressed during the
entire "present time and day" setting
procedure.
2) Set the present time using buttons
"h+" and "m+".
If you keep buttons "h+" and "m+"
depressed for longer than a second the
figures in the display will scroll
continuously. Set the present day of the
week using button "Day".
3) Release button
running. The flashing colon indicates
this. Use a reliable time signal
(e.g. telephone or radio) to set the
clock accurately to the minute.
Flashing colon
indicates 24hr
clock is running.
SWITCHING TIME(S)
You can set as many as six switching-on
commands and an equal number of
corresponding switching-off commands
in the following manner:
1) Depress "Timer" button
once. The actual time will
disappear from the display.
This Timer on indication
will be displayed instead,
denoting a vacant "on"
time on No. 1 programme.
NOTE: Setting hours and minutes: When
setting switch-on time and switch-off time be
sure to set minutes as well as hours.
E.g. if 08.00 is required set all 4 digits: "08."
and ".00"
2)Set the required switching-on time
using button "h+" and "m+".
3)Set the day(s). See "Day" button
selection (over) on which the
switching-on command must be
executed.
. The clock is now
Advertisement

Subscribe to Our Youtube Channel
Related Manuals for KingShield T80-C


Summary of Contents for KingShield T80-C
- Page 1 To do this, connect to power. Instructions for Din Rail Mounting The built-in rechargeable battery will Digital Compact Timer begin to charge.When symbols appear in Model - T80-C the display (after approx. 2 minutes), press the “Reset” button (use a pencil or SPECIFICATIONS pen).
- Page 2 MO = Monday, TU = Tuesday, GUARANTEE WE = Wednesday, TH = Thursday, FR = Friday, SA = Saturday, Your KingShield Din Rail Mounting SU = Sunday. Digital Compact Timer is guaranteed for On a weekly combination (or ‘block’ 12 months from the date of purchase.
Need help?
Do you have a question about the T80-C and is the answer not in the manual?
Questions and answers