Sony ZV-1F Startup Manual
Hide thumbs
Also See for ZV-1F:
- Startup manual (211 pages) ,
- Help manual (299 pages) ,
- Installation manual
Advertisement
Quick Links
Digital Camera
Startup Guide
ZV-1F
We use environmentally conscious packaging materials
Environmentally conscious packaging materials were used for the camera and
supplied accessories.
Note the following due to the characteristics of the packaging materials.
• Powder, etc. from the packaging materials may adhere to the camera or
supplied accessories. In this case, remove it with a commercially available
blower or cleaning paper before use.
• The packaging materials will deteriorate with continuous use. Be careful when
carrying the product by the packaging.
About the manual for this camera
"Help Guide" (Web manual)
https://rd1.sony.net/help/dc/2210/h_zz/
ZV-1F Help Guide
This guide describes the necessary preparations to start using the
product, basic operations, etc. For details, refer to the "Help Guide"
(web manual).
Looking for valuable information, such as essential points
on shooting
This website introduces convenient functions, ways of usage, and setting
examples.
Refer to the website when you set up your camera.
Tutorials
https://www.sony.net/tutorial/dc/zv1f/
©2022 Sony Corporation Printed in Thailand
Preparations
5-041-855-11(1)
Checking the supplied items
The number in parentheses indicates the number of pieces.
• Camera (1)
• Rechargeable battery pack NP-BX1 (1)
• USB Type-C® cable (1)
• Wind screen (1) (attached to the wind
screen adaptor)
Inserting the battery pack (supplied)/memory card
(sold separately) into the camera
Open the battery/memory card cover, and insert the battery pack and a memory
card into the camera. Then, close the cover.
Lock lever
Battery pack
Battery pack
Make sure that the battery pack is facing in the correct direction, and insert it while
pressing the battery lock lever.
Memory card
Insert the memory card with the notched corner facing as illustrated.
This camera is compatible with SD memory cards or Memory Stick media. For
details on the compatible memory cards, refer to the "Help Guide."
When you use a memory card with this camera for the first time, format the card
using the camera in order to stabilize the performance of the memory card.
Note
• Formatting erases all data, including protected images. Once erased, this data
cannot be restored. Save valuable data to a computer, etc. before formatting.
Charging the battery pack
Charge lamp
1
Turn the power off.
If the camera is turned on, the battery pack will not be charged.
2
Using a USB Type-C cable (supplied), connect the USB Type-C terminal
of the camera to an external power source, such as a commercially
available USB AC adapter or mobile battery.
The charge lamp will light up when charging starts. When the charge lamp turns
off, charging is completed.
Performing initial setup for the camera
By connecting the camera and a smartphone with the Bluetooth function, you can
perform initial camera setup such as date and time settings from the smartphone.
Install the dedicated smartphone application on your smartphone in advance.
Install the dedicated smartphone application from the following webpage.
Also, update to the latest version of the application.
• Wind screen adaptor (1)
• Lens cap (1) (attached to the camera)
• Startup Guide (this manual) (1)
• Reference Guide (1)
1
Press the ON/OFF (Power) button to turn
on the camera.
2
Select the desired language and then
press the center of the control wheel.
• The privacy notice screen will appear. Read
Memory card
3
Press the center of the control wheel.
4
Follow the instructions on the camera
screen to register your smartphone.
• Launch the dedicated application on your
Ensure the notched corner faces
correctly.
• If you select to register your smartphone
• To register your smartphone to the camera
5
Perform the initial camera setup on the screen of the dedicated
application.
• Follow the instructions on the screen to set the following items.
Shooting
Shooting movies
1
Press the Still/Movie/S&Q button to select
the movie recording mode.
Each time you press the button, the shooting
mode switches in the order of still image
shooting mode, movie recording mode, and
slow-motion/quick-motion shooting mode.
2
Press the MENU button and select
[
mode.
3
Press the MOVIE (Movie) button to start recording.
4
Press the MOVIE (Movie) button again to stop recording.
Hint
• The start/stop movie recording function is assigned to the MOVIE (Movie) button
in the default settings. Even without switching shooting modes in Step 1, you
can start movie recording from still image shooting mode by pressing the MOVIE
(Movie) button.
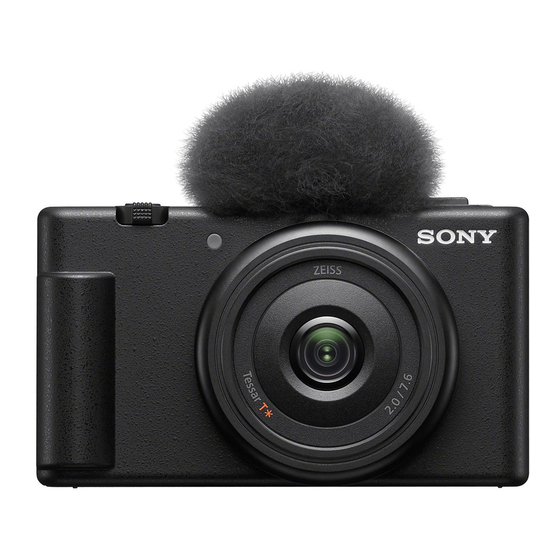
Using the wind screen (supplied)
Use the wind screen to reduce wind noise picked
up by the internal microphone when recording a
movie.
Attach the wind screen to the Accessory Shoe.
https://www.sony.net/ca/
ON/OFF (Power) button
the privacy notice regarding biometrics by
opening the link using your smartphone, etc.
smartphone to pair the camera with your
Select items : //// /
smartphone.
Confirm : Center button
later, the area/date/time setting screen will
appear.
after the initial setup, select MENU
(Network) [Smartphone Connect]
[Smartphone Regist.].
- Area/Date/Time
- Auto Power OFF Temp.
- Device Name
You can change these settings later from the camera menu.
(Shooting) [Shooting Mode]
Shoot Mode] the desired shooting
Control wheel
Still/Movie/S&Q
button
MOVIE (Movie)
button
MENU button
Wind screen
Accessory Shoe
Advertisement

Related Manuals for Sony ZV-1F


Summary of Contents for Sony ZV-1F
- Page 1 Using the wind screen (supplied) Use the wind screen to reduce wind noise picked Wind screen up by the internal microphone when recording a movie. Attach the wind screen to the Accessory Shoe. Accessory Shoe ©2022 Sony Corporation Printed in Thailand...
- Page 2 • The Bluetooth® word mark and logos are registered trademarks owned by Bluetooth SIG, Inc. Before discarding or transferring this product to others, be sure to perform the following and any use of such marks by Sony Group Corporation and its subsidiaries is under license. operation to protect private information.
Need help?
Do you have a question about the ZV-1F and is the answer not in the manual?
Questions and answers