
Related Manuals for Almaco HP5

Summary of Contents for Almaco HP5
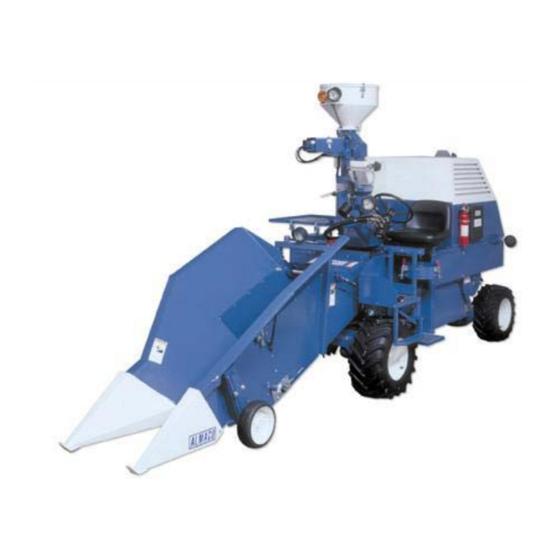
- Page 1 Operator’s Manual ALMACO HP 5 COMBINE 99 M AVENUE / BOX 296 NEVADA, IA 50201 515-382-3506 FAX 515-382-2973 WWW.ALMACO.COM...
- Page 3 HP 5 OPERATOR’S MANUAL SECTION A FORWARD Manual ID Number MOC0312044 FORWARD...
- Page 4 HP 5 OPERATOR’S MANUAL FORWARD...
- Page 5 OPERATOR’S MANUAL TO THE PURCHASER: We at ALMACO wish to extend to each customer our thanks and congratulations for your selection of one of our Harvest Pro Plot Combines to be included in your agricultural experiments and field production inventory.
- Page 6 HP 5 OPERATOR’S MANUAL FORWARD...
- Page 7 HP 5 OPERATOR’S MANUAL COMPONENT DATA SHEET MODEL HP 5 Serial Number: _________________________ Date Shipped: ____________________ Tire Size: Front:_________________________ Rear: ___________________________ Sieve Type & Size: Top: __________________ Bottom:__________________________ Hydraulics: ____________________________ Engine Type:___________________________ Serial #: _________________________ Header(s): _____________________________ Reel:____________________________ Snout Style(s): _________________________ DRIVES - RIGHT SIDE: Engine to Jackshaft: ______________________________________________________ Threshing Cylinder Belt: ___________________________________________________...
- Page 8 HP 5 OPERATOR’S MANUAL SPECIAL OPTIONS 1:______________________________________________________________________ 2:______________________________________________________________________ 3:______________________________________________________________________ 4:______________________________________________________________________ 5:______________________________________________________________________ 6:______________________________________________________________________ 7:______________________________________________________________________ 8:______________________________________________________________________ 9:______________________________________________________________________ 10:_____________________________________________________________________ 11:_____________________________________________________________________ 12:_____________________________________________________________________ 13:_____________________________________________________________________ 14:_____________________________________________________________________ 15:_____________________________________________________________________ 16:_____________________________________________________________________ 17:_____________________________________________________________________ 18:_____________________________________________________________________ 19:_____________________________________________________________________ 20:_____________________________________________________________________ 21:_____________________________________________________________________ 22:_____________________________________________________________________ FORWARD...
-
Page 9: Table Of Contents
HP 5 OPERATOR’S MANUAL TABLE OF CONTENTS FORWARD ................... SECTION A INTRODUCTION ....................A-8 MANUFACTURERS WARRANTY................A-9 SAFETY....................SECTION B GENERAL SAFTEY....................B-3 OPERATIONAL SAFETY ..................B-5 SERVICE SAFETY ....................B-8 SAFETY DECAL LOCATIONS ................B-11 OPERATION ..................SECTION C FUNCTION COMBINE FUNCTION .................. -
Page 10: Forward
All specifications, diagrams, and drawings in this manual are based on the latest information at printing time. ALMACO reserves the right to make changes at any time without notice. Please contact an ALMACO representative if you have any questions regarding:... -
Page 11: Manufacturers Warranty
OPERATOR’S MANUAL MANUFACTURER’S WARRANTY We guarantee each ALMACO combine to be free from defects in material and workmanship for one year from date of shipment from the factory. Our obligation under this warranty is limited to the replacement or the repair at our Nevada, Iowa factory of such part as shall appear to us, upon inspection, to have been defective in material or workmanship. - Page 12 HP 5 OPERATOR’S MANUAL A-10 FORWARD...
-
Page 13: Safety
HP 5 OPERATOR’S MANUAL SECTION B SAFETY SAFETY... - Page 14 HP 5 OPERATOR’S MANUAL SAFETY...
-
Page 15: General Saftey
Keep all decals in good condition and replace any that are missing or damaged. New decals are available from ALMACO, refer to Safety Decal Locations later in this section for ordering information. Be sure new equipment, components and repair parts display all required safety decals. - Page 16 HP 5 OPERATOR’S MANUAL PREPARE FOR EMERGENCIES Be prepared if a fire starts. Keep a fire extinguisher and a first aid kit handy. All machines come from the factory equipped with a fire extinguisher. Make sure the extinguisher is properly charged and in working order.
-
Page 17: Operational Safety
HP 5 OPERATOR’S MANUAL OBSERVE ROAD TRAFFIC REGULATIONS Always observe local road traffic regulations when using public roads. USE SAFETY LIGHTS AND DEVICES When transporting your machine on a public road either during the day or at night, use the necessary safety lights. You are required by law to have lights if operating on a public roadway after dusk. - Page 18 HP 5 OPERATOR’S MANUAL KEEP RIDERS OFF MACHINE Only allow passengers and operators where proper seating is supplied. Do not allow people to climb on the combine while in motion. Riders are subject to injury such as being thrown from the machine. Riders also obstruct the operator’s view, which is unsafe.
- Page 19 HP 5 OPERATOR’S MANUAL STAY CLEAR OF HEADER Rotating knives, gathering belts, conveyor belts of row crop head, etc., cannot be completely shielded due to their function. Stay clear of these moving parts during operation. Always disengage header drive, shut off engine, and remove key before servicing or unclogging header.
-
Page 20: Service Safety
HP 5 OPERATOR’S MANUAL SERVICE SAFETY PRACTICE SAFE MAINTENANCE Keep service area clean and dry. Remove any buildup of grease, oil, or debris. Never lubricate or service machine while it is running. Keep your machine in proper working condition. damage immediately. - Page 21 HP 5 OPERATOR’S MANUAL AVOID HIGH-PRESSURE FLUIDS Escaping fluid under pressure can penetrate the skin causing serious injury. Relieve pressure before disconnecting hydraulic or other lines. Use cardboard or paper to search for leaks. HANDLE BATTERIES SAFELY Batteries contain sulfuric acid and can explode.
- Page 22 Check the MSDS before you start any job using hazardous chemicals, so you will know the risks and how to handle the chemical safely. Follow the procedures and use the recommended equipment. Contact ALMACO for MSDS's on chemical products used on ALMACO equipment. B-10 SAFETY...
-
Page 23: Safety Decal Locations
Safety Decals, type of warning, and follow instructions on all decals. REMEMBER: Damaged, removed or illegible Safety Decals MUST be replaced. New decals are available from ALMACO, order by part number shown above. FIGURE B-1 Left Side Safety Decal Locations SAFETY... - Page 24 Safety Decals, type of warning, and follow instructions on all decals. REMEMBER: Damaged, removed or illegible Safety Decals MUST be replaced. New decals are available from ALMACO, order by part number shown above. FIGURE B-2 Right Side Safety Decal Locations B-12...
- Page 25 Safety Decals, type of warning, and follow instructions on all decals. REMEMBER: Damaged, removed or illegible Safety Decals MUST be replaced. New decals are available from ALMACO, order by part number shown above. FIGURE B-2 Row Crop Head Safety Decal Locations SAFETY...
- Page 26 HP 5 OPERATOR’S MANUAL B-14 SAFETY...
-
Page 27: Operation
HP 5 OPERATOR’S MANUAL SECTION C OPERATION OPERATION... - Page 28 HP 5 OPERATOR’S MANUAL OPERATION...
-
Page 29: Combine Function
HP 5 OPERATOR’S MANUAL COMBINE FUNCTION The threshing operation is accomplished by a mechanically driven, 13” diameter, variable speed raspbar cylinder and one adjustable, underslung, grated style concave. A strawpuller positioned directly behind the threshing cylinder prevents cylinder wrapping and assists the movement of plant material through the machine. -
Page 30: Row Crop Head Function
HP 5 OPERATOR’S MANUAL SIEVE SHAKER PAN INTERNAL CONVEYOR WINNOWING VENTURI BLOWER Cleaning Function Diagram FIGURE C-2 Samples are bagged from the discharge of the cyclone. An optional volumetric cylinder can be used to take quantitative yield data on samples before bagging. An optional weigh hopper can perform automatic weight and moisture tests before bagging. -
Page 31: Operator Control Function
13) CYCLONE 14) FORWARD REVERSE CONTROL FIGURE C-3 Gauge Panel 1) Serial Tag: This number identifies each combine and should be on hand for parts and service calls. This way ALMACO can better service your combine and its specific options. OPERATION... - Page 32 Check this gauge if electronics act sluggish, or if there are electronic problems in general. If voltage drops or rises outside of the 13.5 - 14.5V range diagnose the problem, check SECTION D TROUBLE SHOOTING, and or call ALMACO for assistance. 4) Fuel Gauge: Displays fuel level.
-
Page 33: Engine Starting Procedure
HP 5 OPERATOR’S MANUAL 12) Electronic Accessory: This switch controls any electronic accessory options. These options may be specific to your combine. Be sure to understand these functions before operating. See SECTION I OPTIONS for additional information on available options. 13) Cyclone Dump: Manually operates the cyclone knife valve at the bottom of the cyclone. -
Page 34: Machine Settings And Adjustments
HP 5 OPERATOR’S MANUAL 6. When the engine starts, release the key and adjust engine speed for warm up (see engine manual). NOTE: Combines equipped with an optional Operator Presence System, will shut down the engine after a preset number of seconds if the operator leaves the seat. The engine will continue to run if all the above conditions are met or the operator returns to the seat before the time runs out. - Page 35 HP 5 OPERATOR’S MANUAL Threshing Cylinder Speed Use the Concave / Cylinder settings chart below to determine initial settings. When the crop is wet speed up the threshing cylinder and increase the clearance. In dry conditions it is possible to slow down and reduce the cylinder / concave clearance to avoid crop damage.
- Page 36 HP 5 OPERATOR’S MANUAL Locate desired crop or similar crop on Table C-1 Cylinder / Concave Setting Chart. This will give indicate a place to start. This setting may need to go up or down depending on crop and field conditions.
-
Page 37: Concave / Cylinder Clearance Chart
HP 5 OPERATOR’S MANUAL The cyclone blower creates air flow for the pneumatic seed delivery. The cyclone blower speed should be fast enough to blow seed into the cyclone without plugging, but not fast enough to blow seed out the top of the cyclone. Adjust speed using adjustable pitch sheave. 1. -
Page 38: Removing The Head
OPERATOR’S MANUAL REMOVING THE HEAD: ALMACO heads are removable for storage, transportation purposes, and for different crops. 1. Raise head to loosen tension on lift assist spring. Remove front bolt from lift assist spring. 2. Use head lift lever to lower head onto gauge wheels and use engine hoist or stands to support head. -
Page 39: Troubleshooting
HP 5 OPERATOR’S MANUAL SECTION D TROUBLESHOOTING TROUBLESHOOTING... - Page 40 HP 5 OPERATOR’S MANUAL TROUBLESHOOTING...
- Page 41 Decrease ground speed Concave too tight Increase concave clearance Cylinder too slow Increase cylinder speed Component failure Contact ALMACO Plant material hangs up on Debris caught in sieve, which Clean off sieves sieves holds plant material Curtains interfere w/ plant...
- Page 42 HP 5 OPERATOR’S MANUAL Threshed grain in the Threshing cylinder throws grain Install or lengthen curtains discharge (out rear of out rear of machine machine) Incorrect winnowing blower Decrease shutter setting (less setting air) Decrease winnowing blower speed ROW CROP HEAD MECHANICAL PROBLEMS Gathering belts / rotating Clutch not on Turn on clutch...
- Page 43 HP 5 OPERATOR’S MANUAL STRAWPULLER / SHAKER PAN DRIVES Strawpullers and shaker pans Clutch not engaged Turn clutch switch on are not moving Strawpuller is plugged Turn off machine. Remove plug manually Loose or broken drive chain Repair or replace chain Loose or broken drive sprocket Tighten set screws, replace key or sprocket...
- Page 44 Lube cable, ends. Replace worn broken, worn cable ends parts Component failure Contact ALMACO Insufficient charge pressure Contact ALMACO If the problem does not appear in this section or if there are any questions on how to proceed with a solution contact ALMACO. TROUBLESHOOTING...
-
Page 45: Maintenance
HP 5 OPERATOR’S MANUAL SECTION E MAINTENANCE MAINTENANCE... - Page 46 HP 5 OPERATOR’S MANUAL MAINTENANCE...
- Page 47 Chock wheels before working on ground drive hydraulic circuit. Machine may not be equipped with fail-safe brakes. Machines equipped with brakes may slip causing serious injury or death. Relieve hydraulic pressure before removing or replacing hydraulic lines. Contact ALMACO, if serious hydraulic system work is needed. NOTICE: Lubricate all relubricatable bearings with lithium based grease.
-
Page 48: Maintenance Schedule
HP 5 OPERATOR’S MANUAL MAINTENANCE SCHEDULE Interval (in hours of operation) COMBINE Check all chain drives for proper tension, sprocket wear, and lube Check all belt drives for wear and proper tension. Check for oil or hydraulic fluid leaks Grease header pivots Check linkages for proper operation Check fire extinguisher gauge Shake the extinguisher to remove compaction... -
Page 49: Daily Maintenance Checklist
HP 5 OPERATOR’S MANUAL DAILY MAINTENANCE CHECKLIST Before starting and operating the combine complete the Daily Maintenance Checklist. 1. Check safety equipment Lubricate cyclone bearings, 1 pump only Lubricate winnowing blower bearings, 1 pump only Check engine oil level, check for leaks Check hydraulic oil level, check for leaks Remove plant material from head and combine SERVICE RECORD... -
Page 50: Conveyor Roller Adjustment
HP 5 OPERATOR’S MANUAL CONVEYOR AND ROLLER ADJUSTMENT When installing replacement belts position the V-guide on the inside of the belt so that it rides in the center of the V-groove in the roller. All conveyors should run straight and evenly across roller surfaces without binding or scuffing the side frame. -
Page 51: Storage And Transportation
HP 5 OPERATOR’S MANUAL SECTION F STORAGE AND TRANSPORTATION STORAGE AND TRANSPORTATION... - Page 52 HP 5 OPERATOR’S MANUAL STORAGE AND TRANSPORTATION...
-
Page 53: Receiving The Combine
STORAGE AND TRANSPORTATION RECEIVING THE COMBINE Each ALMACO HP5 combine is shipped pre-tested. All field adjustments need to be made prior to field use. See TABLE C-1 Initial Cylinder / Concave Settings Chart for the crop being harvested. SECTION D TROUBLESHOOTING will also help in setting up your combine. Crated units are shipped partially dismantled, with fuel tank and crankcase empty. -
Page 54: Towing
HP 5 OPERATOR’S MANUAL NOTICE: Avoid securing machine at points, which could cause damage during transport. Attach chains to tie downs only. Do not attach chains to the header; this will cause damage to the header pivot point. TOWING On occasion it may be necessary to tow the combine. In these situations it is important not to damage the hydrostatic ground drive motors. - Page 55 HP 5 OPERATOR’S MANUAL - Clean battery terminals and cable ends. - Remove battery to prevent freezing and discharge if desired. DANGER! Batteries contain sulfuric acid and can explode. Keep sparks and flame away when checking, filling, or charging batteries. NOTE: Inspect the combine, schedule service, and order replacement parts, so that required maintenance is not forgotten in the off season.
- Page 56 HP 5 OPERATOR’S MANUAL STORAGE AND TRANSPORTATION...
-
Page 57: Specifications
HP 5 OPERATOR’S MANUAL SECTION G SPECIFICATIONS SPECIFICATIONS... - Page 58 HP 5 OPERATOR’S MANUAL SPECIFICATIONS...
- Page 59 HP 5 OPERATOR’S MANUAL SPECIFICATIONS FLUID AND CAPACITIES Engine Oil: 15W-40 class CC/SE or CD/SE Engine Capacity (w/filter): 7 qt (6.5L) Hydraulic Oil: Dexron III or compatible Hydraulic Tank Capacity: 11 gal (38L) Fuel: Diesel (sulfur content less than 5%) Fuel Tank Capacity: 11 gallon (42L) ENGINE Engine: Deutz F3L2011...
- Page 60 HP 5 OPERATOR’S MANUAL SIEVES Type: Graepel Length: 55 Width: 16-3/4 WINNOWING BLOWER Diameter: 10" Length: 18" overall Number of Cages: 2 Volume Control: Shutter and Variable Pitch Sheave SPECIFICATIONS...
-
Page 61: Diagrams
HP 5 OPERATOR’S MANUAL SECTION H DIAGRAMS DIAGRAMS... - Page 62 HP 5 OPERATOR’S MANUAL DIAGRAMS...
- Page 63 HP 5 OPERATOR’S MANUAL DIAGRAMS...
- Page 64 HP 5 OPERATOR’S MANUAL DIAGRAMS...
- Page 65 HP 5 OPERATOR’S MANUAL DIAGRAMS...
- Page 66 HP 5 OPERATOR’S MANUAL DIAGRAMS...
- Page 67 HP 5 OPERATOR’S MANUAL DIAGRAMS...
- Page 68 HP 5 OPERATOR’S MANUAL DIAGRAMS...
- Page 69 22019 TORQUE LIMITER 22351 SPROCKET, 26T, TORQUE LIMITER 22349 SPROCKET, 26T, JACK SHAFT, STANDARD HEAD 22310 SPROCKET,19T, JACK SHAFT, STANDARD HEAD 22312 SPROCKET, 72T ALMACO MODIFIED 22313 SPROCKET, 72T IDLER, NYLATRON 22311 SPROCKET, 19T ALMACO MODIFIED 22205 CHAIN, #35 DIAGRAMS...
- Page 70 HP 5 OPERATOR’S MANUAL 22324 SPROCKET, 25T 22019 TORQUE LIMITER 22022 SPROCKET, 30T 22132 SPROCKET, 16T, ALMACO MODIFIED 22321 HUB, ALMACO MODIFIED 22348 SPROCKET, 11T, ALMACO MODIFIED 22321 HUB, ALMACO MODIFED 22347 SPROCKET, 56T, ALMACO MODIFIED 22193 HUB, ALMACO MODIFIED...
- Page 71 HP 5 OPERATOR’S MANUAL 20018 FLANGETTE 195152 JACK SHAFT, MAIN, STD HEAD 20003 BEARING, MAIN JACK SHAFT 20022 FLANGETTE 20003 BEARING, PINCH BELT IDLER, STD HEAD 20022 FLANGETTE 20018 BEARING, PINCH BELT DRIVE, STD HEAD 20063 BEARING, JACK SHAFT, STD HEAD 20038 BEARING, REEL SHAFT, STD HEAD 20100...
- Page 72 HP 5 OPERATOR’S MANUAL H-12 DIAGRAMS...
- Page 73 HP 5 OPERATOR’S MANUAL DIAGRAMS H-13...
- Page 74 HP 5 OPERATOR’S MANUAL HP 5 HYDRAULIC COMPONENT LIST REF # ALMACO# DESCRIPTION 10451 PUMP, HYDRAULIC 10893 MOTOR, FRONT WHEEL, W/ BRAKES 10886 MOTOR, FRONT WHEEL, W/O BRAKES PUMP, AUX GEAR 11016 RELIEF VALVE, LOW PRESSURE 11063 RELIEF VALVE, HIGH PRESSURE...
- Page 75 HP 5 OPERATOR’S MANUAL DIAGRAMS H-15...
- Page 76 HP 5 OPERATOR’S MANUAL H-16 DIAGRAMS...
Need help?
Do you have a question about the HP5 and is the answer not in the manual?
Questions and answers