Table of Contents
Advertisement
Quick Links
Advertisement
Table of Contents

Subscribe to Our Youtube Channel
Related Manuals for Whadda WPB109


Summary of Contents for Whadda WPB109
- Page 1 USER MANUAL ESP32 development board WPB109 whadda.com...
-
Page 2: Safety Instructions
If in doubt, contact your local waste disposal authorities. Thank you for choosing Whadda! Please read the manual thoroughly before bringing this device into service. If the device was damaged in transit, do not install or use it and contact your dealer. -
Page 3: What Is Arduino
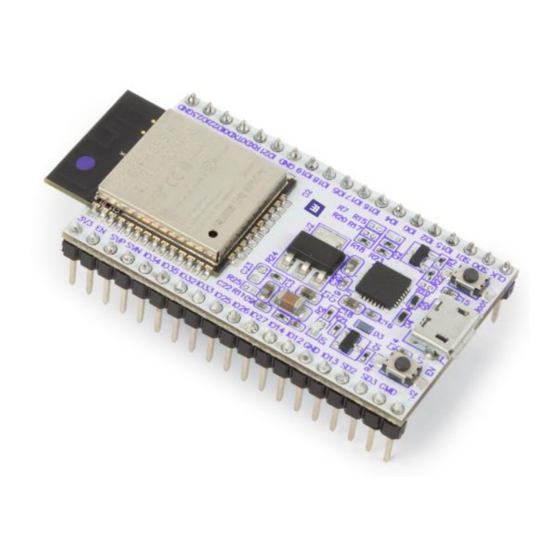
Product Overview The Whadda WPB109 ESP32 development board is a comprehensive development platform for Espressif’s ESP32, the upgraded cousin of the popular ESP8266. Like the ESP8266, the ESP32 is a Wi-Fi-enabled microcontroller, but to that it adds support for Bluetooth low- energy (i.e. -
Page 4: Product Description
Features • onboard Wi-Fi and Bluetooth® • 1 x onboard red LED • hall effect sensor • temperature sensor • ultra-low power analogue pre-amplifier • dedicated reset button • 2 × 8-bit DACs • SPI, I²S, I²C and UART interfaces •... -
Page 5: Getting Started
Getting Started Installing the Required Software First, make sure you have the latest version of the Arduino® IDE installed on your computer. You can download the latest version by going to www.arduino.cc/en/software. 2. Open the Arduino® IDE and open the preferences menu by going to File > Preferences. Enter the following URL into the "Additional Boards Manager URLs"... - Page 6 3. Open the Boards Manager from Tools > Board menu and install the esp32 platform by putting ESP32 into the search field, selecting the most recent version of the esp32 core (by Espressif Systems), and clicking "Install". Uploading the First Sketch to the Board Once the ESP32 core has been installed, open the tools menu and select the ESP32 Dev module board by going to: Tools >...
- Page 7 2. Connect the Whadda ESP32 module to your PC using a microUSB cable. Open the tools menu again and check if a new serial port has been added to the port list and select it (Tools > Port: “COM14” > COM14). If this is not the case, you may need to install a new driver to enable the ESP32 to properly connect to your computer.
- Page 8 4. Click the Upload button ( ) and monitor the info messages at the bottom. Once the message “Connecting…” appears, press and hold the Boot button on the ESP32 until the uploading process has finished. Press and hold Boot button Release Boot button 5.
-
Page 9: Having Trouble
6. Press the Reset/EN button, debug messages should start appearing on the serial monitor, together with the Chip ID (If the GetChipID example was uploaded). Having Trouble? Restart the Arduino® IDE and reconnect the ESP32 board. You can check if the driver has been properly installed by checking Device manager on Windows under COM Ports to see if a Silicon Labs CP210x device is recognized. - Page 10 Wi-Fi Connection Example The ESP32 really shines in applications where Wi-Fi connectivity is required. The following example will harness this extra functionality by having the ESP module function as a basic webserver. ® Open the Arduino IDE and open the AdvancedWebServer example by going to File >...
- Page 11 2. Replace YourSSIDHere with your own Wi-Fi network name and replace YourPSKHere with your Wi-Fi network password. 3. Connect your ESP32 to your pc (if you haven’t already), and make sure that the correct board settings in the Tools menu are set and that the proper serial communication port has been selected.
- Page 12 5. Open the serial monitor ( ) and check that the baud rate is set to 115200 baud: 6. Press the Reset/EN button, debug messages should start appearing on the serial monitor, together with status info about the network connection and the IP-address. Take a note of the IP address: Is the ESP32 Having Trouble to Connect to your Wi-Fi? Check that the Wi-Fi network name and password have been set up correctly, and that the...
- Page 13 You should get a webpage that shows a randomly generated graph from the ESP32. What to do Next with My Whadda ESP32 Board? Check out some of the other ESP32 examples that come preloaded in the Arduino® IDE.
- Page 14 Modifications and typographical errors reserved - © Velleman Group nv. WPB109_v01 Velleman Group nv, Legen Heirweg 33 - 9890 Gavere...
Need help?
Do you have a question about the WPB109 and is the answer not in the manual?
Questions and answers