Table of Contents
Advertisement
Quick Links
Advertisement
Table of Contents

Summary of Contents for RWC JG Underfloor
- Page 1 Underfloor INSTALLATION AND USER MANUAL 240V Wired Programmable Thermostat...
-
Page 2: Table Of Contents
Thermostat specification ......... Important safety information ......Display ............. Time setting ....................Programme setting ..........Operation mode ........... Alarm instructions Installation ............Wiring diagram ..........Configuration Menu .......... Connecting the App ........... -
Page 3: Thermostat Specification
Specification Power source: 100-240VAC 50/60Hz Load current output: 250VAC 3(2)A Temperature setting range: 5~35°C Display accuracy: 0.1°C Setting accuracy: 0.5°C Storage temperature: -10~60°C, 0~90%RH Ambient temperature: 0~50°C, 0~80%RH Wifi frequency: 2.4GHz 12mm 86mm 23.1mm... -
Page 4: Important Safety Information
Important safety information Read all of the information in this manual before installing this thermostat. removing, cleaning, or servicing this thermostat. Only a professional contractor should install this thermostat. All wiring must conform to local and national building and electrical codes and regulations. -
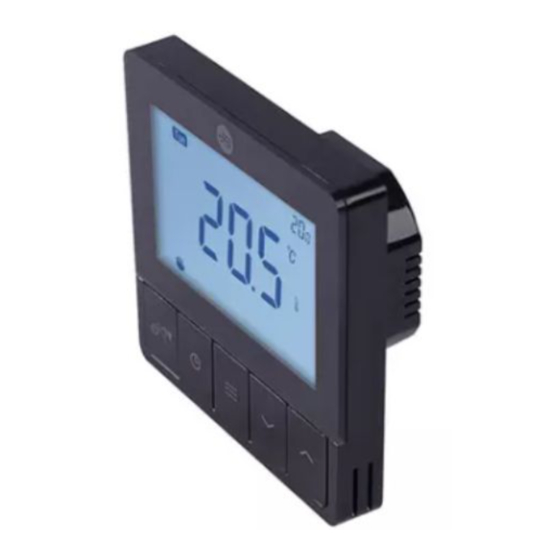
Page 5: Display
Thermostat display ON/OFF/Boost Time setting Menu button Lower temperature setting Raise temperature setting Reset needle... - Page 6 Thermostat display If the icon is not shown then WiFi is not connected If the signal is lost after connection the icon will flash Manual mode Programming mode Key lock Boiler on/o Frost protection Holiday mode Settings menu Mode: Room mode, floor mode, dual temperature mode Sleep mode Away mode...
- Page 7 ON/OFF function Press ‘ ’ to turn the thermostat ON. Press and hold ‘ ’ again to turn the thermostat OFF. Key lock function In the main display interface, press and hold ‘ ’ ‘ ’ at the same time to activate or cancel the key lock.
- Page 8 Open window function If the room temperature drops 6°C in 4 minutes, the open window function will activate and display ‘ ’, then turn down all heating. When the room temperature increases by 2°C the thermostat will return to normal operation. Press any button to cancel the open window function while it is active.
-
Page 9: Time Setting
Time setting Press and hold ‘ ’ for 4 seconds, press ‘ ’ to select year, month, day, time scale, time, press ‘ ’ ‘ ’ to adjust setting, press ‘ ’ to confirm. If there are no actions for 10 seconds, the thermostat will return to temperature display mode. -
Page 10: Programme Setting
Programme setting Programme setting: 4/6 period programming optional (factory default: 6 period). When thermostat is on, press and hold ‘ ’ to enter the programming mode. Press ‘ ’ or ‘ ’ to select the programming week (5+2, 5+1+1 or 7 individual day optional). -
Page 11: Operation Mode
Operation mode Programming mode (The factory default is programmable) The thermostat will run according to the pre-set schedule. The screen will show ‘ ’ Manual mode From programming operation mode, press ‘ ’ to enter the manual mode, the screen will display ‘ ’. -
Page 12: Alarm Instructions
Alarm instructions Err. display Err . condition Result Internal sensor short circuit Thermostat shut down all heating output Internal sensor open circuit Thermostat shut down all heating output External sensor short circuit Thermostat shut down all heating output External sensor open circuit Thermostat shut down all heating output... -
Page 13: Installation
Installation Install the base Mounting screws Install the panel Finish... -
Page 14: Wiring Diagram
Wiring diagram Wiring diagram for 230V connections: Power: 100-240VAC 50/60Hz Imax: 3(2)A Wiring diagram for volt-free connection (e.g. boiler control) Suggest cable is not over 1.5mm... -
Page 15: Configuration Menu
Configuration menu parameters. Press and hold ‘ ’ for 3 seconds, display ‘ ’, indicates all the configuration settings have reverted to factory default setting. The thermostat will return to ‘ ’ mode if no buttons are pushed within 10 seconds. Displayed Press or Press... - Page 16 Configuration menu Press or Press Displayed Item Descriptions to select button (factory default) When the temperature is < room temperature -setting value, the heating will stop. °C 0.2°C ~ 5°C When the temperature is < room temperature + setting value, the heating will start. Program option ON/OFF ON/OFF...
- Page 17 Configuration menu Press or Displayed Press Item Descriptions to select button (factory default) Frost protection option On / OFF ON / OFF °C 5°C ~ 17°C Frost protection temperature setting On/OFF TPI function option: ON/OFF Anti-seize function selection: ON/OFF On/OFF nC/ nO Select the actuator type :...
- Page 18 Configuration menu Press or Press Displayed Item Descriptions to select button (factory default) Select maximum floor setting °C 6 – 45°C temperature limitation Press to confirm and exit. ‘ ’ Note item 14, if connected to a wiring centre all actuators should be the same configuration.
-
Page 19: Connecting The App
Connecting the App Download and register Click App store (click Android application market) Search for ‘JG Underfloor’ and download < Register United Kingdom > Underfloor Mobile Number/Email Get Verification Code I Agree privacy Policy and User Agreement LOGIN SIGN UP... - Page 20 Login When you finish the registration, log into your email and click on the link to activate your account. Your APP is now ready to use. LOGIN United Kingdom > Registered mailbox /phone number Please enter your account Insert your password Password LOGIN I Agree privacy Policy and User Agreement...
- Page 21 First, please turn on the location of your phone thermostat and then press and hold ‘ ’ for 3 seconds, the thermostat display will show ‘ ’. Then go to the JG underfloor app.
- Page 22 Cancel Add device Select 2.4 GHz Wi-Fi Network Searching for nearby devices. make sure your device has entered pairing mode. and enter password If your Wi-Fi is 5GHz, please set it to be 2.4GHz ! Turn on Bluetooth Common router setting method Add Manually 20.5 20.5...
- Page 23 Cancel Adding device... Thermostat 01:47 Scan Register Initialize devices on Cloud the device Home Scene Adding device Added successfully...
- Page 24 Thermostat Temporary leaving mode: If you are away from home temporarily, Setting History Program click the ‘Away’ button, the temperature will Room Temp Away remain at 16°C, the energy-saving icon ‘ ’ 22.6 C turns green and is on. After you arrive at home, click the button again to recover the previous temperature setting.
- Page 25 Thermostat Thermostat Click the ‘ ’ to enter the programming mode Program Setting History Program 22.6 C Away Room Temp Click the ‘ ’ for checking the history History Click the ‘ ’ for setting implicit parameters Setting 20.0 C Set Temp Slide off...
- Page 26 APP Setting-Multi-day Programming Click ‘7 Day’ to select the date 7 Day 7 Day Please select the date to program: Click the ‘Program’ to enter the programming mode Cycle Hour Minute 20.0 C Slide up and down to select the time, press ‘ ’...
- Page 27 Optional Parameter Setting Thermostat Program Esc Set Histroy Room Temp Away 22.6 C 20.0 C Set Temp Anti seize Slide up and down Frost protection optional parameters...
- Page 28 History Thermostat Week Month Year Program Histroy History Esc Set Setting Porgram Click here to check RoomTemp 22.6 C Away the history 20.0 C Set Temp Set Temp Slide off Set Temp Current Temp Heating Time...
- Page 29 Remove devices Click the Thermostat icon ‘ ’ Thermostat History Program Setting Away 22.6 C Room Temp 20.0 C Set Temp Click ‘Remove Remove Device Device’ Slide off...
- Page 30 Voice command: After waking up the speaker you can say Amazon Alexa Google Assistant * Alexa, turn on bedroom. * Ok, Google, turn on bedroom. * Alexa, raise the bedroom by 1 degree. * Ok, Google, set the bedroom to 16 degrees. * Alexa, drop the bedroom by 1 degree.
- Page 32 Reliance Worldwide Corporation (UK) Limited Horton Road West Drayton UB7 8JL United Kingdom Tel: +44 (0) 1895 449233 Reliance Worldwide Corporation (UK) Limited reserves the right to make changes to the product which may aBect the accuracy of information contained in this leaflet.
Need help?
Do you have a question about the JG Underfloor and is the answer not in the manual?
Questions and answers