Table of Contents
Advertisement
Quick Links
Advertisement
Table of Contents

Related Manuals for Avidsen HomeFlow W


Summary of Contents for Avidsen HomeFlow W
- Page 1 HomeFlow W WIRED SMART WIFI THERMOSTAT Ref.127062 www.avidsen.com...
-
Page 3: Table Of Contents
CONTENTS A - SAFETY D - CONNECTION INSTRUCTIONS 1 - INSTALLING THE MOBILE APPLICATION AND CREATING AN ACCOUNT 2 - CONNECTING THE THERMOSTAT 1 - OPERATING PRECAUTIONS 2.1 - Connection in EZ mode 2 - WARNING 2.2 - Other connection mode (AP mode) 12 3 - MAINTENANCE AND CLEANING E - USE 4 - RECYCLING 1 - USE VIA THE APP B - PRODUCT... -
Page 4: A - Safety Instructions
This product was designed to control a boiler (gas, heating oil, irreversible heat pump); any other use Pour en savoir plus : of the device is not covered by the warranty or www.quefairedemesdechets.fr technical support. Avidsen cannot be held liable for any use that does not comply with the instructions in this manual and causes damage. Children should be supervised to make sure that they do not play with the device. 3 - MAINTENANCE AND CLEANING The outer case can be cleaned periodically. -
Page 5: B - Product Description
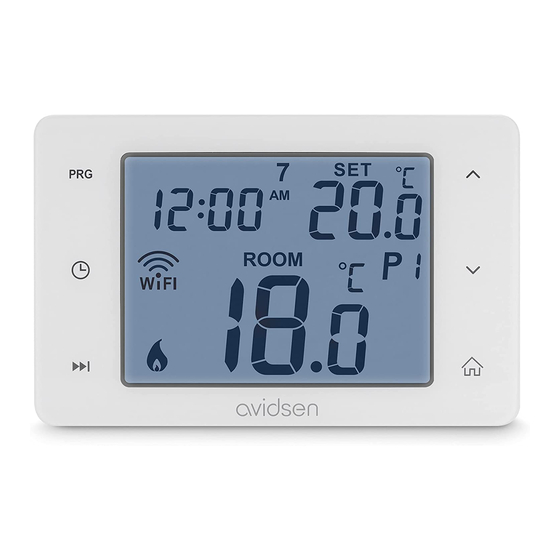
B - PRODUCT DESCRIPTION The HomeFlow W programmable thermostat lets you control your home’s temperature from your smartphone (Apple and Android). It has a large backlit LCD screen. Easy to install and use, it will quickly fit into your lifestyle. You can configure weekly programmes from the app or thermostat directly. 1 - KIT CONTENTS 1 smart thermostat Wall plugs and screws for mounting 2 - CHARACTERISTICS 1. Weekly programmes from the thermostat or in the app 2. Use temperature range: 0°C to 40°C 3. Adjustable temperature range: 5°C to 35°C (in increments of 0.5°C) 4. Precision of temperature measurements: ± 1°C (to 20°C) 5. Power supply: 230VAC/50Hz 6. Switchable current: 6A (2A inductive load), 230V 7. Backlighting: white 8. Compatible with 2.4 GHz WIFI (iOS 10.0 minimum and Android 4.0.3 minimum) -
Page 6: C - Installation
C - INSTALLATION Before the device is permanently installed, make sure it is within WIFI range of your router. If it is installed outside WIFI range, you should install a WIFI repeater to boost the signal. 1 - WIRING AND MOUNTING Wiring diagram based on the type of installation. Refer to the manual for your heating equipment. NO NC COM Electric valve /pump NO NC COM... -
Page 7: How To Configure A Programme
C - INSTALLATION symbol flashes, press the or buttons to Default programme adjust the current month. Events Time Temp 3. Press once until the year symbol flashes, press the or buttons to adjust the current 07:30 20°C year. 09:30 20°C 4. Press once until the hour symbol flashes, press the or buttons to adjust the current 11:30... -
Page 8: Locking The Buttons
C - INSTALLATION 2.7 - LOCKING THE BUTTONS 1. Press for 5 seconds to lock the button, the screen will display LOC 2. To unlock the screen, press for 5 seconds, the screen will display UNLO 2.8 - BACKLIGHTING 1. Backlighting is activated when the user presses a button. It remains active for 15s after the last press 2.9 - TECHNICAL SETTINGS 1. Press and hold for 5 seconds to enter the settings. 2. Press to select the setting. 3. Press the or buttons to adjust the values. 4. Press or wait 15 seconds to return to the main menu. Default Settings Screen Adjustment option value Press for 3 seconds to enter WIFI WIFI Configuration pairing mode. Then follow the instructions in the "Login" paragraph. The hysteresis is adjustable from 0.2 to 2°C. The hysteresis prevents the heating from being switched on and off too quickly close Hysteresis to the thermostat's setpoint temperature. -
Page 9: D - Connection
1 - INSTALLING THE MOBILE APP AND CREATING AN ACCOUNT Once the thermostat is connected, follow the instructions below to pair it. Download the Avidsen Home app from the Android Play Store or Apple App Store. Choose your country and enter your email address, then select Obtenir le code de vérification (Get confirmation code). Launch the app and log in if you already have an account. If not, press CREER UN NOUVEAU... -
Page 10: Connecting The Thermostat
D - CONNECTION B) Next, select “HomeFlow-W” To complete your registration, set a password between 6 and 20 characters long with letters and numbers only. Then press Terminé (Finished). 2 - CONNECTING THE THERMOSTAT 2.1 – CONNECTION IN EZ MODE This is the easiest type of connection to make. A) To start pairing, press AJOUTER (ADD) in the app. Make sure your phone is connected to your router or gateway’s 2.4GHz WIFI network. If you already have a device installed on the application (e.g. IP camera, smart plug, etc.) click on + in the top right corner of the application. C) Select your 2.4 GHz WIFI network (note: your smartphone must be connected to the same WIFI network that your thermostat will use), enter your network password and press SUIVANT... - Page 11 D - CONNECTION By default, the device suggests pairing in AP (Access Point) mode. The configuration of this type of pairing is explained in 2.2. D) To pair in EZ mode, select “Mode EZ” (EZ Mode) at the top right, then press SUIVANT (NEXT): Tick the box “le logo WIFI doit clignoter” (the WIFI logo must blink) and press SUIVANT (NEXT): E) To put the thermostat in pairing mode, • Press and hold for 5 seconds to enter the settings Please wait while the pairing procedure takes place. This stage can last several minutes.
-
Page 12: Other Connection Mode (Ap Mode)
D - CONNECTION Pairing is complete. You can now use the thermostat from the app. 2.2 – OTHER CONNECTION MODE (AP MODE) Repeat steps A) to C) of EZ mode pairing. Tick “le logo WIFI doit clignoter" (the WIFI logo must blink), then press SUIVANT (NEXT): D) To restart the device, The WIFI indicator light flashes and EZ mode appears. Press the arrow again Until the letters AP appear: • When the WIFI indicator light flashes, you can You must now connect your product to the access start the pairing process on your smartphone point created by the thermostat. Go to your... - Page 13 Your thermostat is now operational and will appear Go back to the app and press “se connecter in your app. You can rename it by clicking on the maintenant” (connect now). small pencil to the right of the device name. Please wait while the pairing procedure takes You can now control your Avidsen thermostat from place. This stage can last several minutes. your smartphone.
-
Page 14: E - Use
E - USE 1 - USE VIA THE APPLICATION 1.1 - WEEKLY PROGRAMME To start, select your thermostat on the app’s home - Press the weekly programme button. The page. below screen appears The thermostat’s page consolidates the information - Select the day of the week you wish to and available actions programme - Select a period. The below screen appears ON/OFF button Mode selection (auto, manual, absence) This page lets you define: Weekly programme - The time when the new temperature setpoint Settings will take effect - Rename the period Setpoint temperature - Period icon Room temperature - Desired temperature Temperature adjustment Change the product name and information about the device... -
Page 15: Settings
E - USE 1.2 - SETTINGS From the settings menu, you can change - The default absence time - The temperature during holidays or absence - Temperature calibration - Restore default values 1.3- VOICE ASSISTANT COMPATIBILITY Your new smart thermostat is compatible with both Google Home and Alexa voice assistants. Refer to your voice assistant’s instructions to connect your thermostat. Once connected, you can: - Turn the thermostat on and off - Alexa, turn on the thermostat - Ok Google, turn off the thermostat - Ask the assistant to increase the temperature - Alexa, increase the temperature by 1°C - Ok Google, lower the temperature by 1°C - Ask the assistant to set a temperature... -
Page 16: F - Technical And Legal Information
79mm x 124mm x 32mm Max. load 1380 W 2 - WARRANTY Avidsen undertakes to keep a stock of spare This product is guaranteed for parts and labour parts for this product throughout the contractual for 2 years from the date of purchase. Proof of warranty period. - Page 18 Avidsen 19 avenue Marcel Dassault - ZAC des Deux Lions 37200 Tours - France...
Need help?
Do you have a question about the HomeFlow W and is the answer not in the manual?
Questions and answers