
Summary of Contents for FlashTiming FT-FAT
- Page 1 Technical Support: Bob: 309-369-6208 FlashTiming FT-FAT User Manual Version 1.5 For FT-FATLS Plus, FT-FAT200, FT-FAT120(V2), FT-FAT90...
-
Page 3: Table Of Contents
Advance Settings for Folder Discovery ................13 File Naming Options for Non-Meet Management Users ............ 14 Network Information ........................15 Overview ............................. 16 FT-FAT Radio Devices ........................16 USB Radio ..........................16 Starter Unit .......................... 17 Camera ..........................17 Camera Settings .......................... 17 Switch Cameras ........................ - Page 4 Before the Race ......................... 20 Zero Control Test ........................ 21 Scheduled Events ........................22 Meet Management Events....................22 Capturing Video ..........................23 Starting a Race ..........................23 Capturing Video .......................... 23 Live Review .......................... 23 Bookmarks .......................... 24 Manual Capture ........................24 Backup Timer ........................
- Page 5 Apple Raceberry JaM’s ScoreMeetLynx ..................40 DirectAthletics MeetPro ......................40 EasyWare Easy Meet Manager ....................40 RaceTab ............................41 Sports Automation’s TrackMate ....................41 10 FT-FAT System ............................. 42 10.1 Overview ............................. 42 10.2 The Starter Unit ........................... 42 10.3 Powering the Unit ........................
-
Page 7: Introduction
Camera product line including the FT-FAT LS Plus, FT-FAT200, FT-FAT120 (version 2 cameras) and FT- FAT90 systems. The FT-FAT LS Plus system provides both line scan and video images of the finish line with frame rates up to 1000FPS. The other systems provide full frame video up at 200, 120 and 90 frames per seconds. -
Page 8: System Setup
2 System Setup 2.1 Startup Instructions These instructions will guide you through the initial setup of your FT-FAT system and give a quick summary on how to use the system. 1. Connect the camera to the capture computer Attached the right-angle antenna to the back of the camera cover. -
Page 9: Line Scan Video
Once all devices are detected, the Start Race tab appears and you’re ready to start and capture video of a race. 1. Press the green button on the FT-FAT Starter Unit. This will send an “Are you ready?” signal to the computer. The green light on the starter and the green button on the computer will flash. -
Page 10: Camera Setup
2.3 Computer Setup The FlashTiming System can be set up to work with one, two, or three computers. One computer is sufficient when there is adequate time between races for the capture official to review the video and record the times. -
Page 11: Networking Computers
2.4 Networking Computers The FT-FAT video camera requires a 1 Gigabit Ethernet connection. The system comes with a 1Gbit POE/Switch for powering your camera and connecting your computers. Your computers should be connected together on a local area network (LAN) isolated from other network traffic. We do not recommend using a wireless network (because of delays during playback) or a network with other computers that may be receiving network traffic during critical times during capture and playback. -
Page 12: Scoring Data Folder Setup (Optional)
One minute of video requires 200MB of disk space. A typical meet requires 20-40 minutes of video, or 4-8 gigabytes of disk space. 2.6 Scoring Data Folder Setup (Optional) The Scoring Data Folder is the location used to exchange data files between FlashTiming and one of the following compatible meet management software packages: ... - Page 13 3. Click Interfaces on the menu bar. 4. Click Setup. 5. Click Photo Finish. 6. Click Flash Timing. (If running a college meet, or using an older version of Meet Manager and FlashTiming Interface is not an option, click FinishLynx File Sharing.) 7. Click OK. 2.6.2.2 Erase Previously Created Event Lists and Time Files It’s best to remove the previously created event lists and time files from previous meets before starting...
-
Page 14: Sports Automation's Trackmate
FlashTiming can read the events lists and heat sheets from EasyWare’s Easy Meet Manager. Time results from FlashTiming can be saved to the scoring folder and then imported into Easy Meet Manager to score the meet. The default scoring folder for Easy Meet Manager is C:\EasyMeetManager\Data1. Be sure to share this folder if you keep the default and are using multiple computers. -
Page 15: Racetab
8. Click Save and Done. Your event list and heat sheets are automatically saved and updated every time you change the event list or heat sheets. Press the Get Times button after a race has been timed to bring in the times from FlashTiming. For RaceTab version 4: 1. - Page 16 ScoreMeetLynx assigns event numbers to the men and women’s event. It asks for a numeric offset for event numbers to distinguish the men’s from the women’s event. FlashTiming uses the event number and description to name the video files and the resulting time results files.
-
Page 17: Getting Started
Private for accessing other computers. To launch FlashTiming, click the FlashTiming FT-FAT shortcut located on your computer’s desktop, or click the Windows icon in the lower left of the screen and type “FT-FAT” in the search box. The FlashTiming startup screen appears. -
Page 18: Scoring Folder
To create a new meet, enter the name and date of your meet and click Create Meet. FlashTiming creates a folder on the computer’s C drive under C:\FlashTimingVideos. This folder is shared and the folder permissions are set to allow other users to read the files. -
Page 19: Advance Settings For Folder Discovery
Check the box when you first configure FT-FAT for your meet. Check Turn on folder discovery. This will allow other computers on the same network to easily find the scoring folder. -
Page 20: File Naming Options For Non-Meet Management Users
This option provides a set of menus for gender, event, division, round, and heat when saving the captured video file. The menu choices create a descriptive filename for the captured video. You may customize the event and division menus by selecting the option FlashTiming File Naming Option and clicking on the Customize File Menus button. -
Page 21: Network Information
Firewall – FlashTiming must be allowed through the firewall to access the camera and other computers on the network. The best practice to allow just the application through the firewall. FT-FAT sets the access when starting the application. If this operation is not successful and you cannot see the cameras or other computers, change the firewall settings to OFF. -
Page 22: Overview
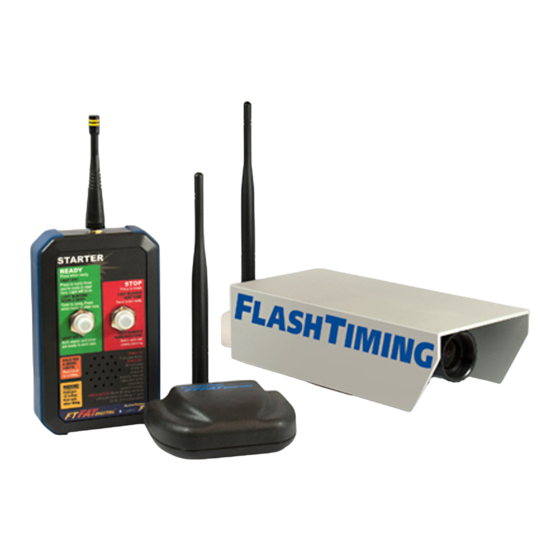
The record time tab appears once a video is opened for review. 4.1 FT-FAT Radio Devices The FAT system includes 3 radio devices: Camera, Starter Unit, and USB Radio. Before launching the program in capture mode, setup the camera by plugging it into one of the POE ports on the provided network switch and connecting the capture computer to another port on the switch. -
Page 23: Starter Unit
Starter Unit The most common causes of not detecting the Starter Unit are: the Starter Unit does not have an antenna attached, the Starter Unit is not turned on, the Starter Unit is in low-power mode, or ... -
Page 24: Set The Brightness
Video Quality FlashTiming compresses the video strip to condense the size of the resulting video file. Low quality results in faster compression, but degrades the video quality. Test the System Click Test Settings to check the frame rate and whether the computer is dropping any video frames. - Page 25 The IP Configuration Tool scans your computer for network connections and attached cameras. All discovered network connections are displayed in the top panel and information on the selected item is shown below. The FAT cameras are listed under Local Area Connection or Ethernet with the default name beginning in “ac800-“.
-
Page 26: Setting Up For A Meet
4.3 Setting up for a Meet Before the Race Check the camera focus, set the finish line and test the FT-FAT radio devices before each meet. 4.3.1.1 Focus the Camera Line Scan System Only: Click the Edit Lines button located above the preview area to see a full frame video of the finish line. -
Page 27: Zero Control Test
FAT time corresponds to the flash produced when the starting pistol is fired. To do this with the FT-FAT software, place the starting device in the view of the camera and capture the video before firing the gun. Put the system in the “Ready” State and fire the gun. Stop the capture after firing and review that file. -
Page 28: Scheduled Events
FlashTiming or any changes made to the event list during the meet. The display tool bar is shown at the top of the list if you set up a display to show Entries. Click on an event in the list and then the list icon to display the entries for the selected event. -
Page 29: Capturing Video
Live Review Live Review is available with the FT-FAT LS Plus camera and when the camera is in line scan mode. This feature allows you to review the video while you record. You may trim the video during live review to show only the portion of the image with movement. -
Page 30: Bookmarks
Stop Watch button when the starting pistol is fired, the stopwatch starts and the times are displayed in the box to the right. In the few instances when the FT-FAT race clock does not start, the stopwatch can be used to calibrate the video or line scan image. -
Page 31: Save The Video
#, round # and heat # separated by an underscore (_). This information is used by FlashTiming to retrieve the list of athletes for the event and should not be modified. The one exception is the heat #. -
Page 32: Race Clocks
FT-Display. The race time appears on the display when the start is detected by the FT-FAT system. The race clock will continue running until the race is stopped by either stopping the video capture or clicking the Abort button. -
Page 33: Video Review
6 Video Review Once a video is saved, it can be open for review to determine the athletes’ times. 6.1 Load Video The Load Video tab on the left side lists all videos and line scan images in the capture folder. The name of the capture folder is displayed at the top of the list. -
Page 34: Line Scan Controls
Line Scan Controls The controls from left to right are: Race Time: Displays the current race time of the curser position and video frame. Calibrate: See the section below, Calibrate the Video. Zoom: Zoom options include: Fit to Area: Scales the line scan height to fit in the preview area. ... -
Page 35: Full Frame Video Controls
6.3 Full Frame Video Controls The preview area displays the video frame. Click and drag the position indicator on the track bar to move quickly to any frame in the video. Also use the mouse wheel to advance and rewind the video. Use the video controls to change the image size, finish line and navigate through the video. -
Page 36: Calibrate The Video
FlashTiming can then compute the time for each line scan or video frame based on the calibrated time. -
Page 37: Record Times
6.6 Record Times The Record Times Tab becomes active once you load a line scan image or video file. To record an athlete’s time for a race, do the following: 1. Verify the event information if using a meet management scoring package. 2. -
Page 38: Recording An Athlete's Time
crucial. Select this option for non-lane races if you are not ready to match the athlete to the finish time. Note: Load Athletes and Load Athletes from Multiple Events are only available for seeded events and when using a scoring package. Recording an Athlete’s Time 1. -
Page 39: Athlete's Menu
Athlete’s Menu Right click on any row in the results table and the athlete’s menu appears. The athlete’s menu allows you to select the status of seeded athlete, delete or manually edit an existing time, or go to the video frame/line scan showing the athlete’s time. -
Page 40: Display Race Results
Display Race Results The display tool bar is at shown at the top of the Record Time tab if you set up a display to show results. The buttons in the toolbar, from left to right, are: Clear – Clears the display ... -
Page 41: Displays
External monitors and matrix displays must be visible as a display in the Windows Display Setting and the display must be set to “Extend desktop to this display” in order for FlashTiming to access them. To set up a display: 1. -
Page 42: Ft-Scoreboard
UDP. 7.3 Second Monitor or Window FlashTiming can display the race times, results and entries on a second monitor or detached window. Select the monitor from the View On drop-down menu. The detached Window option will bring up a window that can be clicked and dragged to any area on the screen. -
Page 43: Options For Matrix Displays
AthleticLIVE allows spectators to view track and field results on their smart phone, tablet or laptop. Results and entries from FlashTiming are posted on their websites for spectators to view free of charge. The meet organizers pay a fee for the service. See https://live.athletic.net/ for information on how to enlist. -
Page 44: Menu And Short-Cuts
8 Menu and Short-Cuts 8.1 Menu Click the 3 bars in the upper left to open the Menu. Enable Capture – Switches from review only mode to capture mode. Switching to Capture mode initializes the FAT system. Disable Capture – Switches from capture mode to review only. This closes the camera and removes the device and capture controls from the screen. -
Page 45: Keyboard Shortcuts
8.2 Keyboard Shortcuts The following shortcuts are available when communicating with the starter R – Sends a Ready signal to the Starter Unit. A – Sends an Abort signal to the Starter Unit. The following keyboard shortcuts are available when capturing videos: ... -
Page 46: Reading Times Into The Meet Management Application
Click the Enter Results Tab to score your meet. Click Get Event Results button (above the entries grid) and your FlashTiming results are read in and recorded. If an event had multiple heats, you must get the times for all heats before scoring the event. To import just the currently selected heat, toggle the Get Event Results button to Get Heat Results. -
Page 47: Racetab
4. In the lower right corner, select Match by Time Order if the event did not finish in lanes and you did not show the athletes when recording the times in FlashTiming. Otherwise, select Match by Lane/Bib/Position. 5. Click Retrieve from File and the Import Text File of Times Window appears. -
Page 48: Ft-Fat System
It is crucial that the starter and timing official at the capture computer communicate before the start of each race to indicate that they’re both ready for the race to begin. The FT-FAT system has this essential communication integrated into the Starter Unit and the FlashTiming software. On the Starter Unit, the READY button is used to alert the timing officials of a request to start a race and the green light on the Starter Unit is used to indicate that the timing official is ready to start the race. -
Page 49: Powering The Unit
It can be attached to the starter stand or a tripod, or be held in the starter’s other hand. The USB Radio unit is attached to the capture computer through a USB port. The FT-FAT camera is located at the finish line and is connected to the Trendnet POE switch and capture computer with a shielded Cat 6 network cable. -
Page 50: Starting A Race
The three FT-FAT radios may need to be in sight of each other to communicate. The radio signals travel up to 1000 feet reliably and up to 1 mile in ideal conditions. Glass windows of a press box should not impede communication. -
Page 51: No Response/Time Out
This indicates a possible issue with the timing device and the starter may recall the race. If there is a malfunction and the race clock does not start on the capture computer, the FlashTiming software can calculate the times of all the runners from the video based on one hand time. The resulting times will not be FAT but the video will determine the order position and all runners’... -
Page 52: Test The Units
1. Metal Stadiums may deflect or interfere with radio communication. The FT-FAT system includes an external antenna with a 13-foot extension cable and magnetic base for use in metal spectator stands and/or press box. To use: a. Unscrew the antenna on the USB Radio and replace with the 13ft cable connected to the magnetic base. -
Page 53: Appendix A: Tips For Hy-Tek Meet Manager Users
Times are loaded into Meet Manager from the Run the Meet scene in the Meet Manager application. Click the race in the event list and simply hit the Get Times button. Your FlashTiming results are recorded. Here are some tips for importing times from FlashTiming into Meet Managers Before the Start of the Meet: Set up your Meet Manager Data Location. - Page 54 Record your results in FlashTiming – Once all changes have been made to the athlete list in Meet Manager and the changes have been saved you can record the times in FlashTiming. On the review computer, load the video and the athletes.
-
Page 55: Appendix B: Networking Your Computers
The computers must be networked together and folders must be set for sharing to enable the above tasks. We recommend that you turn off your wireless when using FlashTiming and connect your computers with a switch or router. -
Page 56: Managed Vs Unmanaged Network
12.1 Managed vs Unmanaged Network The FT-FAT system ships with a Trendnet 1Gbit POE Switch. This switch powers the camera and allows Ethernet computers to communicate with each other. It is unmanaged switch, which by default will assign an Auto IP, starting with the numbers 169.254.x.x. It runs a CPU intensive process in the background to manage the network traffic, which results in dropped frames when capturing video. -
Page 57: Unblock Messages From Other Computers
Unblock Messages from other computers Windows10 added a feature that allows you to block other computers. Check that this feature in not enabled: 1. Go to Control Panel 2. Click on Programs and Feature 3. Click on Turn Windows features on or off, located in the left column 4. -
Page 58: Windows 7 And Windows 8
3. Double click on Unidentified Networks in the right side. 4. Change Location Type to Private in the Unidentified Network Properties Window. 5. Click OK. 12.3.3.3 Windows 10 Home If you are running Windows10 Home on an unmanaged network or you don’t see the option to change to private in the Network Status window, follow the steps below. -
Page 59: Set The Private Sharing Options
3. If the text, Public Network, is not selectable, click on HomeGroup (3) in the lower left panel of the Network and Center. a. Click on Start the HomeGroup troubleshooter at the bottom of the window titled “Change homegroup settings”. b. - Page 60 2. Turn on file and printer sharing 3. Use user accounts and passwords to connect to other computers. Expand the options for All Networks and set the following: 4. Turn on sharing so anyone with network access can read and write files in the Public folders 5.
-
Page 61: Turn Off All Firewalls And Virus Checkers
Users should either turn off their firewall or allow FlashTiming to communicate through the firewall. Windows 8 and 10 users may turn off the Firewalls using the Computer and Setup Dialog in FlashTiming. Click the menu bar and then View Computer and Setup To turn off the Windows Firewall in Windows 7: Click on Windows Firewall (5) in the Network and Sharing Center;... -
Page 62: Set Folders For Sharing
"Computers". On the Review computer: Click on the Capture Computer and you should see the folder "FlashTiming Videos". Click on the Scoring Computer (if different than the review computer) and you should see the scoring folder. -
Page 63: Set The Computer's Ip Address
Check the IP address and subnet mask to be sure that the computers are on the same network. If the subnet mask is “255.255.255.0” then the first 3 sets of numbers for the IP address need to be the same on all computers and the last number of the IP address needs to be different for each computer. If the subnet mask is “255.255.0.0”... - Page 64 If you set the properties for all computers to “Obtain an IP address automatically”, Windows will assign IP automatically if using Windows7 or greater. If you are using a router, click on Obtain an IP address automatically, and then OK. If you are using only the Trendnet POE switch that comes with the system, assign a static IP address: Click on Use the following IP address.
-
Page 65: Appendix C: Technical Support
Appendix C: Technical Support We are committed to providing high quality fully automatic timing systems with excellent customer service. FlashTiming support personnel are available for assistance to help ensure your success. Telephone us Monday through Friday, from 8AM until 8 PM Pacific Time FlashTiming Support: ...
Need help?
Do you have a question about the FT-FAT and is the answer not in the manual?
Questions and answers