Table of Contents
Advertisement
Quick Links
Advertisement
Table of Contents

Summary of Contents for Laser SmartHome LSH-FLCAM-1
- Page 1 User Manual Floodlight Camera LSH-FLCAM-1...
- Page 2 Thank you for your purchase! Laser Corporation is 100% Australian owned & operated. To get the most out of your product please read the user manual carefully and keep for future use. For specific information relating to your product such as Spare Parts, FAQs, Warranty claims, and...
-
Page 3: What's In The Box
WHAT’S IN THE BOX • Floodlight Camera • Mounting Bracket • USB Cable • Wall Mount Screw Set • User Manual... -
Page 4: Specifications
SPECIFICATIONS 1/3” Color CMOS Image Sensor: 1920x1080p @ 15 frames per second Display Resolution: 2.8mm Focal Length: Viewing Angle: 6pcs 850nm LED, IR distance up to 8m LED: Spotlight: 400 LUX Image Compression: H.264 DNR: 3D Digital noise reduction WDR: Digital wide dynamic range Audio: Built-in Microphone &... -
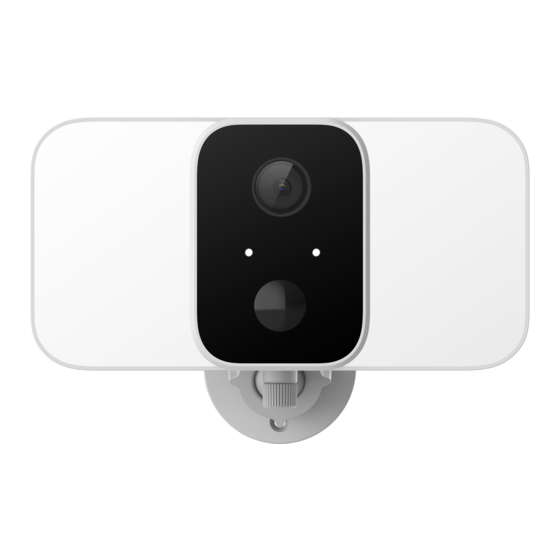
Page 5: Product Diagram
PRODUCT DIAGRAM Light Sensor Lens Indicator Light PIR Sensor Microphone ON/OFF Button SD Card Slot USB Charging Port Reset Mounting Hole... - Page 6 Reset Button Controls • Press and hold for 10 seconds to reset the camera. • A LED indicator light will start flashing. There are 2 flashing states: • Fast Flashing = QR and EZ pairing mode. • Slow Flashing = AP pairing mode. Note: In this manual we cover the QR pairing mode instructions.
-
Page 7: Getting Started With The App
Getting Started with the App 1. Install the Laser SmartHome App for your Smartphone from the iOS App Store or Google. 2. Log in with an existing Laser SmartHome account or create a new account. -
Page 8: Connecting To The App
Connecting to the App 1. Press and hold the “RESET” button on the Floodlight Camera till you get a fast-flashing light. 2. Open the Laser SmartHome App and tap the “+” icon to add a device. - Page 9 Connecting to the App continued... 3. Select the “Camera & Lock” category on the left, then select “Smart Camera (Wi-Fi)”. 4. Enter your Wi-Fi details.
- Page 10 Connecting to the App continued... 5. On the next screen tap the option in the top right and select “QR Code”. 6. Select the checkbox, then tap Next.
- Page 11 Connecting to the App continued... 7. On the next screen you will need to hold the QR Code on the App towards the camera lens on the Floodlight Camera. A tone will be heard when done correctly. Tap “I Heard a Prompt” to continue. Tip: Move the QR code on the phone away, then towards the camera lens a few times so that it...
- Page 12 Connecting to the App continued... 9. When finished pairing tap “Done”, then the device will appear on the Laser SmartHome App home screen. NOTE: If you are unable to pair successfully with the Floodlight Camera, please check your Wi-Fi password and make sure you are only using a 2.4GHz...
-
Page 13: Camera Controls
Camera Controls Camera Switch Settings Between HD & SD Zoom Resolution Camera Audio Battery Charging Status Microphone Fullscreen More Mode Options Record Take Photo Video... - Page 14 Camera Controls continued... Playback Recorded Switch Media on Between Connected Light & Dark Smartphone Theme Playback Recorded Turn Night from Micro Vision SD Card ON/OFF Switch Between Turn 50 & 60Hz Floodlight Modes ON/OFF Turn Check Notifications Alarm Siren such as Motion ON/OFF Detection Alerts etc.
- Page 15 Micro SD Card & Motion Detection • A Micro SD Card installed in the camera will allow your camera to automatically take a video when motion is detected (PIR Motion Detection must be turned on). • Without a Micro SD Card, your camera will only take photos when motion is detected (PIR Motion Detection must be turned on).
- Page 16 Adding Laser SmartHome to the Google Home App • Open the Google Home App. • In the “Google Home” main screen, select the “+” icon to set up device.
- Page 17 Adding Laser SmartHome to the Google Home App continued... • Select “Set up device” to add new device, then select “Works with Google”.
- Page 18 Adding Laser SmartHome to the Google Home App continued... • A list will appear showing actions and a search function to access more apps: from here, search for the Laser SmartHome App.
- Page 19 Adding Laser SmartHome to the Google Home App continued... • Log into your Laser SmartHome account with your email address. • Once linked, it will show the devices linked to your account: you can assign them to rooms. You will be prompted to authorize apps to sync.
-
Page 20: Troubleshooting
TROUBLESHOOTING The Floodlight Camera video feed is not loading. • Make sure your smartphone and the Floodlight Camera are connected to the same Wi-Fi connection. • Check the distance between the Floodlight Camera and your Wi-Fi router. Any obstructions such as walls and ceilings will reduce the range of your Wi-Fi signal. - Page 21 I am unable to connect the Floodlight Camera to the Laser SmartHome App. • Check the Floodlight Camera has a fast-flashing light. If the light is flashing slowly, press and hold the “Reset” button for 10 seconds to switch to a fast-flashing light.
- Page 22 TROUBLESHOOTING continued... Can I use Laser SmartHome on my computer? • The Laser SmartHome App is only designed to work on Smartphones and Tablets that use the Apple App store and the Google Play Store.
- Page 23 Visit our website www.laserco.com.au Check us out at www.youtube.com/lasercoau...
Need help?
Do you have a question about the SmartHome LSH-FLCAM-1 and is the answer not in the manual?
Questions and answers