Table of Contents
Advertisement
Quick Links
Advertisement
Table of Contents

Summary of Contents for STM MINI-REVOLUTION
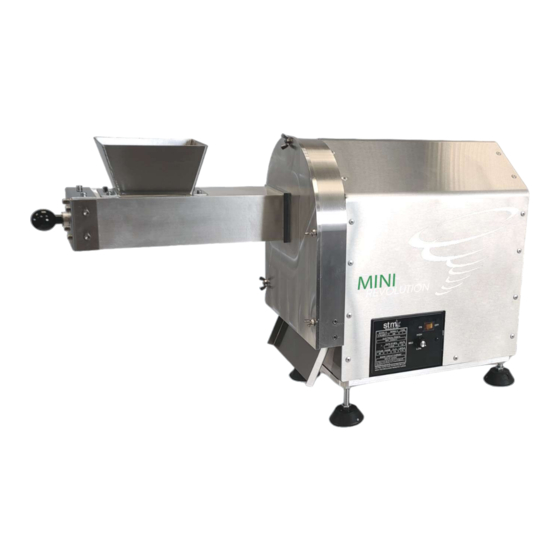
- Page 2 Small Footprint WEIGHT & Approx. 56 lbs DIMENSIONS 30" L x 17.5" H x 10-1/2" W MINI-REVOLUTION THROUGHPUT Up to 1 lbs +/- every 2 minutes USER MANUAL Standard 110V .25 Horse Gear Motor with a 10:1 Ratio POWER Full-Load 7 Amps (FLA) 5-1/2 ft.
-
Page 3: Table Of Contents
TABLE OF CONTENTS Table of Contents ..........1 Blade Maintenance ......... 8 Components ...........,,,..2 Backing Plate ........... 9 Getting Started ..........4 Pushrod ............10 Operation of The Machine ....... 5 Hopper ............11 Front End ............6 Terms of Business ........12 Density Testing .......... -
Page 4: Components
COMPONENTS 5. Hopper 1. Power Switch - Turns the machine on and off. 2. Adjustable Dial - Controls the blade speed 3. Wingnut - 5 wingnuts hold the faceplate in place over the blade 4. Pushrod chamber. 4. Pushrod - Easy to operate, lightweight pushrod allows easy feeding into the machine 3. - Page 5 COMPONENTS 1. Blade 1. Blade - Grinds your material. 2. Wingnuts (5) - Line up your blade cover with these spots for reattachment. 3. Chute - Where material exits after grinding. 4. Limit Switch - This prevents the machine from running if the front end is not attached.
-
Page 6: Getting Started
GETTING STARTED PREPARING WORK AREA Your Mini-Revolution™ is equipped with 4 legs that grip most surfaces for easy placing. We suggest setting up your proccessing area as follows. Material Prep Area Loading Area Material Prep for Mini- Dedicated to housing your Revolution™... -
Page 7: Operation Of The Machine
OPERATION OF MACHINE USING THE MINI-REVOLUTION™ Turn on power and adjust your speed dial to 10 or "HIGH". Maximum power is achieved by turning the dial fully clockwise. Pull the pushrod back and insert material into the hopper. Push material forward with the pushrod into the blades. -
Page 8: Front End
FRONT END Your Mini-Revolution™ comes equipped with an easy feed hopper, variable speed levels, and easy accessibility to your blade area making cleaning a breeze. The front end is able to be easily removed and reattached for easy cleaning and maintenance. -
Page 9: Density Testing
DENSITY TESTING F O R R O C K E T B O X U S E R S O N L Y PERFORMING A DENSITY TEST Tare empty 10 mL beaker on thousandths scale. WHAT IS DENSITY? Density is a characteristic property of a Fill the included beaker up to the 10 mL line substance. -
Page 10: Blade Maintenance
BLADE MAINTENANCE REMOVING THE BLADES SUPPLIES YOU'LL NEED Using a 1/8” Allen Wrench, begin to loosen the (8) 1/8" Allen Wrench Blade locking bolts located on the outside edge of Diamond Cut-proof gloves the Blade. Spray bottle of Isopropyl Alcohol Stain-proof paintbrush Unscrew the bolts halfway and twist the Blade by Microfiber soft cloth... -
Page 11: Backing Plate
BACKING PLATE SUPPLIES YOU'LL NEED REMOVING THE BACKING PLATE 1/8" Allen Wrench Spray bottle of Isopropyl Alcohol After following the "Removing the Blades" Stain-proof paintbrush section you can now remove the Backing Plate. Microfiber soft cloth Dish soap (optional) Using a ⅛” Allen Wrench, remove the (4) bolts located in the center of the Backing Plate. -
Page 12: Pushrod
PUSHROD SUPPLIES YOU'LL NEED REMOVING THE PUSHROD 5/16” Allen Wrench The faceplate of the Hopper is located where 5/32” Allen Wrench the handle of the Pushrod meets the Hopper. Spray bottle of Isopropyl Alcohol Remove the (6) - 5/32” bolts from the front Stain-proof paintbrush plate on the Hopper. -
Page 13: Hopper
HOPPER SUPPLIES YOU'LL NEED 5/16” Allen Wrench 5/32” Allen Wrench Spray bottle of Isopropyl Alcohol REMOVING THE HOPPER Stain-proof paintbrush The faceplate of the Hopper is located Microfiber soft cloth where the handle of the Pushrod meets Dish soap (optional) the Hopper. -
Page 14: Terms Of Business
Due to high demands, certain items may have a lead time of 4-8 weeks or more from payment date, unless otherwise stated. Following the receipt of an invoice, STM Canna must receive payment within a maximum of 7 days before the invoice expires – leaving lead times, quoted prices, specials and discounts on all items subject to change. - Page 15 Supply. Warranties do not transfer for resold machines regardless of age of the model. Please note that results with STM Canna & STM Supply products can yield varying results which depend on a myriad of factors, including but not limited to: correct grind size, age of material, quality of material, moisture content, strain, temperature, correct sized cone usage, quality of cones used, skill of the operator, and more.
- Page 16 No proof of purchase at the time of warranty. The claimant must provide proof of purchase, warranty card, and a warranty authorization number (RMA) obtained from STM. Finishes such as plating or painted surfaces with discoloration or rust due to inclement weather conditions, exposure to salt, exposure to chemicals, or lack of maintenance by the customer are not covered.
- Page 17 LIABILITY The purchaser of any products releases the manufacturer of those parts and STM Canna from all liabilities pertaining to use of the products. TROUBLESHOOTING Reference your instruction sheet and double-check all instructions.
- Page 18 We may ask you for pictures, videos, descriptions, and other identifying information to make a determination. If you are unable to provide adequate documentation requested, your return request will be denied. If your item is deemed defective, which is solely at STM’s discretion, we will issue you an RMA # which you will need to place in and on the package.
Need help?
Do you have a question about the MINI-REVOLUTION and is the answer not in the manual?
Questions and answers