Advertisement
Available languages
Available languages
Quick Links
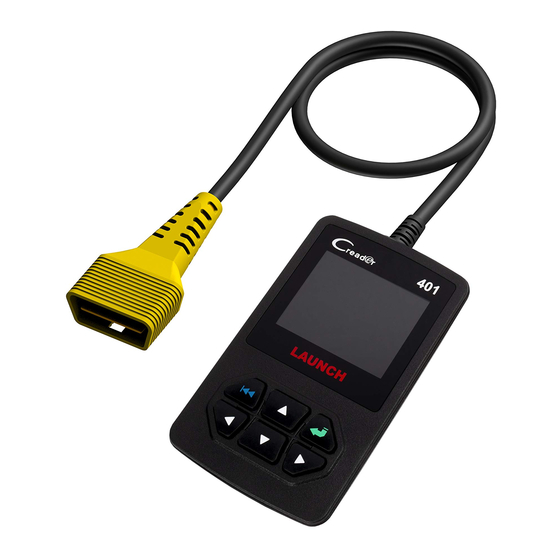
CR401/CR4001
CR401/CR4001 Handset
Diagnostic Cable
LCD Screen
ESC Button
(To return to the
previous screen.)
USB Port
(To update your tool
via USB cable.)
Notes:
Ÿ
To make sure the tool is running the latest available software, it is
advisable to check for updates on a frequent basis. Refer to Section
3 "Register & Update" for details.
This Quick Start Guide is subject to change without written
Ÿ
notice.
Quick Start Guide
OK Button
Selection Button
1. Preparation & Connections
1. Preparation
Turn the vehicle ignition on.
Ÿ
Vehicle battery voltage range should be 9-14Volts.
Ÿ
Throttle should be in a closed position.
Ÿ
2. Vehicle Connection
1. Locate vehicle's DLC socket: The DLC (Diagnostic Link
Connector) is typically a standard 16-pin connector where
diagnostic code readers interface with a vehicle's on-board
computer. It is usually located 12 inches from the center of
the steering wheel, under or around the driver's side for
most vehicles.
If the DLC cannot be found, refer to the vehicle's service
manual for the location.
2. Connect the diagnostic cable into the vehicle's DLC
socket.
LAUNCH
EN
Advertisement

Summary of Contents for Launch CReader CR401
- Page 1 LAUNCH CR401/CR4001 Quick Start Guide 1. Preparation & Connections CR401/CR4001 Handset 1. Preparation Turn the vehicle ignition on. Ÿ Diagnostic Cable Vehicle battery voltage range should be 9-14Volts. Ÿ Throttle should be in a closed position. Ÿ 2. Vehicle Connection 1.
- Page 2 3. After installation, connect one end of the USB cable to the USB port of PC, and the other end to the tool. Once the tool is powered up, launch the update tool on your PC, the system starts reading the tool. Once it obtains the tool information, it will directly navigate to the update center.
-
Page 3: Guía De Inicio Rápido
LAUNCH CR401/CR4001 Guía de Inicio Rápido Configuración de CR401/CR4001 1. Preparación & Conexiones 1. Preparación Dé el contacto en el vehículo. Ÿ Cable de Diagnóstico Ÿ El rango de voltaje de la batería del vehículo debe estar entre 9-14V. El acelerador no debe estar pisado. - Page 4 LAUNCH CR401/CR4001 Guía de Inicio Rápido 3. Actualización 3. Actualización Podrá conectar su equipo para actualizarlo con un cable de USB a un ordenador. Nota: Asegúrese de que el ordenador tiene conexión a Internet. 1. Teclee en el navegador http://mycar.x431.com(“Products” ->...
-
Page 5: Guide De Démarrage Rapide
LAUNCH CR401/CR4001 Guide de démarrage rapide CR401/CR4001 Combiné 1. Préparation & Connexions 1. Préparation Mettez le contact du véhicule. Ÿ Câble de diagnostic Plage de tension de la batterie du véhicule doit être Ÿ comprise entre 9-14Volts. Le Papillon doit être dans une position fermée. - Page 6 LAUNCH CR401/CR4001 Guide de démarrage rapide 3. Mettre à jour 3. Mettre à jour L'outil peut être mis à jour via un câble USB. Remarque: Assurez-vous que le PC dispose d'une connexion Internet. Allez à http://mycar.x431.com(“Products” -> “Creader Online” -> “CR4001”) et téléchargez l'outil de mise à...
- Page 7 LAUNCH CR401/CR4001 Schnellstartanleitung CR401/CR4001 Hörer 1. Preparación & Conexiones 1. Vorbereitung Die Fahrzeugzündung einschalten. Ÿ Diagnoseleitung Ÿ Der Batteriespannungsbereich der Batterie soll 9-14 Volt betragen. Die Drosselklappe soll sich in einer geschlossenen Ÿ Stellung befinden. 2. Fahrzeuganschluss 1. DLC-Steckplatz des Fahrzeugs finden: Der DLC...
- Page 8 LAUNCH CR401/CR4001 Schnellstartanleitung 3. Aktualisieren 3. Aktualisieren Das Gerät ist über USB-Kabel aktualisierbar. Hinweis: Sicherstellen, dass PC ans Internet angeschlossen ist. 1. Auf http://mycar.x431.com(“Products” -> “Creader Online” -> “CR4001”) gehen und das Update-Tool auf PC laden. Klicken Sie auf [Upgrade], um die Aktualisierung zu starten Beim Abschluss der Aktualisierung erscheint ein Nachrichtenfeld "Aktualisierung erfolgreich".
-
Page 9: Краткое Руководство Пользователя
LAUNCH CR401/CR4001 Краткое руководство пользователя CR401/CR4001 Серия 1. Подготовка и подключение 1. Подготовка к работе Включите зажигание автомобиля. Ÿ Диагностический кабель Нормальное напряжение аккумулятора автомобиля Ÿ должно быть от 9 до 14В. Ÿ Дроссельная заслонка двигателя должна быть закрыта. 2. Подключение к автомобилю... - Page 10 LAUNCH CR401/CR4001 Краткое руководство пользователя 3. Регистрация и обновление 3. Регистрация и обновление Вы можете обновить свой прибор с помощью USB-кабеля. Примечание: Убедитесь, что компьютер подключен к Интернету. 1. Посетите интернет-сайт http://mycar.x431.com(“Products” - > “Creader Online” -> “Cr4001”) и загрузите средство...
- Page 11 LAUNCH CR401/CR4001 取扱説明書 端末 1. 準備&接続 CR401/CR4001 1.準備 イグニッションをONにします。 Ÿ 診 断 ケ ー ブ ル 車両バッテリーの電圧範囲は9-14Vです。 Ÿ スロットルが閉位置です。 Ÿ 2. 車両接続 1. 車両DLCソケットの位置を見つけます:DLC(診断リンクコ ネクタ)は通常、標準的な16ピンコネクタです。それは診 断デバイスが車載コンピューターと整合させるコネクタで す。ほとんどの車両では、DLCがステアリングホイールの ス ク リ ー ン 中央から12インチの位置にあります。 DLCを見つけない場合、車両のサービスマニュアルを参照 してください。 ボ タ ン 前 の 画 面 に 戻 り...
- Page 12 LAUNCH CR401/CR4001 取扱説明書 3 .アップデート 3 .アップデート USB ケーブルを通じてデバイスをアップデートすることはでき ます。 注意:コンピューターがインターネットに接続されていること を確認してください。 http://mycar.x431.com(“Products” -> “Creader Online” -> にアクセスしコンピューターにアップデートツー “CR4001”) ルをダウンロードします。 5. [アップグレード]をクリックして更新を開始してください。 6.アップデートが完了した際に、「アップグレートに成功」と いうメッセージがポップアップされます。 7.それからアップデートプロセスが完了し、デバイスが使用可 能になります。 解凍してコンピュータにインストールします(Windows XP、 Windows 7、Windows 8 & Windows 10 対応)。 インストールした後、USB ケーブルの一方の端をコンピュー ターに接続し、もう一方の端をデバイスに接続します。 ツールの電源を入れたら、PC上でアップデートツールを起動 すると、システムは自動的にデバイスの読み取りを開始しま...
-
Page 13: Guia Rápido
LAUNCH CR401/CR4001 Guia rápido CR401/CR4001 Aparelho 1. Preparación & Conexiones 1. Preparação Ligue a ignição do veículo. Ÿ Cabo de diagnóstico A faixa de tensão da bateria do veículo deve ser de 9- Ÿ 14Volts. O acelerador deve estar em posição fechada. - Page 14 LAUNCH CR401/CR4001 Guia rápido 3. Actualização 3. Actualização A ferramenta pode ser atualizada via cabo USB. Nota: Certifique-se de que o PC tem uma ligação à Internet. Vá para http://mycar.x431.com(“Products” -> “Creader Online” -> “CR4001”) e faça o download da ferramenta de atualização para o computador.
Need help?
Do you have a question about the CReader CR401 and is the answer not in the manual?
Questions and answers