Table of Contents
Advertisement
Quick Links
by
Signal Column System
22-SCU / 22-SOC
22-K(x) / 22-K(x)-F(y) / 22-P(x)
marpower.com
MARPOWER
PRODUCTS AND SERVICES
Ship electronics
Signal Column
A. Plesmanlaan 2
Tel. +31(0)88 – 799 1 799
sales@marpower.com
We supply according to EC-directives and are ISO-9001
SMEN05
MARKET
Shipbuilding
9615 TH Kolham, Nederland
July 2020
Date subject to change
Advertisement
Table of Contents

Summary of Contents for MARPOWER 22-K Series
- Page 1 MARPOWER SMEN05 PRODUCTS AND SERVICES MARKET Ship electronics Shipbuilding Signal Column Signal Column System 22-SCU / 22-SOC 22-K(x) / 22-K(x)-F(y) / 22-P(x) A. Plesmanlaan 2 9615 TH Kolham, Nederland Tel. +31(0)88 – 799 1 799 sales@marpower.com July 2020 marpower.com We supply according to EC-directives and are ISO-9001...
- Page 2 FOREWORD We thank you for selecting an Marpower Signal Column product. This manual is intended as documentation during installation, commissioning and servicing and for users of the Electronic Signal Column. This manual is applicable for the: 22-SCU, 22-SOC, 22-K(x), 22-K(x)-F(y) and the 22-P(x).
-
Page 3: Table Of Contents
SMEN05 Signal Column System TABLE OF CONTENTS IMPORTANT SAFETY INSTRUCTIONS ..............1-1 ....................1-1 UALIFIED PERSONNEL ........................1-1 ARKINGS ..................1-2 NSTRUCTIONS AND ARNINGS INTRODUCTION ......................2-1 (SCS) ................2-1 IGNAL OLUMN YSTEM ....................... 2-1 ONTROL ....................... 2-2 PTIONAL ONNECT ...................... - Page 4 ADJUSTMENTS ........................ 8-1 ......................8-1 ONTROL 8.1.1. Disable Output ......................8-1 8.1.2. Local Alarm ....................... 8-1 8.1.3. Mode .......................... 8-2 8.1.4. BG-Verkehr ........................ 8-3 8.1.5. Sub-Master ......................... 8-4 8.1.6. NO or NC ........................8-5 8.1.1. DC-OK ........................8-5 ...................... 8-6 PTIONAL ONNECT 8.2.1.
-
Page 5: Important Safety Instructions
SMEN05 Signal Column System 1. IMPORTANT SAFETY INSTRUCTIONS Qualified personnel In this documentation and on warning labels the reference to “qualified personnel” is meant to be personnel that is familiar with the product, i.e. familiar with installation, transport, mounting, commissioning, operation and or maintenance of the product. This person must have the following qualifications: ... -
Page 6: Instructions And Warnings
For information on maintenance refer to chapter 9. However, while every care has been taken to ensure the completeness and accuracy of this manual, Marpower accepts no responsibility or liability for any loss or damage resulting from the use of the information contained in this document. -
Page 7: Introduction
The indication products must be controlled by a Control Type product. This control operation can be done by the client system, or by the Marpower Control Unit (22-SCU). These devices interface control the lamps, flashlights and claxons of the connected display type. -
Page 8: Optional Connect
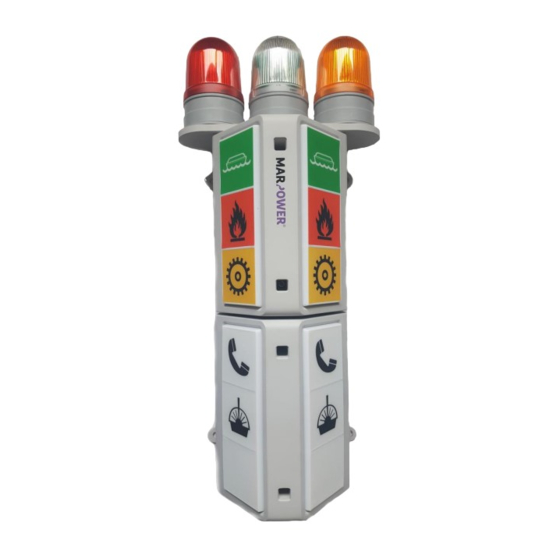
This product is used when the customer doesn’t implement the intelligent Control Unit. The product serves as connection terminal between the Signal Column and the user control system. The product is suited for the Marpower Signal Columns (22-K(x) or the 22-K(x)-F(y) products). Figure 2.1-1: Optional Connect (22-SOC) -
Page 9: System Description
Can control 1 – 3 flashlights and 1 – 2 claxons Can be installed in a old 21-SCU-1 network The Control Unit controls a Marpower display product. The display product can be a Signal Column, a Signal Panel, or a different signalling type product. -
Page 10: Overview Unit
3.1.1. Overview Unit An overview of the Control Unit with the terminals and interfaces has been shown in Figure 3.1-2 below: Figure 3.1-2: Overview of the Control Unit (22-SCU) product, figure not to actual To describe the terminal pins in Figure 3.1-2, the table below describes the terminals and interfaces: Item Function Information Description... -
Page 11: Power Supply
SMEN05 Signal Column System 3.1.2. Power Supply In the figure below, the desired functional pin-out of the Power Supply terminal (X1) is being displayed below: Signal +24 Vdc 0 Vdc Table 3.1-2: Pinout of X8 Figure 3.1-3: PSU pin-out 3.1.3. Power Output In the figure below, the functional pin-out of the power output terminal has been shown: Figure 3.1-4: Power Output pin-out Signal Standard... -
Page 12: Com
3.1.4. COM The functional pin-out of the normal COM terminal X4 has been shown in the figure below: Purpose 0V ( Data/Power ) Data 0V ( Data/Power ) Data Power Supply to other 22-SCU devices Figure 3.1-5: Pinout of COM terminal X4 The terminal X4 is normally used to make a bus or a ring network type of connection. -
Page 13: Input
SMEN05 Signal Column System 3.1.5. Input In the figure below, the functional pin-out of the Input terminal has been shown: Figure 3.1-9: Pin-out of the Input port Signal Purpose 1 – 12: 0V ( - ) The return wire (0V) of the alarm contact (or setting) Input 1 ( + ) The alarm 1 signal, triggers O1 and according PO[x] Input 2 ( + ) - Page 14 Trigger Signal Purpose X8, X9, X10 None +24 Vdc ( + ) The common power source for the light fields Input 1 Output 1 ( - ) The alarm 1 switch, has default priority 1 Input 2 Output 2 ( - ) The alarm 2 switch, has default priority 2 Input 3 Output 3 ( - )
-
Page 15: Optional Connect
SMEN05 Signal Column System Optional Connect An overview of the Optional Connect PCB has been shown in Figure 3.2-1: Figure 3.2-1: Overview of the Optional Connect product To describe the terminal pins in Figure 3.2-1, the table below describes the terminals and interfaces: Item Function Information Description... -
Page 16: Signal Panel
Signal Panel An overview of the Signal Panel with the different light fields has been shown in the figures below: Figure 3.4-1: Overview of the Signal Panel with 6 alarm fields (22-P6) (symbol locations displayed as an example) Figure 3.4-2: Overview of the Signal Panel with 9 alarm fields (22-P9) (symbol locations displayed as an example) Cable and other nececities are included in the package of the Signal Panel. -
Page 17: Technical Specifications
SMEN05 Signal Column System 4. TECHNICAL SPECIFICATIONS Control Unit Term 22-SCU Property Power Supply +24 Vdc (-25% & +30%) Maximum current supply (continuous) 10 A Idle current consumption < 300 mA 0.2 – 6 mm Terminal supported flexible wire diameter Recommended stripping length wire 15 mm Maximum conductor cross-section with sleeve... - Page 18 Recommended stripping length wire 10 mm Maximum conductor cross-section with sleeve 1.5 mm Type of communication Marpower Custom Protection Overload / Temperature & Flyback diode Input X6 & X7 Operation Voltage +24 Vdc Port functionality type Digital External contact type (potential free contact)
- Page 19 SMEN05 Signal Column System Interface Specifications Selection mode (dip-switch) ON / OFF Number of switches 0 – 9 Selection mode (rotating switch) Number of stances Mechanical Product (H x W x L) 60x144x128 mm Weight Module (approx.) 226 g Mounting DIN-Rail 35 Environmental Operating temperature Range...
-
Page 20: Optional Connect
Optional Connect Term 22-SOC Property Electrical Specifications Power Supply 24 Vdc (-25% & +30%) Maximum current supply (continuous) Idle current consumption < 1 mA Required external protection External fuse 6A, C-type Terminal X1 External contact type (potential free contact) 0.2 – 2.5 mm Terminal supported wire diameter (flexible) Number of terminal ports... -
Page 21: Signal Column (With/Without) Flashlight
SMEN05 Signal Column System Signal Column (With/Without) Flashlight Term 22-K(x)-F(y) Property Electrical Specifications LED Board Power Supply +24 Vdc (-25% & +30%) Maximum current supply (continuous) Idle current consumption < 1 mA 24 – 30 AWG (flat cable) Terminal supported wire diameter Number of terminal ports Protection Inverse Polarity Protection, TVS... - Page 22 Environmental Operating temperature Range -25°C / +60°C Maximum humidity 95% RH @ 55°C Cooling Passive IP-Grade IP44 Exceeding these values may reduce the life time of the product Applicable for LED board only...
-
Page 23: Signal Panel
SMEN05 Signal Column System Signal Panel Term 22-P(x) Property Electrical Connection Power Supply +24 Vdc (-25% & +30%) Maximum current supply (continuous @ 24 Vdc) 300 mA Idle current consumption 40 mA 24 – 30 AWG (flat cable) Terminal supported wire diameter Interface Specifications S1 &... -
Page 25: Transport, Mounting And Installation
SMEN05 Signal Column System 5. TRANSPORT, MOUNTING AND INSTALLATION Transport On transport handle the SCS products as "fragile" Keep the SCS products packed, until the location and the pre-preparations have been made. Note! Mounting instructions are packed inside the package material. Mounting 5.2.1. -
Page 26: Signal Column
5.2.3. Signal Column The signal Column can be mounted onto a wall, or any flat surface. This can be done by the supplied 2x mounting bracket. The Signal Column may be pre-installed, thus some steps are not required to implement. The recommended mounting procedure is summarized below: If no pre-installation of the Signal Column has been made, see appendix 10.7. -
Page 27: Installation
SMEN05 Signal Column System Installation Caution Before applying voltage to the system, measure the supply voltage if it’s within the specified maximum limits and if all extern cables are properly installed. Note! The basic configuration of the necessary SCS products will be evaluated in this paragraph. Due that the display products only indicate the alarm, the installation procedure is not necessary and therefore not mentioned or illustrated in this paragraph. - Page 28 Install Power Supply Connect the 24 Vdc supply to the specified circuit breaker, note that the circuit breaker must be switched off! Strip the PSU cable. If the cable is shielded, connect shielding to the din-rail. Strip the wires, the recommended length is 15 mm. It is recommended to install a sleeve on the conductor.
- Page 29 SMEN05 Signal Column System Install COM Connection Strip the COM cable (2 or 3 wire cable). If the cable is shielded, connect shielding to the din-rail. Strip the wires, the recommended length is 10 mm. Feed the cables through the holes and mechanical mounting clamps.
-
Page 30: Optional Connect Basic Configuration
5.3.2. Optional Connect Basic Configuration When the Optional Connect basic configuration is being installed, the following procedure is recommended: Preparation Make sure that the display unit (Signal Column or Signal Panel) is mounted Acquire the necessary materials and the necessary tools Open the Signal Column or cabinet where the control unit is present / or will be installed Pre-Installation Make sure that the pre-installation has been executed on the display unit, see appendix... -
Page 31: Commissioning
SMEN05 Signal Column System 6. COMMISSIONING Important Notes Warning During commissioning the safety regulations laid down in chapter 1 shall be observed. The SCS is mounted on a spot where electrical or mechanical dangers may be present. The products of the SCS is supplied from a low voltage source. Caution ... -
Page 33: Operation & Monitoring
SMEN05 Signal Column System 7. OPERATION & MONITORING Control Unit 7.1.1. Settings The settings of the Control Unit can be adjusted by interfacing with the dip-switch S1. By doing so, the Control Unit will change its operation behaviour. To indicate the setting mapping of dipswitch S1, Figure 7.1-1 has been shown below: Figure 7.1-1: Settings mapping on the dipswitch S1 (Control Unit) The settings have the following functionality (or operation behaviour):... -
Page 34: Operation
7.1.2. Operation The Control Unit has several interface possibilities available for the end-user to configure, or monitor. The Control Unit main operation is summarized into the following tasks: Read the provided alarm signals Broadcast the alarm data through the COM network ... -
Page 35: Monitoring
SMEN05 Signal Column System 7.1.3. Monitoring The Control Unit has many indication possibilities to assist the commissioning, or the operation & monitoring use of the device. Several LED’s are placed around the board to indicate the status and the operation. The functionality of these LED’s has been shown in the table below: Function Text LED = ON... -
Page 37: Adjustments
SMEN05 Signal Column System 8. ADJUSTMENTS Control Unit 8.1.1. Disable Output The Control Unit can disable certain alarm outputs per product. When a Control Unit is configured as a slave device (or sub-master), it can disable alarm signals by using the input contacts (X6 & X7). An input can be used to disable the according alarm and this will result in no (power) output control. -
Page 38: Mode
8.1.3. Mode Another configuration for the Control Unit is the adjustment of its mode. The mode configuration indicates the priority level of the alarm signals and the mapping of the local inputs. This can be done by switching the rotary switch S2 to the correct stance. The power outputs of the Control Unit unit are controlled by the highest priority alarm. -
Page 39: Verkehr
SMEN05 Signal Column System 8.1.4. BG-Verkehr The functionality BG-Verkehr has been implemented to comply with the German ship regulation. This means that the Control Unit will operate 3 flashlights and 1 claxon device. To enable this setting, the dipswitch S1 its 2 switch must be set to ON. -
Page 40: Sub-Master
8.1.5. Sub-Master The Control Unit has a special communication option. This option provides the end-user the option to create a second COM network in the existing network. To enable this setting, the dipswitch S1 its 4 switch must be set to ON. See paragraph 7.1.1 for more information about the dipswitch S1. To indicate the COM network structure with a Sub-Master, Figure 2.2-1 in chapter 2 shows a COM network with a sub-master. -
Page 41: Or Nc
SMEN05 Signal Column System 8.1.6. NO or NC It is possible to configure the Control Unit to accept NC contacts. By default, the Control Unit is set to accept NO contacts. To enable this setting, the dipswitch S1 its 3 switch must be set to ON. -
Page 42: Optional Connect
Optional Connect 8.2.1. 9 Alarmfield Configuration The Optional Connect product is designed to control 6 alarmfields of a Signal Column product. In order to control a 9 alarm field signal column, two Optional Connect products must be installed. One Optional Connect product will control the 6 alarm fields, while the second product will control the remaining 3 alarmfields. -
Page 43: Fault Finding / Maintenance / Service
Alarm contact is ON (at Input x), but 1. Adjust the settings to enable the port. If slave/sub-master device won’t 2. Disable setting is set. not solved, contact Marpower trigger alarm 3. NC mode is set. 1. Switch device to mode 0 to enable Optional claxon port won’t trigger on... -
Page 44: Optional Connect
Optional Connect Failure Possible Cause Remedy 1. Cable or wire break 1. Replace cable, check for breaks No alarm symbols turn ON 2. Incorrectly wired 2. Read wiring schematic (see: 5.3.2) 3. 0V not connected 3. Read wiring schematic (see: 5.3.2) Signal Column Read paragraph 9.1 or 9.2 (depending on control type used) for the possible causes. -
Page 45: Appendices
SMEN05 Signal Column System APPENDICES Optional Settings Control Unit The Control Unit houses special settings at the input terminal (X6 & X7). These settings can be configured by using a jumper wire, or an switch to the according inputs. The optional settings on terminal X6 & X7 are displayed below: Purpose The return wire (0V) of a setting... -
Page 46: Fire Mode
More information about the voltage monitoring can be found in sub-paragraph 8.1.1. 10.1.2. Compatibility 21-SCU-1 The new Control Unit can be set to communicate with older Marpower Signal Colum Units products. When doing so, the new Control Unit can communicate with the older 21-SCU-1 devices. The communication of the compatibility COM network is identical to the new COM network. -
Page 47: Control Unit Program Operation
SMEN05 Signal Column System Control Unit Program Operation To give an overview of the program execution, the figure below indicates the operation of the Control Unit. Figure 10.2-1: Control Unit operation overview In the program, many processes and functions are being handled. The functions of the program are mentioned below: Name Function... -
Page 48: Control Unit Network Configurations
Control Unit Network Configurations 10.3.1. Standard Configuration + a slave with Local 1 and Local 2 10-4... -
Page 49: Recommended Alarm Symbol Order
SMEN05 Signal Column System Recommended Alarm Symbol Order As could be seen in sub-paragraph 7.1.2, the Control Unit maps I(x) to O(x). This means that I1 = O1 and therefore the recommended symbol order for a basic 9 field signal configuration has been shown below: Recommended Controls Recommended... -
Page 50: Imo Regulation Symbols
IMO Regulation Symbols The symbols shown in Table 10.5-1 are the (most) applied alarm symbols on the signal column and these symbols will be used in the following chapters: Alarms Color FL Symbol Remarks Emergency Alarms General emergency Green/ White Boat stations for crew Other than machinery... -
Page 51: Mechanical Drawings
SMEN05 Signal Column System Mechanical Drawings 10.6.1. Control Unit & Optional Connect & Signal Panel 10-7... -
Page 52: Signal Column
10.6.1. Signal Column 10-8... -
Page 53: Signal Column With Flashlight
SMEN05 Signal Column System 10.6.1. Signal Column with Flashlight 10-9... -
Page 54: Pre-Installation
Pre-Installation 10.7.1. Signal Column It is recommended that all columns are screwed shut when the Signal Column is being moved. Place the Signal Column on a flat surface / desk Unpack the device and carefully remove any protective sheets or covers on the signal column Do not dispose the protective materials immediately, since they may be needed later Source or collect the needed additional materials The control type, the Control Unit or the Optional Connect... - Page 55 SMEN05 Signal Column System When opened, scan if all the parts are present Install the mounting bracket, by using the mounting holes inside a column With the M4 screws and additional rings Screw the two mounting brackets to the Signal Column (no. alarm field dependent) Check if the bolts are tight enough (>...
- Page 56 10.7.2 for the mounting instructions. 10. Normally a claxon will be installed externally (not on Signal Column), contact Marpower if the claxon must be installed onto the Signal Column for the possible options. 11. Place the according alarm symbols on the light fields.
-
Page 57: Flashlight Frame
SMEN05 Signal Column System 10.7.2. Flashlight Frame The flashlight frame can be installed on the top-side of the Signal Column. Note that during these steps that the Signal Column must be opened Source or collect the needed additional materials A Signal Column A Flashlight Frame The Isolation Rubber 2 x (no. - Page 58 Locate the appropriate lamp location Place the lamp housing (under part) with the provided rubber plate onto the flashlight frame, use the mounting holes for guidance. It is recommended to place first the rubber plate and then the flashlight casing. When positioned, mount the housing When the wires are connected to the lamp feed them through the middle hole in the flashlight frame...
- Page 59 SMEN05 Signal Column System 10. Repeat the steps: 4 – 9 until all flashlights are mounted 11. Install the flashlight frame to the Signal Column Acquire the according screws to mount the flashlight frame to the Signal Column Place an isolation rubber plate between the Signal Column and the flashlight frame Guide the flashlight wire(s) through the rubber gap Guide the wires through the dedicated Signal Column hole, the rubber plate should indicate which hole on the Signal Column will be used to feed the flashlight wires through...
-
Page 60: Signal Panel
10.7.3. Signal Panel When the Signal Panel is being installed, the following procedure is recommended: Preparation Make sure that the display unit (Signal Column or Signal Panel) is or can be mounted Acquire the necessary materials and the necessary tools Open the Signal Column or cabinet where the control unit is present / or will be installed Pre-Installation Make sure that the control device is correctly installed, see sub-paragraph 5.3.1 (22-SCU)
Need help?
Do you have a question about the 22-K Series and is the answer not in the manual?
Questions and answers