Advertisement
Quick Links
Advertisement

Related Manuals for Ralink RT5390BC8


Summary of Contents for Ralink RT5390BC8
- Page 1 802.11b/g/n 1T1R Combo Card RT5390BC8 User’s Manual...
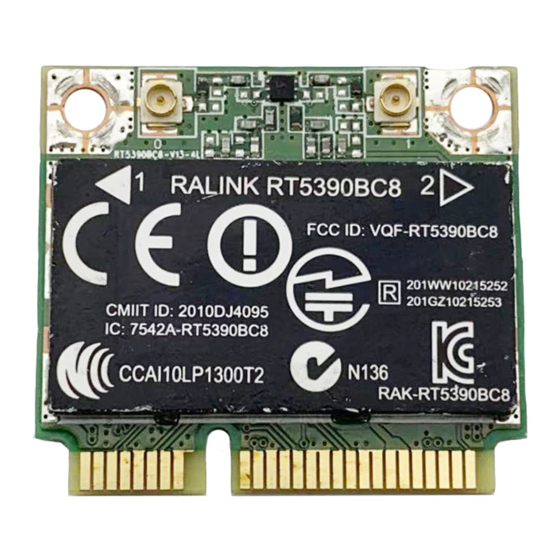
- Page 2 Federal Communication Commission Interference Statement This equipment has been tested and found to comply with the limits for a Class B digital device, pursuant to Part 15 of the FCC Rules. These limits are designed to provide reasonable protection against harmful interference in a residential installation.
- Page 3 This transmitter module is authorized only for use in device where the antenna may be installed such that 20 cm may be maintained between the antenna and users. The final end product must be labeled in a visible area with the following: “Contains FCC ID: VQF-RT5390BC8”. Manual Information To the End User The OEM integrator has to be aware not to provide information to the end user regarding how to install or remove this RF module in the user’s manual of the end product which integrates this module.
- Page 4 IC ID can not be used on the final product. In these circumstances, the OEM integrator will be responsible for re-evaluating the end product (including the transmitter) and obtaining a separate IC authorization. End Product Labeling The final end product must be labeled in a visible area with the following: “Contains TX IC : 7542A-RT5390BC8”.
- Page 5 Manual Information That Must be Included The OEM integrator has to be aware not to provide information to the end user regarding how to install or remove this RF module in the user’s manual of the end product which integrates this module. The end user manual shall include all required regulatory information/warning as show in this manual.
- Page 6 以下警語適用台灣地區 經型式認證合格之低功率射頻電機,非經許可,公司、商號或使用者均不得擅自變更頻率、加大功率或變更原 設計之特性及功能。 低功率射頻電機之使用不得影響飛航安全及干擾合法通信;經發現有干擾現象時,應立即停用,並改善至無干 擾時方得繼續使用。前項合法通信,指依電信法規定作業之無線電通信。低功率射頻電機須忍受合法通信或工 業、科學及醫療用電波輻射性電機設備之干擾。 本模組於取得認證後將依規定於模組本體標示審合格籤,並要求平台上標示「本產品內含射頻模組:ID 編號」...
- Page 7 Hardware Quick Installation Guide Installing the Wireless Mini PCI Express Module 1. Power down the computer. 2. Plug the Wireless PCI Express Minicard Module board to motherboard minicard slot 3. Connect 2 external antennas used I-PEX connector for WiFi antenna. 4.
- Page 8 INTRODUCTION The 11b/g/n 1T1R WLAN Mini Card is a device that allows you connect your computer to a wireless local area network (LAN). A wireless LAN allows your system to use wireless Radio Frequency (RF) technology to transmit and receive data without physically attaching to the network. The Wireless protocols that come with this product ensure data security and isolation from interference generated by other radio frequencies.
- Page 9 You can also use one computer as an Internet Server to connect to a wired global network and share files and information with other computers via a wireless LAN. The Access Point Network The network installation allows you to share files, printers, and Internet access much more conveniently.
- Page 10 SOFTWARE INSTALLATION Install the device 1. Make sure the computer is turned off. Remove the expansion slot cover from the computer. 2. Carefully slide the 11b/g/n 1T1R WLAN Mini Card into the mini PCI slot. Push evenly and slowly and ensure it is properly seated.
- Page 11 There are two modes for you to choose in this screen, either choose WiFi mode or performance mode (TxBurst mode). This mode selection screen is set for the default mode shown in the utility screen, you can still change its mode later in the utility screen. Click Next to continue.
- Page 12 When you are prompted the following message, please click Install to begin the installation.
- Page 13 6. When the following screen appears, click Finish to complete the software installation.
- Page 14 HARDWARE INSTALLATION Verification To verify if the device exists in your computer and is enabled, go to Start > Control Panel > System (> Hardware) > Device Manager. Expand the Network Adapters category. If the 11b/g/n 1T1R WLAN Half Mini Cardis listed here, it means that your device is properly installed and enabled.
- Page 15 NETWORK CONNECTION Once the device driver is well installed, a network setting described in the following should be also established. In Windows 2000/ XP 1. (In Windows 2000) Go to Start Settings Control Panel Network and Dial-up Connections Local Area Connection Properties.
- Page 16 Make sure that all the required components are installed. If any components are missing, click on the Install… button to select the Client/Service/Protocol required. After selecting the component you need, click Add… to add it in. For making your computer visible on the network, make sure you have installed File and Printer Sharing for Microsoft Networks.
- Page 17 IP Address Note: When assigning IP Addresses to the computers on the network, remember to have the IP address for each computer set on the same subnet mask. If your Broadband Router use DHCP technology, however, it won’t be necessary for you to assign Static IP Address for your computer. 1.
- Page 18 After the Wireless adapter has been successfully installed, users can use the included Configuration Utility to set their preference. Go to Start (All) Programs Ralink Wireless Ralink Wireless Utility. You can also open the Configuration Utility by double clicking the icon or right clicking to select Launch Config Utilities.
- Page 19 Intelligent Wireless Utility Profile Profile can book keeping your favorite wireless setting among your home, office, and other public hot-spot. You may save multiple profiles, and activate the correct one at your preference. The Profile manager enables you to Add, Edit, Delete and Activate profiles.
- Page 20 Network The Network page displays the information of surrounding APs from last scan result. The tab lists the information including SSID, Network type, Channel, Wireless mode, Security-Enabled and Signal.
- Page 37 Manual Motorola Bluetooth Version 2.1.2...
- Page 38 Motorola Bluetooth Manual Notices ©2008 Motorola, Inc. 1303 East Algonquin Road Schaumburg, IL 60196 All rights reserved Printed in U.S.A. Proprietary Material Information and software in this document are proprietary to Motorola, Inc. and without the express prior permission of an officer of Motorola, Inc. may not be copied, reproduced, disclosed to others, published, or used, in whole or in part, for any purpose other than that for which it is being made available.
-
Page 39: Installation
Motorola Bluetooth Manual Installation To install Motorola Bluetooth, you’ll need a PC with Microsoft Windows XP with Service Pack 2 operating system or later. If you have installed the previous version of Motorola Bluetooth, de-install it before installation of the new version. To start installation, plug in your Bluetooth dongle (it must be based on CSR Bluetooth chipset) and launch BluetoothSetup.exe from your installation disk –... - Page 40 Motorola Bluetooth Manual Exploring the Bluetooth Environment “My Bluetooth” explorer window provides you with an easy way to explore your Bluetooth environment. There are several ways to open “My Bluetooth” explorer window: • Double-click on the “My Bluetooth” desktop icon •...
- Page 41 Motorola Bluetooth Manual The “My Bluetooth” window, with no devices found, looks like the screenshot below. If it’s the first time you’ve opened a “My Bluetooth” window, there will be no devices found and the “My Bluetooth” window will be empty. Press the “F5”...
- Page 42 Motorola Bluetooth Manual When the tray icon switches from a blue revolving to a blue solid state, it means that device discovery is finished and you can explore the found devices. You can view the “My Bluetooth” window in various ways. The example window below shows device icons in groups arranged by “Device Type.”...
- Page 43 Motorola Bluetooth Manual The “Secure Pairing Request” window will appear, requesting that you enter a secret PIN code to pair with the selected device. V2.1.2...
- Page 44 Motorola Bluetooth Manual Enter any numeric code in the “PIN Code” field and click the “OK” button. This PIN code needs to be repeated on the device you are pairing with. If secret PIN codes entered on the PC and on the device are the same, then the PC with Motorola Bluetooth becomes paired with another Bluetooth device, and a green mark is shown on the icon of the paired device.
- Page 45 Motorola Bluetooth Manual The following sections provide details about particular Bluetooth services usage. If you want to un-pair from an already paired device, right-click on the device icon and select “Unpair” in the context menu. V2.1.2...
- Page 46 Motorola Bluetooth Manual Files Transfer over Bluetooth There are two basic ways to transfer files between your PC and a Bluetooth device: • Using the file transfer folder on a remote device • Using the “send-to” wizard Using File Transfer Folder File transfer folder provides you with the most powerful way of file exchange.
- Page 47 Motorola Bluetooth Manual You can easily explore the device file structure in the explorer window and transfer files between your PC and a device. Using the Send-To Wizard If your Bluetooth device does not have File Transfer Folder, or if you prefer a wizard-like interface, the “Send File to Bluetooth Device”...
- Page 48 Motorola Bluetooth Manual In the “Send to Bluetooth Device” wizard, click the “Browse…” button to select file to be sent to a Bluetooth device. After a file is selected, click “Next” – the transfer process will start with a progress bar appearing on your monitor, indicating the current transfer status.
- Page 49 Motorola Bluetooth Manual When the transfer process is complete, the wizard page will be updated, showing transfer statistics. V2.1.2...
- Page 50 Motorola Bluetooth Manual Click “Finish” to close the “Send File to Bluetooth Device” wizard. When another Bluetooth device initiates file transfer to your PC (for example, using the “Send via Bluetooth” command), the message window will appear where a destination path for incoming files can be selected. V2.1.2...
- Page 51 Motorola Bluetooth Manual After a path is selected, click “Accept” and the file transfer will start. V2.1.2...
- Page 52 Motorola Bluetooth Manual After the file transfer is finished, the window will be updated to remind you where the received file has been saved. V2.1.2...
- Page 53 Motorola Bluetooth Manual Click the “Hide” button to close this window, or the “Open Folder” button to open the folder where the received file was saved. V2.1.2...
- Page 54 Motorola Bluetooth Manual Using Bluetooth Headsets With Motorola Bluetooth, you can use stereo headsets with your PC. Turn on your headset device and wait while Motorola Bluetooth finds it. The headset will be displayed in the “Audio and Video Devices” group. Double-click on the headset device icon in the “My Bluetooth”...
- Page 55 Motorola Bluetooth Manual To connect the headset to your PC, click on the “Connect” button in the “Audio & Video” section of the services view. You may need to perform additional actions on your device to accept connection. (For example, some headsets may require pairing to accept connection.) As soon as connection is established, the service view will be updated to inform you of the established connection.
- Page 56 Motorola Bluetooth Manual Now you can use your headset to listen to music from your PC. Please note: you are allowed to have only one audio connection at a time. If you want to connect to another audio device, you will need to disconnect from the existing audio connection first.
- Page 57 Motorola Bluetooth Manual Using a Bluetooth Mouse and Keyboard With Motorola Bluetooth, you can easily connect and use various Bluetooth devices, such as a mouse, keyboard and other Human Interface devices (such as gaming pads and the like). Turn on your Bluetooth Human Interface and wait while Motorola Bluetooth finds it;...
- Page 58 Motorola Bluetooth Manual Click on “Connect” to establish connection with your device. You may need to perform additional actions on your device to accept the connection (for example, some devices may request you perform pairing before connection is established). After connection is established, the service view is updated to inform you that your device is connected.
- Page 59 Motorola Bluetooth Manual Now you can use your Bluetooth Human Interface device as an ordinary device (keyboard, mouse, etc). To disable a connection with the device, click on the “Disconnect” button. V2.1.2...
- Page 60 Motorola Bluetooth Manual Using a Bluetooth Printer With Motorola Bluetooth, you can easily use your Bluetooth printer. Turn on your Bluetooth printer and wait while Motorola Bluetooth finds it; it will be displayed in the “Printers & Scanners” group. Double-click on the device icon in the “My Bluetooth” explorer window to open the list of services available on this device.
- Page 61 Motorola Bluetooth Manual If your printer supports printing without additional drivers, “Print Files” section will appear in the “Imaging” group in the service you for the printer. To use this capability, just press the “Print…” button to select a file and start printing. Please note that only pictures and simple text documents can be printed with this service.
- Page 62 Motorola Bluetooth Manual Using a Bluetooth Network Most Bluetooth mobile phones provide Bluetooth networking service. Using such services, you can establish a regular TCP/IP networking connection with the device. If the device provides Bluetooth networking services, a “Networking” section will be available in the service view for that device. Click on the “Connect”...
- Page 63 Motorola Bluetooth Manual Using Bluetooth Serial Ports With virtual serial ports, Bluetooth may be used as a cable replacement for legacy applications that need a serial connection to operate. After the virtual serial port is configured, any legacy application may be run on either device, using the virtual serial port as if there was a real serial cable connecting the two devices.
-
Page 64: Personal Information Management
Motorola Bluetooth Manual Personal Information Management Some phones and other devices provide access to contacts and other PIM data over Bluetooth. If the device supports access to PIM data over Bluetooth, a “Data Synchronization” section will be available in the service view for that device. - Page 65 Motorola Bluetooth Manual Controlling and Configuring Motorola Bluetooth With Motorola Bluetooth tray applications, you can easily control and configure your Bluetooth device operation. Motorola Bluetooth tray allows you to: • Open a Motorola Bluetooth user-interface explorer window • Open the folder where files received over Bluetooth are saved •...
-
Page 66: General Settings
Motorola Bluetooth Manual My Bluetooth Settings The “My Bluetooth Settings” setup window is launched with the “My Bluetooth Settings…” command in the Motorola Bluetooth tray application context menu. General Settings The first page in the “My Bluetooth Settings” window is a “General Settings”... -
Page 67: File Transfer Settings
Motorola Bluetooth Manual • Make your PC undiscoverable by other Bluetooth devices by un- checking the “Allow Bluetooth devices to find this computer” option. • Switch on/off connection notification balloons with the “Notify me when other Bluetooth devices want to connect’ option. File Transfer Settings The second page in the “My Bluetooth Settings”... - Page 68 Motorola Bluetooth Manual • Disable/enable receiving objects/files from other Bluetooth devices with the “Enable receiving files from other Bluetooth devices” option. Serial Port Settings The third page in the “My Bluetooth Settings” window is the “Serial Port Settings” page. On this page, you can manage virtual Bluetooth serial ports on your PC. All configured Bluetooth serial ports are shown on this page.
- Page 69 Motorola Bluetooth Manual To add an incoming Bluetooth serial port, click on the “Add…” button. Also, you can remove any Bluetooth serial port (incoming or outgoing) on this page. If you need to remove a Bluetooth serial port, select it from the list and click on the “Remove”...
-
Page 70: Network Settings
Motorola Bluetooth Manual Network Settings The fourth page in the “My Bluetooth Settings” window is the “Network Settings” page. On this page, you can disable/enable Bluetooth Networking capability on your PC. By default, Bluetooth Networking is disabled. So, you need to enable it in order to allow other Bluetooth devices to initiate networking connection to your PC. -
Page 71: Audio Settings
Motorola Bluetooth Manual Audio Settings The fifth page in the “My Bluetooth Settings” window is the “Audio Settings” page. On this page, you can enable/disable Bluetooth audio capability on your By default, Bluetooth Audio is disabled. So, you need to enable it in order to allow other Bluetooth devices to initiate audio connection to your PC. -
Page 72: Language Settings
Motorola Bluetooth Manual Language Settings The sixth page in the “My Bluetooth Settings” window is the “Language Settings” page. On this page, you can explicitly select the language for the Motorola Bluetooth user interface. By default, Motorola Bluetooth tries to select Windows system language for its interface, and, if it is not supported, the English language is selected.
Need help?
Do you have a question about the RT5390BC8 and is the answer not in the manual?
Questions and answers