Table of Contents
Advertisement
Quick Links
Advertisement
Table of Contents

Summary of Contents for Elexa DOME DMWV1
- Page 1 Always Connected. Always Covered. Water Main Shut-Off DMWV1 User Manual...
-
Page 2: Preface
Preface As this is the full User Manual, a working knowledge of Z-Wave automation terminology and concepts will be assumed. If you are a basic user, please visit www.domeha.com for instructions. This manual will provide in-depth technical information about the Water Main Shut-Off, especially in regards to its compli- ance to the Z-Wave standard (such as compatible Command Classes, Associa- tion Group capabilities, special features, and other information) that will help you maximize the utility of this product in your system. -
Page 3: Table Of Contents
Table of Contents Preface ..........................2 Description & Features ..................... 4 Specifications ........................5 Physical Characteristics ....................6 Inclusion & Exclusion ......................7 Factory Reset & Misc. Functions ..................8 Physical Installation ......................9 LED & Button Behavior ....................12 Compatible Command Classes .................. -
Page 4: Description & Features
Description & Features SolidWorks Student Edition. For Academic Use Only. The Dome Water Main Shut-Off is a Z-Wave Plus Certified device that installs over any standard 1/2” to 1-1/2” ball valve, and opens or closes the valve when given a signal. The Water Main Shut-Off consists of three main parts - the “MOTOR ASSEMBLY,”... -
Page 5: Specifications
Specifications Technical Specifications Radio protocol Z-Wave(500 series) Power supply 12VDC Power Consumption 0.13W Working current 35mA Operating temperature 32 - 112 °F Radio frequency 908.4 MHz US Range Up to 150’ depending on environment Dimensions (L x W x H) 2.5”... -
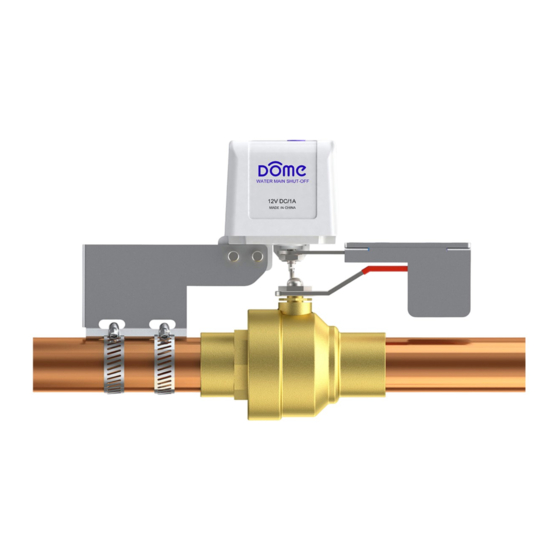
Page 6: Physical Characteristics
Physical Characteristics The names used in Figures 1 & 2 will be used throughout this manual. Please refer to this page as needed. LED Indicator Open/Close Mounting Bracket Button Motor Assembly Control Arm Figure 1 - Main Parts of the Water Main Shut-Off SolidWorks Student Edition. -
Page 7: Inclusion & Exclusion
Inclusion & Exclusion Inclusion 1. For proper inclusion, bring the Water Main Shut-Off to the final location where it will be used. * CAUTION Upon inclusion, the motor will engage and start turning automatically. To avoid serious injury, keep your fingers and hands clear of the CONTROL ARM and its path, only gripping the unit firmly by either the MOUNTING BRACKET or the top of the MOTOR ASSEMBLY 2. -
Page 8: Factory Reset & Misc. Functions
Factory Reset & Misc. Functions Resetting the Water Main Shut-Off Press and hold the open/close button for at least 10 seconds then release. The Shut-Off ’s memory will be erased to factory settings. A flashing light indicates a successful factory reset. Beware that resetting your device will disconnect it from your system. -
Page 9: Physical Installation
Physical Installation Review the Pre-Installation Checklist below to make sure the Water Main Shut-Off can be used for your application. The device should already be included in your Z-Wave system before continuing further. Pre-Installation Checklist 9 The Water Main Shut-Off can be installed on any 1/2” to 1-1/2” brass ball valve 9 Make sure the VALVE HANDLE is comfortably usable by hand prior to installation... - Page 10 Installation Process 1. Make sure the installed valve is comfortably usable by hand before continuing further. 2. Open both HOSE CLAMPS completely so their ends are free, insert both of them into the slots in the MOUNTING BRACKET, and let them hang loosely. 3.
- Page 11 Centers are aligned Figure 6 - Proper Alignment of the Water Main Shut-Off ball valve, and tighten the HOSE CLAMPS until the Shut-Off is completely secure (Figure 5.) 7. Squeeze the CONTROL ARM closed around the valve handle and secure it CAUTION It is absolutely critical that the axes for both the valve and Water Main Shut-Off are aligned.
-
Page 12: Led & Button Behavior
LED & Button Behavior Color Behavior This happens when… …the device is not yet included in a Z-Wave Net- Blink Continuously work. …the device is included in a Z-Wave Network and is Blue On Continuously in the “Closed” position. …the device isincluded in a Z-Wave Network and is Off Continuously in the “Open”... -
Page 13: Compatible Command Classes
Compatible Command Classes Command Class Notes Device Reset Locally V1 (5A) Powerlevel V1 (73) Association Group Information V1 (59) Returned Value: 01 05 00 0F 00 0F 00 Z-Wave Plus Version: 01 Role Type: 05 (Slave — Always On) Z-Wave Plus Info V2 (5E) Node Type: 00 (Z-Wave Plus Node) Installer Icon Type: 0F 00... - Page 14 Command Class Notes Group 1 Group 1 is the “Lifeline” group, which can hold five devices. The Water Main Shut-Off sends this group a Binary Switch Report whenever Association V2 (85) it is turned on or off. The Water Main Shut-Off also sends this group a Device Reset Locally notification to remove itself from the Z-Wave net- work.
-
Page 15: Troubleshooting
Troubleshooting : Q Help! My Water Main Shut-Off paired successfully, but my control- ler can’t see it anymore after I installed it! : A First, make sure your battery didn’t come loose during set-up. Otherwise, the Z-Wave signal is probably weak in that area of your home. Remember that the 120' - 150' range doesn’t take into account walls, furniture, and other obstacles. -
Page 16: Warranty & Support
Household users should contact either the retailer where they Elexa Consumer Products, Inc. (”ECP”) warrants to the original purchased this product, or their government office, for details retail purchaser (”Purchaser”) that the DOME Window/Door of where and how they can take these items for sensor (the “Product”) will be free of defects in materials or...
Need help?
Do you have a question about the DOME DMWV1 and is the answer not in the manual?
Questions and answers