
Summary of Contents for CMi TORQ-HUB
- Page 1 Revision Date: June 2, 2021 Operating Manual Display Operating Manual CONCEPT MEASUREMENT INC. 7” MULTI - TOUCH DISPLAY Phone: (403)340.3466 Email: Info@concept-cmi.com #100-310 Burnt Park Way Red Deer County T4S-2L4...
-
Page 2: Main Screen Functions
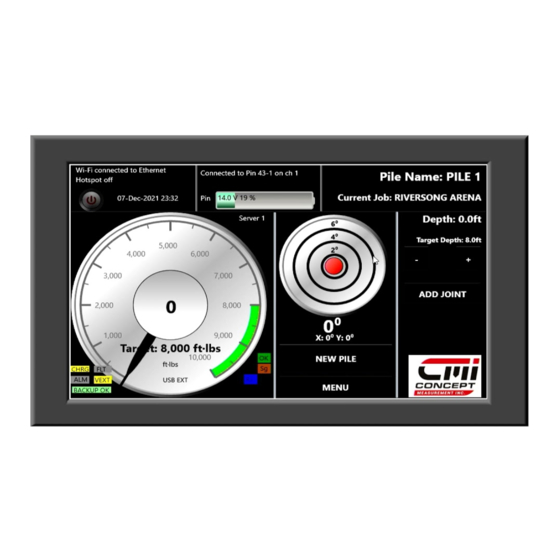
MAIN SCREEN FUNCTIONS THE CMI 7” COLOR DISPLAY AT A GLANCE 1. Date 10. New Pile 2. Pile Name 11. Inclinometer 3. Dial Indicator Live Torque 12. Current Job 4. Change Dial Range or Set Zero Calibration 13. Add Joint 5. - Page 3 NOTE: Before using the Torq-Hub be sure to fully charge the battery inside the hub before starting your job. It should be 16.5 V. When changing the battery be sure to hold the battery connector end and the end of the cable when removing and plugging the battery back in.
- Page 4 CMI 7” Display Operating Guide Connect to Hub. *We suggest before you begin, that you zero any value you see in the left circle by touching within the circle and pushing zero calibration. You can center the bullseye by touching anywhere within...
- Page 5 CMI 7” DISPLAY OPERATING GUIDE Job Creation and Selection 1. Touch MENU 2. Touch JOB MANAGEMENT. The Job Information screen will appear. - Enter job name. - Touch SELECT JOB Note: As many new jobs can be entered as required.
- Page 6 CMI 7” DISPALY OPERATING GUIDE Job Creation and Selection 3. Touch from the main screen. NEW PILE 4. Touch enter the pile name NEW PILE, using the pop-up keyboard. Note: Pile name is a mandatory entry as it appears on your data report when downloaded to the Excel Report.
- Page 7 CMI 7” DISPLAY OPERATING GUIDE Setting Target/Optimum Torque/Torque Range 1. On the main screen, touch anywhere in the circle on the left to zero calibration, then click . This can ZERO CALIBRATION take up to 10 seconds. 2. To set the Torque Range Selector...
- Page 8 CMI 7” DISPLAY OPERATING GUIDE Inclinometer Bull’s Eye Resolution Selector. 1. To zero the bullseye: Touch anywhere on the Inclinometer ball. Touch CENTER BULLSEYE. 2. To set resolution: Use the arrow keys to set resolution. Resolution is the amount of degree that shows on the dial.
- Page 9 CMI 7” DISPLAY OPERATING GUIDE Add Joint. 1.In the event you need to add a joint, touch ADD JOINT. 2. Enter the extended joint length on the on-screen key pad. 3. Click ENTER. Once the joint is added you can use the plus or minus keys to add in one-foot increments.
- Page 10 CMI 7” DISPLAY OPERATING GUIDE Setting Units of Measurement, and Language To set the unit of measurement: 1. Touch MENU. 2. Touch PREFERENCES. 3. Set unit of measurement. 4. Touch SELECT TORQUE UNIT and change to ft./lbs. or N.m. 5. Touch LENGTH UNIT and select ft.
- Page 11 CMI 7” Display OPERATING GUIDE Exporting Piling Jobs NOTE: You can export to USB or email the jobs. 1. Touch MENU. 2. Touch JOB MANAGEMENT. 3. Highlight the job you wish to export, click EXPORT PILES, or you can preview the file.
- Page 12 Exporting Piles Continued. Once you have exported your jobs they can be deleted from the display. 1. Touch JOB MANAGEMENT. 2. Highlight the serial number to blue. 3. Touch DELETE. 4. Enter the password and touch DELETE. NOTE: Once the job has been deleted it cannot be retrieved.
- Page 13 (Apple/ iOS shown). → Settings personal hotspot. Take note of the WiFi password, you will need to enter this into the CMI display later. 2. On display: Touch MENU then touch WIFI NETWORK. 3. Select your smartphone from available WiFi connections (Greg’s iPhone shown here).
- Page 14 (noted above). Once the password is entered the connection will be established and you are ready to email reports from the CMI display. Note: Some email servers are heavily firewalled. If the email does not arrive, this is most likely the cause.
- Page 15 Download Free Phone App 1. Download Concept Torque Viewer from the App Store. This will allow the engineer to see what the operator sees. 2. How to link to the app. On display: Touch MENU. Touch LINK TO PHONE. Start the hotspot. *Remember the number displayed as you will need it later*...
-
Page 16: Troubleshooting
TROUBLESHOOTING The TROUBLESHOOTING screen is used by CMI if you require tech support for software versions or other matters. When you have the Torq-Hub connected, the serial number of the hub is located at the top of the display in the middle. -
Page 17: Warranty Policy
Any claims under this warranty must be made within fourteen (14) days after the buyer learns of the facts upon which claim is based. All claims not made in writing and not received by CMI within the time specified above may be deemed waived. CMI will not be responsible for nor accept any charges for work carried out by out of house repairs, or for charges for spare parts fitted to any CMI products without written approval from CMI. -
Page 18: Returned Goods Policy
CMI reserves the right to determine whether products claimed to be defective shall be inspected when returned to the factory. If judged by CMI to be defective in material or workmanship, the product will be replaced, or a credit issued at the option of CMI. - Page 19 #100-310 Burnt Park Way Red Deer County Alberta Canada, T4S 2L4 PH: (403)340.3466 www.concept-cmi.com A corporate member of: Printed in Canada. Display Operating Manual...
Need help?
Do you have a question about the TORQ-HUB and is the answer not in the manual?
Questions and answers