Table of Contents
Advertisement
Quick Links
D A IK IN ROOM AIR CON D ITI ON E R
OPERATION MANUAL
D A IK IN 空 調 機
使用說明書
M ODEL S
型 號
FTXM41VVLT
FTXM50VVLT
FTXM60VVLT
FTXM71VVLT
[Sticker attachment area]
Attach the SSID&KEY sticker of wireless LAN connecting
adapter to the sticker attachment area and keep safe.
請將無線 LAN 連線轉接器的 SSID&KEY
貼紙貼在貼紙黏貼處,妥善保存。
[貼紙黏貼處]
Advertisement
Chapters
Table of Contents

Related Manuals for Daikin FTXM41VVLT


Summary of Contents for Daikin FTXM41VVLT
- Page 1 D A IK IN ROOM AIR CON D ITI ON E R OPERATION MANUAL D A IK IN 空 調 機 使用說明書 M ODEL S 型 號 FTXM41VVLT FTXM50VVLT FTXM60VVLT FTXM71VVLT [Sticker attachment area] [貼紙黏貼處] Attach the SSID&KEY sticker of wireless LAN connecting adapter to the sticker attachment area and keep safe.
- Page 2 Features Enhanced comfort, energy savings and air cleaning DRY (Dehumidifying) This mode mixes dehumidifi ed cool air with room air to adjust the air outlet temperature and remove moisture. Page 14 INTELLIGENT EYE The INTELLIGENT EYE sensor detects human movement in a room. If no one is in the room for more than 20 minutes, the operation automatically changes to energy saving operation. Page 21 WEEKLY TIMER Up to 4 timer settings can be saved for each day of the week according to your family’s life style. The WEEKLY TIMER allows you to set on/off times and the desired temperature. Page 28 MOLD PROOF The MOLD PROOF function dries the interior of the indoor unit and provides an ideal environment to suppress the generation of mold for the indoor unit. Page 17 FLASH STREAMER AIR CLEANING Flash streamer decomposes mold and allergic substances.
-
Page 3: Table Of Contents
Contents Read Before Operation Safety Precautions .......... Names of Parts ..........Preparation Before Operation ...... Basic Operation AUTO · DRY · COOL · HEAT · FAN Operation ........Adjusting the Airflow Rate ....Adjusting the Airflow Direction ... Useful Functions MOLD PROOF Operation ....FLASH STREAMER AIR CLEANING Operation ....COMFORT AIRFLOW Operation ..INTELLIGENT EYE Operation ... POWERFUL Operation ...... ECONO / OUTDOOR UNIT QUIET Operation ........... -
Page 4: Read Before Operation
Read Before Operation Safety Precautions Read the precautions in this manual carefully This appliance is filled with R32. before operating the unit. • Keep this manual where the user can easily find it. • The precautions described herein are classified as WARNING and CAUTION. They both contain important information regarding safety. Be sure to observe all precautions without fail. WARNING Failure to follow these instructions properly may result in personal injury or loss of life. Failure to observe these instructions properly may result in property damage or personal injury, CAUTION which may be serious depending on the circumstances. Be sure to follow the Be sure to establish an earth Never attempt. instructions. connection. • After reading, keep this manual in a convenient place so that you can refer to it whenever necessary. If the equipment is transferred to a new user, be sure also to hand over the manual. WARNING • Do not use means to accelerate the defrosting process or to clean, other than those recommended by the manufacturer. • The appliance must be stored in a room without continuously operating ignition sources (for example: open flames, an operating gas appliance or an operating electric heater). - Page 5 Read Before Operation • Do not sit on the outdoor unit, put things on the unit, or pull the unit. Doing so may cause accidents, such as falling or toppling down, thus resulting in injury, product malfunctioning, or product damage. • Do not place objects that are susceptible to moisture directly beneath the indoor or outdoor units. Under certain conditions, condensation on the main unit or refrigerant pipes, air filter dirt or drain blockage may cause dripping, resulting in fouling or failure of the object concerned. • After prolonged use, check the unit stand and its mounts for damage. If they are left in a damaged condition, the unit may fall and cause injury. • To avoid injury, do not touch the air inlet or aluminium fins of the indoor or outdoor units. • The appliance is not intended for use by unattended young children or infirm persons. Impairment of bodily functions and harm to health may result. • Children should be supervised to ensure that they do not play with the unit or its remote controller. Accidental operation by a child may result in impairment of bodily functions and harm health. • Avoid impacts to the indoor and outdoor units, or otherwise product damage may result. • Do not place flammable items, such as spray cans, within 1m of the air outlet. The spray cans may explode as a result of hot air from the indoor or outdoor units. • Be careful not to let pets urinate on the air conditioner. Urination on the air conditioner may result in electric shock or fire. • Do not wash the air conditioner with water, as this may result in electric shock or fire. • Do not place water containers (vases, etc.) above the unit, as this may result in electric shock or fire hazards if they should topple over. • Do not insert the batteries in the wrong polarity (+/-) orientation as this may result in short circuiting, fire, or battery leakage. • Do not sit or hang on the panel. The panel may fall, and injury or product malfunctioning may result. • Do not sway the panel. The panel may hit people or objects, and injury or property damage may result. • Do not let children play around the panel. Injury or property damage may result. • Do not pull the wires. The wires may be broken and the panel may fall, and injury or property damage may result.
-
Page 6: Names Of Parts
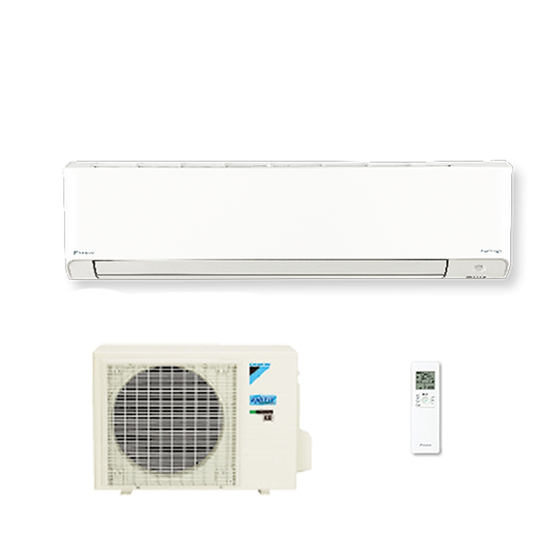
Read Before Operation Names of Parts Indoor Unit Air inlet „ Room temperature Front panel sensor and Room humidity sensor • Sense air temperature and humidity around the unit. „ Streamer air inlet • Air inlet for streamer operation. Air outlet Flaps INTELLIGENT EYE (horizontal blades) sensor Page 16 • Detects the movements of people Louvres (vertical blades) Model name and automatically switches... - Page 7 Read Before Operation „ Open the front panel Backside of the front panel Fixing tab Panel support plate Wireless LAN connecting adapter (inside) Page 7, 34 Streamer unit (inside) Prevents mold and allergens with the decomposition power of the streamer discharge. SSID&KEY sticker of wireless LAN connecting adapter Air filter Air quality filter (enzyme blue with PM2.5) Outdoor Unit * The appearance of the outdoor unit may differ between different models.
- Page 8 請將無線 LAN 連線轉接器的 SSID&KEY 貼紙貼在貼紙黏貼處,妥善保存。 [About the SSID and KEY] • The [SSID] and [KEY] shown on the SSID&KEY sticker are necessary when connecting the air conditioner to a smartphone via wireless LAN. „ Configuration • The user is responsible for providing the following items before using this product: „ Smartphone or tablet (Supported OS versions: Android 4.1.2 or higher; iOS 10.0 or higher. For the latest compatibility http://www.daikinthai.com/product/dmobile/compatible information, refer to the web site at „ Internet line and communicating device (Modem/router or similar device) „ Wireless LAN access point „ Application name: [DAIKIN Mobile Controller] (free) (application version 4.0 or higher is needed to control this product) For details on the installation method for the DAIKIN Mobile Controller application, please see Page 34 Wireless LAN connecting adapter lamp (Orange) • The wireless LAN connecting adapter lamp lights when connecting to a router (Wireless LAN access point). Please see Page 34 Display • For wireless LAN connecting adapter operation,...
- Page 9 Read Before Operation Remote Controller Signal transmitter Display (LCD) Receiver • Displays the current settings. (In this illustration, each section is shown with all its displays on for the • To use the remote controller, aim the purpose of explanation.) transmitter at the indoor unit. If there is anything blocking the signals between the unit and the remote controller, such as a curtain, the unit may not operate. • The maximum transmission distance is TEMPERATURE about 7m. adjustment button • Changes the temperature setting. Page 14 FAN setting button • Selects the airfl ow rate setting. Page 15 ON/OFF button • Press this button once to start operation. Press once again to stop it. Page 13 POWERFUL button and Wireless LAN button...
- Page 10 Read Before Operation Names of Parts „ Open the front cover MODE selector button • Selects the operation mode. (AUTO/DRY/COOL/HEAT/FAN) Page 13 ECONO/QUIET button • ECONO/OUTDOOR UNIT QUIET operation. Page 24 SENSOR button • INTELLIGENT EYE operation. SWING button and Page 21 MENU button SWING button COMFORT button • Adjusts the airfl ow direction. • COMFORT AIRFLOW operation.
-
Page 11: Preparation Before Operation
Read Before Operation Preparation Before Operation CAUTION Incorrect handling of batteries can result in injury from battery leakage, rupturing or heating, or lead to equipment failure. Please observe the following precautions and use safely. • If the alkaline solution from the batteries should get in the eyes, do not rub the eyes. Instead, immediately flush the eyes with tap water and seek the attention of a medical professional. • Keep batteries out of reach of children. In the event that batteries are swallowed, seek the immediate attention of a medical professional. • Do not expose batteries to heat or fire. Do not disassemble or modify batteries. The insulation or gas release vent inside the battery may be damaged, resulting in battery leakage, rupturing, or heating. - Page 12 Read Before Operation Preparation Before Operation „ To set the clock Press “ ” appears on the LCD. “ ” and “ ” blink. Press to set the current day of the week. Display Day of the week Monday Tuesday Wednesday Thursday Friday Saturday Sunday Press “ ” blinks.
- Page 13 Read Before Operation „ To set the brightness of the indoor unit lamps Adjust the brightness of the indoor unit display as desired, or turn OFF the display. „ To set Press and hold the button for 2 seconds. • ‘‘ ” appears on the LCD. • ‘‘ ” (menu number) blinks. Press and select menu number . Press to confi rm the selected setting. Press and select the desired brightness as follows:...
-
Page 14: Basic Operation
Basic Operation AUTO · DRY · COOL · HEAT · FAN Operation The air conditioner operates with the operation mode of your choice. From the next time on, the air conditioner will operate with the same operation mode. „ To start Press and select an operation mode. • Each pressing of the button changes the mode setting in sequence. AUTO COOL HEAT Press • “ ” appears on the LCD. • The OPERATION lamp lights green. Display „ To stop Press again. • “ ” disappears from the LCD. • The OPERATION lamp goes off. NOTE Notes on AUTO operation • In AUTO operation, the system selects an appropriate operation mode (COOL or HEAT) based on the indoor temperature and starts the... - Page 15 Basic Operation „ To change the temperature setting Press • Press to raise the temperature and press to lower the temperature. Each pressing of the button changes the temperature by 0.5°C. COOL HEAT AUTO operation operation operation operation operation The temperature 18.0~32.0°C 10.0~30.0°C 18.0~30.0°C “STD~(STD−3.0°C)” *1, *2 setting cannot be changed. *1 STD (Standard)..Indoor temperature when DRY operation is started. *2 STD (Standard)..“ ” and “ ” appear on the LCD. Dry (Dehumidifying) „ To use Dry (Dehumidifying) mode Press and select DRY operation mode.
-
Page 16: Adjusting The Airflow Rate
Basic Operation Adjusting the Airfl ow Rate You can adjust the airfl ow rate to increase your comfort. „ To adjust the airfl ow rate setting Press • Each pressing of changes the airfl ow rate setting in sequence. AUTO Indoor unit quiet Airflow rate 1-5 (Low to High) • When the airfl ow is set to “ ”, quiet operation starts and noise from the indoor unit will become quieter. • In the quiet operation mode, the airfl ow rate is set to a weak level. • In DRY operation, the airfl ow rate setting cannot be changed. -
Page 17: Adjusting The Airflow Direction
Basic Operation Adjusting the Airfl ow Direction You can adjust the airfl ow direction to increase your comfort. CAUTION • Always use a remote controller to adjust the angles of the fl aps and louvres. − I f you attempt to move the fl aps and louvres forcibly by hand when they are swinging, the mechanism may be damaged. − Inside the air outlet, a fan is rotating at a high speed. „ To start auto swing Up and down airfl ow direction Press • “ ” appears on the LCD. • The fl aps (horizontal blades) will begin to swing. Right and left airfl ow direction Press • “ ... -
Page 18: Useful Functions
Useful Functions MOLD PROOF Operation The inside of the air conditioner is dried to reduce the occurrence of mold and odour. When COOL or DRY operation is performed, condensation may occur inside the air conditioner and may cause mold or odour. It is recommended to dry the inside of the air conditioner using MOLD PROOF operation. [To operate automatically] „ To set Press and hold the button for 2 seconds. Press and select menu number . • “ ” appears on the LCD. • “ ” (menu number) blinks. Press to confi rm the selected setting. Press to change the setting as follows:... - Page 19 Useful Functions NOTE Notes on MOLD PROOF operation • The flaps may sometimes close to increase the drying effect inside the air conditioner. • MOLD PROOF operation may not be performed if the COOL or DRY operation time is short. • If MOLD PROOF operation does not suit your preference, set operation to “OFF”. Page 17 Relation between MOLD PROOF operation and indoor unit lamps Air conditioner MOLD PROOF setting MOLD PROOF lamp STREAMER lamp MOLD PROOF is “ON” Lights up Operating Depends on STREAMER (OPERATION lamp lights up) setting MOLD PROOF is “OFF”...
-
Page 20: Flash Streamer Air Cleaning Operation
Useful Functions FLASH STREAMER AIR CLEANING operation The streamer generates a high-speed electron stream with a high oxidizing power, reducing bad odours and viruses. Together with the air quality fi lter (enzyme blue with PM2.5) and the air fi lters, this function cleans the air in the room. „ To set Press and hold the button for 2 seconds. Press and select menu number . • “ ” appears on the LCD. • “ ” (menu number) blinks. Press to confi rm the selected setting. Press to change the setting as follows: Streamer operation is enabled... -
Page 21: Comfort Airflow Operation
Useful Functions COMFORT AIRFLOW Operation The fl ow of air will be in the upward direction while in COOL/DRY operation and in the downward direction while in HEAT operation, which will provide a comfortable wind that will not come in direct contact with people. Airfl ow direction : Upward Airfl ow direction : Downward (ceiling spread airfl ow) (fl oor spread airfl ow) COOL and DRY operation HEAT operation „ To start Press • “ ” appears on the LCD. COOL and DRY HEAT operation FAN operation operation Flaps direction Goes up Goes down... -
Page 22: Intelligent Eye Operation
Useful Functions INTELLIGENT EYE Operation The INTELLIGENT EYE operation detects human movement. If no one is detected in the room for more than 20 minutes, the unit automatically enters energy saving operation. CAUTION • Do not place large objects near the INTELLIGENT EYE sensor. Also keep heating units and humidifi ers outside the sensor’s detection area. This sensor can detect undesirable objects. • Do not hit or violently push the INTELLIGENT EYE sensor. This can lead to damage and malfunction. „ To start Press • “ ” appears on the LCD. blank Intelligent eye No Setting „ To cancel Press again. • “ ” disappears from the LCD. - Page 23 Useful Functions INTELLIGENT EYE operation is useful for energy saving „ People are detected in the sensing area. „ No people are detected in the sensing area. The air conditioner is in normal operation while The air conditioner will switch to energy-saving mode after the sensor is detecting human movement. 20 minutes. Energy saving operation • If no presence detected in the room for 20 minutes, the energy saving operation will start. • This operation changes the temperature by −2°C in HEAT / +2°C in COOL / +2°C in DRY operation from the set temperature. When the room temperature exceeds 30°C, the operation changes the temperature by +1°C in COOL / +1°C in DRY operation from the set temperature. • This operation decreases the airflow rate slightly in FAN operation only.
-
Page 24: Powerful Operation
Useful Functions POWERFUL Operation POWERFUL operation quickly maximises the cooling (heating) effect in any operation mode. In this mode, the air conditioner operates at maximum capacity. „ To start Press during operation. • “ ” appears on the LCD. • POWERFUL operation ends in 20 minutes. Then the system automatically operates again with the previous settings which were used before POWERFUL operation. „ To cancel Press again. • “ ” disappears from the LCD. NOTE Notes on POWERFUL operation • Pressing causes the settings to be cancelled, and “ ” disappears from the LCD. • POWERFUL operation will not increase the capacity of the air conditioner if the air conditioner is already in operation with its maximum capacity demonstrated. − In COOL, HEAT and AUTO operation To maximise the cooling (heating) effect, the capacity of outdoor unit increases and the airfl ow rate becomes fi xed at the maximum setting. -
Page 25: Econo / Outdoor Unit Quiet Operation
Useful Functions ECONO / OUTDOOR UNIT QUIET Operation ECONO operation enables effi cient operation by limiting the maximum power consumption. This function is useful to prevent the circuit breaker from tripping when the unit operates alongside other appliances on the same circuit. OUTDOOR UNIT QUIET operation lowers the noise level of the outdoor unit by changing the frequency and fan speed of the outdoor unit. This function is convenient during the night-time operation. „ To start Press and select the desired mode. • Each time is pressed, a different setting option appears on the LCD. blank ECONO OUTDOOR UNIT Combination No Setting QUIET „ To cancel Press until no icon is displayed. NOTE Notes on ECONO operation • This operation is performed with lower power and therefore may not provide a suffi cient cooling (heating) effect. -
Page 26: Timer Operation
TIMER Operation ON/OFF TIMER Operation Timer functions are useful for automatically switching the air conditioner on or off at night or in the morning. You can also use the ON TIMER and OFF TIMER together. [ON TIMER with a 24 hour clock display] (24 HOUR ON/OFF TIMER) „ To set • Check that the clock is correct. If not, set the clock to the present time. Page 11 Press “ ” appears on the LCD. “ ” blinks. • “ ” and day of the week disappear from the LCD. Press until the time setting reaches the point you like. - Page 27 TIMER Operation [OFF TIMER with a 24 hour clock display] (24 HOUR ON/OFF TIMER) „ To set • Check that the clock is correct. If not, set the clock to the present time. Page 11 Press “ ” appears on the LCD. “ ” blinks. • “ ” and day of the week disappear from the LCD. Press until the time setting reaches the point you like. • Each pressing of either button increases or decreases the time setting by 10 minutes. Holding down either button changes the time setting rapidly. Press again.
- Page 28 TIMER Operation ON/OFF TIMER Operation [ON/OFF TIMER with an hours remaining display] (COUNT UP-DOWN ON/OFF TIMER) • Check that the clock is correct. If not, set the clock to the present time. Page 11 Press and hold for about 5 seconds, when signal indicater ( ) blink, release your fi nger from the button. For ON TIMER “ ...
-
Page 29: Weekly Timer Operation
TIMER Operation WEEKLY TIMER Operation Up to 4 timer settings can be saved for each day of the week. This is convenient to adapt the WEEKLY TIMER to your family’s life style. „ Setting example of the WEEKLY TIMER The same timer settings are used from Monday through Friday, while different timer settings are used for the weekend. [Monday] Make timer settings for programmes 1-4. Page 29 Programme 1 Programme 2 Programme 3 Programme 4 25.0°C 27.0°C 6:00 8:30 17:30 22:00 [Tuesday] Use the copy mode to make settings for Tuesday to Friday, because these settings are the same as those for Monday. Page 31 [Friday] Programme 1 Programme 2 Programme 3 Programme 4... - Page 30 TIMER Operation WEEKLY TIMER Operation „ To use WEEKLY TIMER operation Setting mode • Make sure the day of the week and time are set. If not, set the day of the week and time. Page 11 Programme 1 Programme 2 Programme 3 Programme 4 [Monday] 25.0°C 27.0°C 6:00 8:30 17:30 22:00 Setting Displays Day and number ON/OFF Time Temperature Press • The day of the week and the reservation number of the current day will be displayed. • 1 to 4 settings can be made per day.
- Page 31 TIMER Operation Press to select the desired time. • The time can be set between 0:00 and 23:50 in 10-minute intervals. • To return to the ON/OFF TIMER mode setting, press • Proceed to STEP when setting the OFF TIMER. Press • The time will be set. • “ ” and the temperature blink. Press to select the desired temperature. • The temperature can be set between 10.0°C and 32.0°C. COOL or AUTO: The unit operates at 18.0°C even if it is set to 10.0°C to 17.0°C. Page 14 HEAT or AUTO: The unit operates at 30.0°C even if it is set to 31.0°C to 32.0°C. Page 14 • To return to the time setting, press • The set temperature is only displayed when the mode setting is on. Press • The temperature will be set and go to the next reservation setting. • The temperature is set while in ON TIMER operation, and the time is set while in OFF TIMER operation. • The next reservation screen will appear. • To continue further settings, repeat the procedure from STEP Press to complete the setting. • Be sure to direct the remote controller toward the indoor unit and check for a receiving tone and blinking of the OPERATION lamp.
- Page 32 TIMER Operation WEEKLY TIMER Operation Copy mode • A reservation made once can be copied to another day of the week. The whole reservation of the selected day of the week will be copied. Programme 1 Programme 2 Programme 3 Programme 4 [Monday] 25.0°C 27.0°C 6:00 8:30 17:30 22:00 COPY Programme 1 Programme 2 Programme 3 Programme 4 [Tuesday] 25.0°C 27.0°C [Friday] 6:00 8:30 17:30 22:00 Setting Displays Confi rmation...
- Page 33 TIMER Operation „ Confi rming a reservation • The reservation can be confi rmed. Setting Displays Normal Confi rmation Press • The day of the week and the reservation number of the current day will be displayed. Press to select the day of the week and the reservation number to be confi rmed. • Pressing displays the reservation details. • To change the confi rmed reserved settings, select the reservation number and press The mode is switched to setting mode. Proceed to Setting mode STEP Page 29 Press to exit the confi rmation mode.
- Page 34 TIMER Operation WEEKLY TIMER Operation „ To delete a reservation An individual reservation Press • The day of the week and the reservation number will be displayed. Press to select the day of the week and the reservation number to be deleted. Press • “ ” and “ ” or “ ” blink. Press until no icon is displayed. • Pressing changes the ON/OFF TIMER mode in sequence.
-
Page 35: System Control Via Smart Control
Web site: For more information on the latest version of wireless LAN control, please refer to the above website. „ Application software installation • Before downloading the application software for installation, please read ‘‘Configuration” on Page 7 For Android phones 1) Open [Google Play]. 2) S earch using the application name: [DAIKIN Mobile Controller]. 3) Follow the on-screen instructions for installation. For iOS phones 1) Open [App Store]. 2) S earch using the application name: [DAIKIN Mobile Controller]. 3) Follow the on-screen instructions for installation. „ Setting Connect the wireless LAN connecting adapter to your home network. - Page 36 System control via Smart Control Wireless LAN connection Enabling/disabling the wireless LAN connecting adapter „ To enable While operation is stopped, press and hold the button for 5 seconds. • “ ” appears on the LCD. • “ ” (SP menu) blinks. Press and select SP menu . Press to confi rm the selected setting.
- Page 37 NOTE. Press to return to the default screen. Connect your smart phone to your home network. Open the Home screen of the DAIKIN Mobile Fig. 1 Controller application. The air conditioner will be listed there (Fig. 1). NOTE Note on simple connection (WPS connection) • If you fail to connect (the wireless LAN connecting adapter lamp (orange) continues to blink), repeat steps 1-5.
- Page 38 • The wireless LAN connecting adapter lamp (orange) stays lit. If you fail to connect, refer to NOTE. Connect your smart phone to your home network. Open the Home screen of the DAIKIN Mobile Controller application. The air conditioner will be listed there. Fig. 2 Reset connection setting to factory defaults.
-
Page 39: Care
Care Care and Cleaning CAUTION • Before cleaning, be sure to stop the operation and turn off the circuit breaker. • Do not touch the aluminum fi ns of the indoor unit. If you touch those parts, this may cause an injury. „ Quick reference Cleaning parts Front panel • Wipe it with a soft damp cloth. • Only neutral detergent may be used. Streamer air inlet If dirty • Do not place objects around the indoor unit. Doing so may have an adverse infl uence on the performance, product quality, and life of the streamer. Air fi lter • Vacuum dust or wash the fi lter. Air quality fi lter (enzyme blue with PM2.5) Once every 2 weeks To purchase the fi lters (Table 1) or to purchase the another type, contact the... - Page 40 Care Care and Cleaning „ Air fi lter Open the front panel. Wash the air fi lters with water or clean them with • Hold the front panel by the sides and open it. vacuum cleaner. Backside of the front panel • It is recommended to clean the air fi lters every 2 weeks. Fixing tab Panel support plate If the dust does not come off easily • Wash the air fi lters with neutral detergent thinned with lukewarm water, then dry them up in the shade.
- Page 41 Care „ Filter (small) * For the applicable filter type, please refer to Page 38 Attaching Clean or replace. [Cleaning] Open the front panel and pull out the air filters. Deodorizing filter (enzyme blue) : Blue Page 39 / Titanium apatite deodorizing filter : Insert the filter. Blue-Black • Check that the filters are inserted securely under the tabs.
- Page 42 Care Care and Cleaning „ Prior to a long period of non-use Operate the MOLD PROOF mode. Page 17 After operation stops, turn off the circuit breaker for the room air conditioner. Clean the air filters and reattach them. Page 39 To prevent battery leakage, take out the batteries from the remote controller.
-
Page 43: When The Need Arises
When the Need Arises Indoor unit The flaps do not start swinging immediately. • T he air conditioner is adjusting the position of the flaps. The flaps will start moving soon. The air conditioner stops generating Different sounds are heard. airflow during HEAT operation. „ A sound like flowing water • Once the set temperature is reached, the airflow rate is • T his sound is generated because the refrigerant in reduced and operation stopped in order to avoid the air conditioner is flowing. -
Page 44: Troubleshooting
When the Need Arises Troubleshooting Before making an inquiry or a request for repair, please check the following. If the problem persists, consult your dealer. Not a problem Check This case is not a problem. Please check again before requesting repairs. Air conditioner The air conditioner does not operate Case Description / what to check • Has the circuit breaker been tripped or the fuse blown? OPERATION lamp is off. • Is there a power failure? • Are batteries set in the remote controller? • Turn off the power with the circuit breaker and restart operation with the remote controller. OPERATION lamp is blinking. If the OPERATION lamp is still blinking, check the error code and consult your dealer. - Page 45 When the Need Arises Air conditioner Mist comes out Case Description / what to check • This happens when the air in the room is cooled into mist by the cold airfl ow during COOL Mist comes out of the indoor unit. or other operation. Remote controller Case Description / what to check • The batteries may be exhausted. Replace both batteries with new dry batteries AAA.LR03 (alkaline). Page 10 For details, refer to “Preparation Before Operation”. The unit does not receive signals from the remote controller or has • Signal communication may be disabled if an electronic-starter-type fl uorescent lamp...
- Page 46 • There may be a problem with your device. Please contact the store where you bought the air conditioner to request a repair service. • Refer to the FAQ on: None of the above work. http://www.daikinthai.com/product/dmobile For instructions about how to operate the DAIKIN Mobile Controller application, please refer to the operation manual at http://www.daikinthai.com/product/dmobile „ Call your dealer immediately WARNING When an abnormality (such as a burning smell) occurs, stop operation and turn off the circuit breaker. • Continued operation in an abnormal condition may result in problems, electric shock or fi re.
- Page 47 When the Need Arises „ Fault diagnosis by remote controller • In case the air conditioner is malfunctioning, you can check the error code via the remote controller before consulting with service personnel and informing them of the malfunction code. When is held down for about 5 seconds, “ ” blinks in the temperature display section. Press repeatedly until a long beep is produced. • The code indication changes as shown below, and notifi es you with a long beep. CODE MEANING NORMAL...
- Page 48 功能 舒適升級、節能與空氣清淨 的第一選擇 除濕 該模式混合除濕後的冷空氣與室內空氣,以調整出風口溫度 並除去濕氣。 第 14 頁 智慧眼 智慧眼感應器探測室內人的活動。 如果室內超過 20 分鐘無人,空調會自動轉入節能模式。 第 21 頁 週間定時 一周中,每天可最多保存 4 次定時設置, 視您的家庭生活方式而定。週間定時使您能夠設定開/關時間 與希望的溫度。 第 28 頁 防黴 防黴功能對室內機的內部進行除濕,同時提供理想的環境以 抑制室內機上黴菌的生成。 第 17 頁 閃流空氣清淨 閃流技術能分解黴菌及過敏原, 讓室內及空調機內部的空氣保持潔淨,營造舒適環境。 第 19 頁 其他功能 舒適 室外機靜音...
- Page 49 目錄 運轉前須知 安全注意事項 ..........各部位名稱 ............ 運轉前準備 ..........運轉操作 自動.除濕.冷氣.暖氣.送風 運轉 ........... 調節風量 ........... 調節風向 ........... 有用的功能 防黴運轉 ........... 閃流空氣清淨運轉 ......舒適氣流運轉 ........智慧眼運轉 ........強力運轉 ........... 省電 / 室外機靜音運轉 ....定時器運轉 定時開/關運轉 ........週間定時運轉 ........透過「智能控制」進行系統控制 無線 LAN 連線 ........
-
Page 50: 安全注意事項
運轉前須知 安全注意事項 操作本機前請閱讀本說明書中的注意事項。 本裝置中充有 R32。 • 請將此手冊放在使用者易於取閱處。 • 此處所述的注意事項分為警告和注意兩級。其均包含重要安全資訊。請務必嚴格遵守所有注意事項。 警告 如不嚴格遵守這些說明可能導致受傷或失去生命。 注意 如不嚴格遵守這些說明可能導致財產損失或人員受傷,危險程度視具體情況而定。 嚴格禁止。 請嚴格按指令操作。 務必妥善接地。 • 閱讀完畢後,請將本手冊保存在需要時可方便隨時取閱的地方。如果將裝置轉讓給新使用者,務必將本手 冊一併轉交。 警告 • 除生產商所建議的方法之外,請勿用其他方法加速除霜過程或進行清潔。 • 不得將裝置存放在有持續工作的點火源的房間中 (例如:明火、使用中的瓦斯用具或電熱器)。 • 請勿打孔或點燃。 • 請注意:冷媒可能是無味的。 • 本電器必須安裝、操作及存放於地面面積大於 1.9m 機型 FTXM41, 3.5m 機型 FTXM50/60, 3.9m 機型 FTXM71 的房間內。... - Page 51 運轉前須知 • 請勿坐在室外機上、在機體上放置物體或拉機體。否則可能引起事故,如掉落或倒塌,從而導致受傷、產品功 能異常或損壞。 • 請勿將易於受潮的物體直接放在室內機或室外機下方。在某些情況下,主機或冷媒管上的結露、濾網上的灰塵 或堵塞的排水可能掉落,弄髒相關物體或使其功能異常。 • 長時期使用後,請檢查機體底座及其固定架有無損壞。如發現損壞而放任不管,則機體可能掉落而引起受傷。 • 為避免受傷,請勿觸碰室內機或室外機的進風口或鋁制鱗片。 • 本裝置不供幼兒及身心虛弱者在無人監護的情況下使用。否則可能損傷身體機能並有損健康。 • 孩童使用時應有人監護以確保其不將機體及其遙控器用於玩耍。孩童無意操作可能引起身體機能及健康受損。 • 避免撞擊室內機和室外機,否則可能導致產品損壞。 • 請勿將易燃物品,如噴霧器,置於出風口 1m 以內。 噴霧器可能因室內機或室外機生成的熱空氣而發生爆炸。 • 小心勿讓寵物在空調機上小便。在空調機上小便可能造成觸電或火災。 • 請勿用水清洗空調機,否則可能引起觸電或火災。 • 請勿將貯水容器(花瓶等)放於機體上方,否則一旦其翻倒則可能引起觸電或火災。 • 電池放入時應避免極性 (+/-) 錯誤,否則可能導致短路、失火或漏液。 • 切勿坐在或懸掛在蓋板上。蓋板可能會掉落,進而導致人身傷害或產品故障。 • 切勿晃動蓋板。蓋板可能擊中人員或物品,進而導致人身傷害或財物損壞。 • 切勿讓兒童在蓋板附近玩耍。可能會導致人身傷害或財物損壞。 • 切勿拉扯電線。電線會損壞,且蓋板可能會掉落,進而造成人身傷害或財物損壞。 • 切勿在行進路線中放置障礙物。蓋板可能掉落,進而導致人身傷害或財物損壞。...
-
Page 52: 各部位名稱
運轉前須知 各部位名稱 室內機 進風口 „ 室溫感應器及室 前面板 內濕度感應器 • 該感應器能感應空調 機周圍的空氣溫度及 濕度。 „ 閃流進風口 • 閃流運轉的進風口。 出風口 上下葉片(水平活頁) 智慧眼感應器 • 該感應器能探測人員活動, 第 16 頁 並自動在正常運轉及節能運 機型 葉片(左與右) 轉之間切換。 • 左右葉片在出風口的內部。 第 21, 22 頁 第 16 頁 顯示 閃流指示燈(綠色) 防霉指示燈(綠色) 第... - Page 53 運轉前須知 „ 打開前面板 上部前面板的背面 固定卡榫 面板支撐板 無線 LAN 連線轉接器 (內部) 第 7, 34 頁 閃流組件(內部) 閃流放電的強大分解力能去 除黴菌及過敏原。 無線 LAN 連線轉接器 SSID&KEY 貼紙 濾網 空氣清淨濾網(藍色酵素+PM 2.5) 室外機 * 各型號的室外機外觀可能不同。 進風口 室外溫度感應器(背面) (背面和機器右側) 冷媒管道與機器間佈線 接地端子 (內側) 出風口 排水軟管...
- Page 54 運轉前須知 各部位名稱 無線 LAN 連線轉接器 無線 LAN 連線轉接器必須搭配 DAIKIN Mobile Controller 應用程式使用,才能讓智慧型手機或平板電腦連 上區域網路並控制空調機。 注意 • 請將貼紙貼在使用說明書封面的貼紙黏貼處(如下圖所示),妥善保存: SSID 及 KEY 貼紙範例 [Sticker attachment area] [貼紙黏貼處] Attach the SSID&KEY sticker of wireless LAN connecting adapter to the sticker attachment area and keep safe.
- Page 55 運轉前須知 遙控器 訊號發送部位 顯示(LCD 液晶顯示螢幕) 訊號接收部 • 顯示當前設定。 (為方便說明,在本圖中每個設 定部份都被顯示出來。) • 如需使用遙控器,請將訊號發 送部位對準室內機。如果空調 機與遙控器之間有阻礙訊號的 物件,如窗簾等,空調機則不 會響應訊號。 • 訊號傳遞的最大距離約為 7 米。 溫度」調節按鈕 • 更改溫度設定。 第 14 頁 風量」設定按鈕 • 選擇風量設定。 第 15 頁 開/關」按鈕 • 按此按鈕一次可啟動運轉。 再按一次則停止運轉。 第 13 頁 強力運轉」按鈕及 無線...
- Page 56 運轉前須知 各部位名稱 „ 打開前蓋板。 模式」選擇按鈕 • 用於選擇運轉模式。 (自動˙除濕˙冷氣˙暖氣˙送風) 第 13 頁 省電運轉/靜音」按鈕 • 省電運轉/室外機靜音 運轉。 第 24 頁 智慧眼」按鈕 擺動」按鈕及 • 智慧眼運轉。 功能表」按鈕 第 21 頁 擺動」按鈕 • 調整風向。 舒適」按鈕 第 16 頁 • 舒適氣流運轉。 功能表」按鈕(長按 2 秒) 第 20 頁 • 調整顯示器亮度。...
-
Page 57: 運轉前準備
運轉前須知 運轉前準備 注意 若未正確處理電池,電池可能漏液、破裂或發熱,導致人員受傷或設備故障。 請遵守以下注意事項,確保使用安全。 • 萬一鹼性溶液不慎進入眼睛,切勿搓揉。請立刻用自來水沖洗眼睛,然後儘速就醫。 • 將電池存放在兒童無法取得之處。若不慎吞入電池,應立刻就醫。 • 切勿讓電池暴露於高溫或火源下。切勿拆解或改造電池。電池內的絕緣體或排氣孔可能受損,導致電池漏液、 破裂或發熱。 • 切勿損毀或剝除電池表面的標籤。 „ 安裝電池的步驟 1. 滑動前蓋板,將其取下。 – 和 的 位置要放對! 2. 裝入 2 顆 AAA. LR03 乾電池(鹼性)。 3. 打開前蓋板。 „ 將遙控器架固定在牆上 1. 選擇一個訊號能夠傳送到空調機的地方。 2. 使用配件組中的螺絲將支架固定到牆壁、柱子或類似位置上。 3. 將遙控器放置在遙控器架上。 遙控器 „... - Page 58 運轉前須知 運轉前準備 „ 設置時鐘的步驟 按下 。 」出現在 LCD 液晶顯示幕上。 」與「 」會閃爍。 按下 來設定當前日為星期幾。 顯示 一星期的日子 星期一 星期二 星期三 星期四 星期五 星期六 星期日 按下 。 「 」閃爍。 按下 將時鐘設置為當前時刻。 • 按住 或 會快速增加或減小時間顯示值。 按下 。 • 按下按鈕時,請將遙控器對準室內機。 「 」閃爍。 註 關於時鐘設定的注意事項 • 如果室內機的內部時鐘未設置到正確的時刻,「定時開啟」、「定時關閉」與「週間定時」功能將不能準時運作。...
- Page 59 運轉前須知 „ 設定室內機指示燈的亮度 將室內機顯示器調成您想要的亮度,或關閉顯示器。 „ 設定 長按 按鈕 2 秒。 • 「 」出現在 LCD 液晶顯示幕上。 • 「 」(選單編號) 閃爍。 按 或 ,選擇功能表編號 。 按 確認您所選擇的設定。 按 或 ,按照以下方式選擇您想要的亮度: 亮度:高(預設) 亮度:低 亮度:關 再按一下 。 • 亮度將設為您所選擇的設定值。 按 回到預設螢幕。 註 關於室內機指示燈亮度設定的注意事項 • 顯示器會在 60 秒後自動回到預設螢幕。若要更快回到預設螢幕,請按兩下 。...
-
Page 60: 自動˙除濕˙冷氣˙暖氣˙送風運轉
運轉操作 自動˙除濕˙冷氣˙暖氣˙送風運轉 空調會以您選擇的運轉模式運轉。 下次啟動時,空調即以與本次相同的運轉模式運轉。 „ 開始 按下 並選擇運轉模式。 • 每按一次按鈕,運轉模式就會依順序改變一次。 除濕 冷氣 暖氣 送風 自動 按下 。 • 「 」 出現在 LCD 液晶顯示幕上。 • 運轉指示燈亮綠色。 顯示 „ 停止 再次按下 。 • 「 」從 LCD 液晶顯示屏上消失。 • 運轉指示燈熄滅。 註 自動運轉備註事項 • 在自動運轉時,系統根據室內與室外溫度選擇合適的運轉模式(冷氣或暖氣)並啟動運轉。 • 系統每隔一段固定時間會自動重新選擇設定,以使室內溫度達到使用者設定的溫度。 冷氣運轉備註事項... - Page 61 運轉操作 „ 更改溫度設定的步驟 按下 。 • 按下 來提高溫度,按下 來降低溫度。 每按一下按鈕,溫度改變 0.5℃。 冷氣運轉 暖氣運轉 自動運轉 除濕運轉 送風運轉 *1, *2 18.0~32.0℃ 10.0~30.0℃ 18.0~30.0℃ “STD~(STD-3.0℃ )" 溫度設定不可改變。 *1 STD (標準)..除濕運轉開始時的室內溫度。 *2 STD (標準)..「 」與「 」出現在 LCD 液晶顯示幕上。 除濕 „ 使用除濕模式 按下 並選擇除濕運轉模式。 • 「...
-
Page 62: 調節風量
運轉操作 調節風量 您可調節風量來提高舒適度。 „ 調節風量設定 按 。 • 每按一下 可依下列順序改變風量。 自動 室內機靜音 風量 1-5(由低至高) • 當風量被設定為「 」時,將啟動室內機靜音運轉,則空調機產生的噪音 就會變小。 • 在靜音運轉模式下,風量會設為弱。 • 在除濕運轉時,風量設定不可改變。 • 若冷氣 / 除濕運轉一開始的風量設定為「自動」,則室內機會先除臭, 抑制內部任何異味。因此,室內機不會立刻出風。(請稍待約 1 分鐘。) • 當風量較小時,冷氣(暖氣)效果也會較弱。 節能小常識 溫度設定適中有助於節能。 • 建議的溫度設定冷氣模式:26.0-28.0℃, 暖氣模式:20.0-24.0℃ 。 用百葉窗或窗簾遮掩窗戶。 • 防止陽光及空氣進入室內可加強冷房(暖房)效果。 保持空氣濾網乾淨。... -
Page 63: 調節風向
運轉操作 調節風向 您可調節風向來提高舒適度。 注意 • 請務必使用遙控器來調節上下葉片與左右葉片的角度。 - 如果在上下葉片與左右葉片擺動時嘗試用手移動葉片,機械裝置可能會損壞。 - 在出風口內部有風扇正以高速旋轉。 „ 開始自動搖擺 上風向與下風向 按 。 • 「 」出現在 LCD 液晶顯示幕上。 • 上下葉片(水平活頁)將開始擺動。 右風向與左風向 按 。 • 「 」出現在 LCD 液晶顯示幕上。 • 葉片(左與右)將開始擺動。 3D 立體風向 按下 與 。 • 「 」與「 」出現在... -
Page 64: 防黴運轉
有用的功能 防霉運轉 空調機內部會變得乾燥,以抑制黴菌及異味滋生。 在冷氣或除濕運轉中,空調機內部可能凝結水氣,進而發霉或發臭。 建議您使用防霉運轉,以便去除空調機內部的濕氣。 [自動運轉] „ 設定 長按 按鈕 2 秒。 按 或 ,選擇功能表編號 。 • 「 」出現在 LCD 液晶顯示幕上。 • 「 」(選單編號) 閃爍。 按 確認您所選擇的設定。 按 或 變更設定如下: 自動運轉停用(預設) 自動運轉啟用 再按一下 。 • 自動防霉運轉將根據您選擇的設定啟用或停用。 • 若自動防霉運轉啟用,則「 」會出現在 LCD 螢幕上。當防霉運轉正在進 行時,防霉指示燈會亮綠燈色。... - Page 65 有用的功能 註 關於防霉運轉的注意事項 • 上下葉片有時會關上,以加強空調機內部的除濕效果。 • 若冷氣或除濕運轉的時間很短,防霉運轉可能不會啟動。 • 若防霉運轉不符合您的需要,請設為「關」。 第 17 頁 防霉運轉與室內機燈號的關聯 空調機 防霉設定 防霉指示燈 閃流指示燈 防霉「開」 恆亮 運轉中 取決於閃流設定 (運轉指示燈恆亮) 防霉「關」 熄滅 未運轉 防霉「開」 恆亮 恆亮 (運轉指示燈熄滅)
-
Page 66: 閃流空氣清淨運轉
有用的功能 閃流空氣清淨運轉 閃流組件會產生具有高度氧化能力的高速電子流,分解異味分子及有 害病毒。搭配空氣品質濾網(藍色酵素+PM2.5)及空氣濾網使用, 該功能可以讓室內空氣變得乾乾淨淨。 „ 設定 長按 按鈕 2 秒。 按 或 ,選擇功能表編號 。 • 「 」 出現在 LCD 液晶顯示幕上。 • 「 」(選單編號) 閃爍。 按 確認您所選擇的設定。 按 或 變更設定如下: 閃流運轉啟用(預設) 閃流運轉停用 再按一下 。 • 閃流空氣清淨運轉將根據您選擇的設定啟用或停用。 • 若閃流運轉啟用,則「 」會出現在 LCD 螢幕上。 當閃流空氣清淨運轉開始時,閃流指示燈會閃綠色。... -
Page 67: 舒適氣流運轉
有用的功能 舒適氣流運轉 在冷氣/除濕運轉中,風向將會向上,而在暖氣運轉中,風向則會向下, 這樣就能實現一種不會直吹人體的舒適風。 風向:上吹 風向:下吹 (藉由天花板擴散氣流) (藉由地板擴散氣流) 冷氣及除濕運轉 暖氣運轉 „ 開始 按 。 • 「 」出現在 LCD 液晶顯示幕上。 冷氣及除濕運轉 暖氣運轉 送風運轉 上下葉片方向 向上 向下 不可用 風量 自動 „ 取消 再按一下 按鈕。 • 「 」從 LCD 液晶顯示幕上消失。 • 上下葉片將回到舒適氣流運轉之前的記憶位置。 註 有關舒適氣流運轉的注意事項... -
Page 68: 智慧眼運轉
有用的功能 智慧眼運轉 智慧眼運轉會偵測人員動態並調整左右風向。設定時可讓風向不直接 對人吹,也可直接對人吹。如果室內超過 20 分鐘沒有偵測到人, 空調機會自動進入節能模式。 注意 • 請勿在智慧眼感應器附近放置大型物體。此外,請將暖氣機及加濕器移出感應器偵測 區域。感應器可能會偵測到預期之外的物體。 • 切勿撞擊或猛壓智慧眼感應器。這會導致損壞和故障。 „ 開始 按下 。 • 「 」出現在 LCD 液晶顯示幕上。 空白 智慧眼 未設定 „ 取消 按下 按鈕。 • 「 」從 LCD 液晶顯示幕上消失。... - Page 69 有用的功能 智慧眼有助於節能 „ 在感測區域內檢測到有人。 „ 在感測區域內未檢測到有人。 雖然傳感器檢測到有人移動,但空調機仍然正常運作。 空調會在 20 分鐘之後切換到節能模式。 節能運轉 • 如果室內 20 分鐘探測不到人員活動,將啟動節能運轉。 • 這一運轉模式會將溫度從設定溫度更改為暖氣運轉降低 2℃,冷氣運轉增加 2℃,除濕運轉增加 2℃。 當室溫超過 30℃ 時,這一運轉模式會將溫度從設定溫度更改為冷氣運轉增加 1℃,除濕運轉增加 1℃。 • 在送風運轉中,這一運轉模式僅會略微降低風量。 註 關於智慧眼運轉的注意事項 • 適用範圍如下。 垂直角度 90° 水平角度 110° (側視) (俯視) 55° 55° 90° • 即使這些區內有人,空調機也可能切換到節能模式。...
-
Page 70: 強力運轉
有用的功能 強力運轉 在任何運轉模式下,強力運轉都會迅速將冷氣(暖氣)效果提升到 最大。您可以達到最大空調能力。 „ 開始 在運轉時按下 。 • 「 」出現在 LCD 液晶顯示幕上。 • 強力運轉會在 20 分鐘後結束。此時,系統會自動切回強力運轉之前的運轉 設定。 „ 取消 再按一下 按鈕。 • 「 」從 LCD 液晶顯示幕上消失。 註 關於強力運轉的注意事項 • 按 會取消設定,而「 」會從 LCD 液晶顯示幕上消失。 • 如果空調已經以其經過驗證的最大能力運轉,強力運轉將不會提高空調能力。 - 在冷氣與暖氣運轉中 為了最大限度地提高冷氣(暖氣)效果,室外機的能力被增大,風量被定為最高設置。 溫度與風量設定不可改變。... -
Page 71: 省電 / 室外機靜音運轉
有用的功能 省電 / 室外機靜音運轉 省電運轉是一種透過限制耗電量最大值、實現高效運轉的功能。 當此產品與其他電器同時運作時,有時需要特別注意以確保電路斷路 器不會跳閘,在這種情況下,省電運轉功能非常有用。 室外機靜音運轉透過改變室外機的頻率與風扇速率來降低室外機的噪 音強度。 此功能在夜間操作時更為方便。 „ 開始 按下 並選擇您希望的模式。 • 每次按下 ,LCD 液晶顯示屏上都會顯示一個不同的設置選項。 空白 省電 室外機靜音 結合 無設定 „ 取消 按下 並選擇 LCD 液晶顯示螢幕上的「空白」。 註 關於省電運轉的注意事項 • 本模式以較低功率運作,因此可能無法提供充分的冷氣(暖氣)效果。 • 按下 會取消設定,而「 」會從 LCD 液晶顯示幕上消失。 • 如果耗電量水平已經很低,省電模式將不會降低耗電量。 關於室外機靜音運轉的注意事項... -
Page 72: 定時開/關運轉
定時器運轉 定時開/關運轉 定時功能對於在夜間或早上自動開關空調非常有用。 您可以將「定時關閉」與「定時開啟」功能配合使用。 [在 24 小時制時鐘顯示下使用「定時開」功能] (24 小時定時開/關) „ 設定 • 檢查時鐘是否正確。 如果不正確,請將時鐘設置為當前時刻。 第 11 頁 按下 。 「 」出現在 LCD 液晶顯示幕上。 「 」閃爍。 • 「 」與「星期幾」標示會從 LCD 液晶顯示屏上消失。 按下 ,直至時間設定達到您所希望的值。 • 每按一次上下按鈕,就會將時間設定增加或減少 10 分鐘。 按住上下按鈕,就會快速改變時間設定。 再次按下 。 • LCD 液晶顯示屏上顯示「 」與設定的時間。... - Page 73 定時器運轉 [在 24 小時制時鐘顯示下使用「定時關」功能] (24 小時定時開/關) „ 設定 • 檢查時鐘是否正確。 如果不正確,請將時鐘設置為當前時刻。 第 11 頁 按下 。 「 」出現在 LCD 液晶顯示幕上。 「 」閃爍。 • 「 」與「星期幾」標示會從 LCD 液晶顯示屏上消失。 按下 ,直至時間設定達到您所希望的值。 • 每按一次上下按鈕,就會將時間設定增加或減少 10 分鐘。 按住上下按鈕,就會快速改變時間設定。 再次按下 。 • LCD 液晶顯示屏上顯示「 」與設定的時間。 • 定時器指示燈亮黃色。 顯示...
- Page 74 定時器運轉 定時開 / 關機運轉 [在剩餘小時數顯示下使用「定時開/關」功能] (正/倒數計時開/關) • 檢查並確認時鐘正確。若不正確,將時鐘設定為現在時間。 第 11 頁 長按 或 約 5 秒,等指示燈 ( ) 閃爍時 放開按鈕。 定時開 「 」出現在 LCD 液晶顯示幕上。 「 」閃爍。 定時關 「 」出現在 LCD 液晶顯示幕上。 「 」閃爍。 • 「 」及星期幾從 LCD 螢幕上消失。 按 直到您想設定的時間出現為止。 • 每按一下按鈕,時間設定會增加或減少...
-
Page 75: 週間定時運轉
定時器運轉 週間定時運轉 一周中,每天可最多保存 4 次定時設置。若週間定時是按照您的家庭生活方式設定, 就會非常方便。 „ 在這些情況下使用「週間定時」的方式 對星期一至星期五設置相同的定時器設定,而對週末設置另一套定時器設定。 [ 星期一 ] 對程式(至多1-4)進行定時器設置。 第 29 頁 程式 1 程式 2 程式 3 程式 4 關 關 開 關 25.0℃ 27.0℃ 6:00 8:30 17:30 22:00 開 關 開 關 使用複製模式對星期二至星期五進行設置,因為這些設定與星期一的設定是相同的。 [ 星期二 ] 至... - Page 76 定時器運轉 週間定時運轉 „ 使用「週間定時」運轉的步驟 設定模式 • 確保已設定好星期幾與時刻。 如果未設定好,請即設定星期幾與時刻。 第 11 頁 程式 1 程式 2 程式 3 程式 4 開 關 開 關 [星期一] 25.0℃ 27.0℃ 6:00 8:30 17:30 22:00 設定顯示 日期和編號 「開 / 關」 時間 溫度 按下 。 • 顯示螢幕將會顯示預約日為星期幾以及當日的預約號碼。 • 每天可設置...
- Page 77 定時器運轉 按下 來選擇您希望設定的時刻。 • 這一時刻可以被設在 0:00 到 23:50 之間,以 10 分鐘為間隔。 • 如需回到「開/關定時」模式設置,請按下 。 • 當設定為「定時關閉」時,請前往步驟 9。 按下 。 • 時間即被設定。 • 「 」與溫度會閃爍。 按下 來選擇您希望的溫度。 • 溫度可以被設在 10.0℃ 到 32.0℃ 之間。 冷氣或自動模式:即使空調被設為 10.0℃ 到 17.0℃,空調依然會在 18.0℃ 運轉。 第 14 頁 暖氣或自動模式:即使空調被設為...
- Page 78 定時器運轉 週間定時運轉 複製模式 • 可以對設置過一次的預約進行複製,應用在一周中的另一天。選定的這一天的 完整預約會被複製下來。 程式 1 程式 2 程式 3 程式 4 開 關 開 關 [星期一] 25.0℃ 27.0℃ 6:00 8:30 17:30 22:00 複製 程式 1 程式 2 程式 3 程式 4 開 關 開 關 [星期二] 25.0℃ 27.0℃ 至...
- Page 79 定時器運轉 „ 確認一次預約 • 預約即被確認。 設定顯示 正常狀態 確認 按下 。 • 顯示屏將會顯示預約日為星期幾以及當日的預約號碼。 按下 來選擇一個預約日以及預約號碼。 • 按下 顯示預約的詳細資訊。 • 如需更改已確定的預約設置,請選擇預留號碼並按下 。 模式會被切換為設置模式。請前往 步驟 4。 設定模式 第 29 頁 按下 退出確認模式。 • LCD 液晶顯示屏上顯示「 」,「週間定時」運轉被激活。 • 定時器指示燈亮橘黃色。 顯示 „ 停用「週間定時」運轉的步驟 在 LCD 液晶顯示螢幕上顯示 時按下...
- Page 80 定時器運轉 週間定時運轉 „ 刪除預約的步驟 單獨一次預約 按下 。 • 屏幕將會顯示預約日與預約號碼。 按下 來選擇要刪除的預約日以及預約號碼。 按下 。 • 「 」以及「 」或「 」會閃爍。 按下 直到無任何標誌顯示。 • 按 來依順序改變「開 / 關定時器」模式。 • 選擇「空白」將會取消您所做的任何預約。 空白 按 逆轉順序。 定時開啟 定時關閉 沒有設定 按下 。 • 選定的預約將被刪除。 按下 。 • 如果還有其他的預約,「週間定時」運轉將被啟用。 針對一周中每一天的預約...
-
Page 81: 透過「智能控制」進行系統控制
關於無線 LAN 控制器的最新版本資訊,請參考上述網站。 „ 應用程式安裝 • 下載及安裝應用程式前,請先參閱 的「配置」。 第 7 頁 Android 手機 1) 開啟 [Google Play]。 2) 搜尋應用程式名稱 : [DAIKIN Mobile Controller]。 3) 按照螢幕上的指示安裝。 iOS 手機 1) 開啟 [App Store]。 2) 搜尋應用程式名稱 : [DAIKIN Mobile Controller]。 3) 按照螢幕上的指示安裝。 „ 設定... - Page 82 透過「智能控制」進行系統控制 無線 LAN 連線 啟用/停用無線 LAN 連線轉接器 „ 啟用 當機器停止運轉時,長按 按鈕 5 秒。 • 「 」出現在顯示螢幕上。 • 「 」(SP 選單) 閃爍。 按 或 ,選擇 SP 選單 。 按 ,確認您所選擇的設定。 • 「 」短暫閃爍。 • 無線 LAN 連線轉接器指示燈 (橘色) 會閃爍 1 秒。 按 回到預設螢幕。 顯示 „...
- Page 83 • 無線 LAN 連線轉接器指示燈 (橘色) 會加快閃爍。 在大約一分鐘以內,按下通訊裝置(如路由器) 上的 WPS 按鈕。請參閱通訊裝置的說明書。 • 無線 LAN 連線轉接器指示燈(橘色)會保持恆亮。如果連線失敗, 請參閱「註」。 按 回到預設螢幕。 將您的智慧型手機連線到家用網路。 開啟 DAIKIN Mobile Controller 應用程式的主畫面。 空調機將會列在畫面上(圖 1)。 圖 1 註 關於簡易連線(WPS 連線)的注意事項 • 如果連線失敗〔無線 LAN 連線轉接器指示燈(橘色)持續閃爍〕,請重覆步驟 1-5。 或者,嘗試直接從您的裝置連線。請參閱「存取點連線(AP 連線)」 。 第 37 頁...
- Page 84 請將無線 LAN 連線轉接器的 SSID&KEY 貼紙貼在貼紙黏貼處,妥善保存。 00_CV_3P620957-11A.indd 1 08-Jan-21 11:18:31 AM 開啟 DAIKIN Mobile Controller 應用程式,然後選擇 「設定無線連線 (Configure the wireless connection)」 (圖 2),按照螢幕指示連線到您的家用網路。 • 無線 LAN 連線轉接器指示燈(橘色)會保持恆亮。如果連線失敗,請參閱「註」。 將您的智慧型手機連線到家用網路。 開啟 DAIKIN Mobile Controller 應用程式的主畫面。...
-
Page 85: 保養與清潔
保養 保養與清潔 注意 • 在清潔前,請確保使空調機停止運轉,並關閉斷路器。 • 請勿觸摸室內機的鋁散熱片。如果您觸碰了這些部件,可能會造成人身傷害。 „ 速查表 清潔部件 前面板 • 用浸濕的軟布擦拭。 • 只能使用中性洗劑。 如有污垢 閃流進風口 • 切勿在室內機上放 置物品。 否則可能會傷害閃 流裝置的性能、 濾網 品質及壽命。 • 真空除塵或清洗過濾網。 空氣品質濾網(藍色酵素+PM2.5) 每 2 周一次 如需購買下列濾網(表 1)或另一種濾網,請洽原經銷商。 第 39 頁 濾網的清潔與更換方式因機型而異。請參閱替換濾網上的標籤。 表 1 室內機與遙控器 訂購項目 零件編號... - Page 86 保養 保養與清潔 „ 空氣過濾網 打開前面板。 用清水沖洗空氣過濾網, 或用真空吸塵器進行清理。 • 抓住前面板兩側,將面板打開。 • 建議您每 2 周清理一次空氣過濾網。 上部前面板的背面 固定卡榫 面板支撐板 如果灰塵難以脫落 • 請用經溫水稀釋的中性洗滌劑清洗空氣過濾網, 然後放在陰涼處風乾。 拉出空氣過濾網。 • 將每個空氣過濾網中央的過濾網卡榫略向 上推,然後拉下來。 裝回濾網。 1) 推 慢慢關閉前面板。 • 按下前蓋板兩側與中間部位。 • 務必將前面板確實蓋好。 2) 拉下...
- Page 87 保養 „ 濾網(小) * 關於適用的濾網種類,請見 。 第 38 頁 安裝 清潔或更換。 [清潔] 打開前面板,並拉出濾網。 除臭濾網(藍色酵素): 藍色 / 第 39 頁 安裝鈦磷灰石除臭過濾器: 藍色 - 黑色 插入過濾器。 3-1 用吸塵器吸塵,如果髒污嚴重,請將其 • 檢查過濾器是否固定在卡榫底下。 在溫水或清水中浸泡約10 到 15 分鐘。 搭扣 3-2 清洗後,請甩掉留下的水分,並在陰暗 處晾乾。 • 本濾網建議每 6 個月用水清洗一次, 並且每...
- Page 88 保養 保養與清潔 „ 長時間不用之前 以防霉模式運轉。 第 17 頁 運轉停止後,為空調機關閉斷路器。 清潔濾網並安裝至原位。 第 39 頁 為避免電池漏液,請將電池從遙控器內取出。 „ 我們建議您定期維護 • 在某些運轉條件下,空調機內部會在使用數季之後擠滿灰塵,從而導致性能變差。 除了由用戶進行定期清潔以外,我們還建議由專業人員進行定期保養。 • 如需專業人員保養,請聯絡您購買空調機的經銷商洽詢。 • 維護成本須由用戶承擔。...
-
Page 89: Faq
有需要時 室內機 上下葉片沒有立即開始擺動。 • 空調機正在調整上下葉片的位置。 上下葉片很快就會開始 擺動。 空調機在暖氣運轉中停止產生氣流。 聽到不同的聲音。 „ 像流水的聲音 • 一旦達到設定溫度,風量會降低並停止運轉, • 這種聲音是因空調機中的冷媒流動而產生。 以避免產生涼爽的氣流。當室內溫度下降時, 運轉將會自動恢復。 • 這是空調機中的抽水聲,出現在冷氣或除濕 運轉從空調機中抽水的時候。 „ 風切聲 • 這種聲音出現在空調機中的冷媒流動方向 暖氣運轉突然停止,並且聽到流水的聲音。 轉變時。 • 室外機正在除霜。暖氣運轉會在室外機上的霜 „ 熱漲冷縮聲 被除凈後啟動。 • 這種聲音出現在空調機的機櫃與框架因溫度 您需要等待約 4 到12 分鐘。 變化而稍有熱漲冷縮時。 „ 冷媒流動聲 • 這種聲音出現在除霜運轉模式期間冷媒 流動時。 運轉沒有很快啟動。 „ 在運轉或閒置期間的喀嚓聲 • 這種聲音出現在冷媒控制閥或電氣部件... - Page 90 有需要時 故障排除 在詢問或請求維修之前,請檢查以下事項。 如果問題仍然存在,請諮詢您的經銷商。 非故障 檢查 這些情況並非故障。 請求修理前,請再次檢查。 空調機 空調機未運轉。 情況 描述 / 檢查事項 • 斷路器跳閘或保險絲熔斷? 運轉指示燈熄滅。 • 是否停電? • 遙控器中是否已安裝電池? • 關閉含斷路器的電源,然後使用遙控器重新啟動。 運轉指示燈閃爍。 如果運轉指示燈仍在閃爍,檢查故障代碼,並諮詢您的經銷商。 第 46 頁 空調機突然停止運轉。 情況 描述 / 檢查事項 • 為保護系統,空調機可能會在發生大的電壓波動時停止運轉。 運轉指示燈亮。 空調會在約3 分鐘內恢復運轉。 • 室內機與室外機的進風口與出風口是否有異物堵塞? 運轉指示燈閃爍。...
- Page 91 有需要時 空調機 霧氣冒出來 情況 描述 / 檢查事項 室內機中冒出霧氣。 • 在冷氣或其他運轉中,室內空氣被冷卻形成霧氣,就會發生這種現象。 遙控器 情況 描述 / 檢查事項 • 電池可能已耗盡。請將兩顆電池都更換為新的 AAA.LR03 號電池 (鹼性)。 有關細節,請參閱「運轉前準備」。 第 10 頁 機器不接收遙控器的信號或其運 • 如果室內裝有使用電子啟動器的日光燈(如含安定器型燈),訊號傳輸可能失效。 轉範圍有限。 如果發生這種情況,請諮詢您的經銷商。 • 如果發射器暴露在直射陽光下,遙控器可能無法正常工作。 LCD 燈光微弱、不運作、或顯示 • 電池可能已耗盡。請將兩顆電池都更換為新的 AAA.LR03 號電池 (鹼性)。 字幕飄忽不定。 有關細節,請參閱「運轉前準備」。 第...
- Page 92 亮起,依然無法從住家外面操作。 • 無線 LAN 連線轉接器已停用。 無線 LAN 連線轉接器指示燈不閃 • 室內機與無線 LAN 連線轉接器之間通訊故障。 爍也不亮。 • 您的裝置可能有問題。請與您購買空調機的店家聯絡報修。 • 請參閱常見問題,網址: 上述方法皆不管用。 http://www.daikinthai.com/product/dmobile 關於 DAIKIN Mobile Controller 應用程式的使用說明, 請上網到 http://www.daikinthai.com/product/dmobile 參閱使用說明書。 „ 立即致電你的經銷商。 警告 當出現異常(如燒焦氣味)時,請停止運轉,並關閉斷路器。 • 在出現異常時繼續運轉會導致故障、觸電或火災。 • 請向您購買空調機的經銷商洽詢。 請勿嘗試擅自修理或修改空調機。 • 不正確的操作會導致觸電或火災。 • 請向您購買空調的服務提供商洽詢。...
- Page 93 有需要時 „ 遙控器故障診斷 • 若空調機故障,可先用遙控器查看故障代碼,然後再連絡維修人員並告知故 障代碼。 按下 5 秒鐘後,會有一個「 」標示在溫度 顯示部份閃爍。 重複按 ,直到您聽到長嗶音。 • 代碼標示即按照下表發生改變,並以長嗶音提醒用戶。 代碼 含義 正常 室內機、室外機組合故障 系統 冷媒不足 電壓下降或主電路過電壓 訊號傳輸故障(室內機與室外機之間) 室內機印刷電路板 (PCB) 故障 高壓控制或防凍結保護裝置 風扇電機故障 室內機 熱交換器溫度感應器故障 吸入空氣溫度感應器故障 濕度感應器故障 冷氣- 暖氣切換故障 電路板故障 過載保護啟動 壓縮機啟動故障 風扇直流電機故障 排水管高溫控制 高壓控制(冷氣模式下) 因壓縮機內部溫度而停止運轉...
-
Page 94: 產品規格
規格 產品規格 FTXM41VVLT FTXM50VVLT FTXM60VVLT FTXM71VVLT 室內機 型號 H mm W mm 1100 尺寸 D mm 重量 冷氣運轉時運轉音量 dB(A) 熱泵暖氣運轉時運轉音量 dB(A) 室外機 型號 RXM41VVLT RXM50VVLT RXM60VVLT RXM71VVLT 室內機組合例 FTXM41VVLT FTXM50VVLT FTXM60VVLT FTXM71VVLT 能力 4100 5000 6300 7200 能力 kcal/h 3530... - Page 96 除濕 https://www.daikin.com The two-dimensional bar code is a manufacturing code. 3P620957-11N M20N063B (2111) HT...
Need help?
Do you have a question about the FTXM41VVLT and is the answer not in the manual?
Questions and answers