
Related Manuals for Förster-Technik TAP5-CH2-25

Summary of Contents for Förster-Technik TAP5-CH2-25
- Page 1 2013 Original Operating Instructions Automatic calf feeder Compact type Powder Program version 8.00 and higher TAP5-CH2-25...
-
Page 3: Table Of Contents
Table of contents Table of contents Introduction ............7 Automatic feeder. - Page 4 Table of contents Restart ............... . 44 5.2.1 Restart after temporary shutdown without change of location .
- Page 5 Table of contents 7.1.8 Boiler temperature sensor ..........107 7.1.9 Calibration .
- Page 6 Table of contents...
-
Page 7: Introduction
Introduction Introduction This chapter explains how your automatic feeder is designed and how to operate it safely as intended. Read the operating manual carefully before operating the automatic feeder and ask your ser- vice technician to explain anything that is unclear to you before you use it for the first time. Do not operate the automatic feeder until you have read and understood the safety chapter (see Chapter 2 Important safety instructions, page 17). - Page 8 Introduction Your advantages: • Added functions eliminate cumbersome routine tasks and save you time. • Automatic cleaning programs improve feed hygiene. • The hand terminal gives you quick access to important animal data. • The animal control list provides a clear and easy way of monitoring animals. •...
-
Page 9: Overview Of The Automatic Feeder
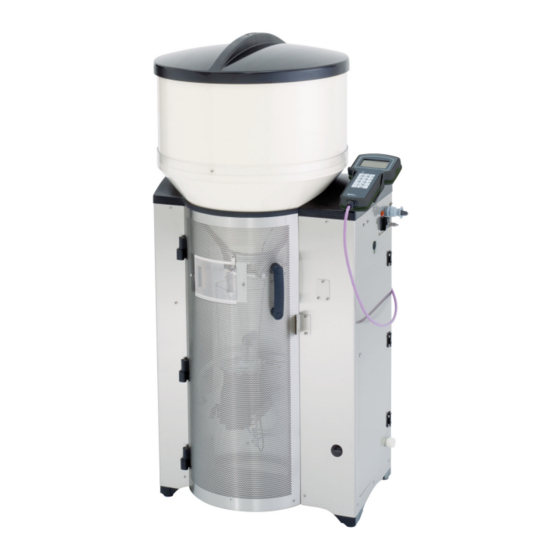
Introduction Overview of the automatic feeder 1.2.1 Front and right side view of automatic feeder 1 Milk powder container 8 Water connector 2 Milk powder discharge 9 Temperature sensor 3 Water supply 10 Right door 4 Mixing jar 11 Connection screw for potential equalization 5 Bar electrode 12 Control switch 6 Hose connection from mixer to box valve... -
Page 10: Left-Hand View Of Automatic Feeder
Introduction 1.2.2 Left-hand view of automatic feeder The name plate is located above the left side door on the outside of the automatic feeder. It contains information about the manufacturer, type and number of the automatic feeder, infor- mation for connecting the feeder to the the mains as well as the certifications of the automatic feeder. - Page 11 Introduction Behind the left side door 1 Storage container for detergent 2 Feeding pump 3 Detergent dosing pump 4 Mixer drain valve 5 Feeding station valve(s)
-
Page 12: Boiler With Heating Circuit
Introduction 1.2.3 Boiler with heating circuit 1 Hose connection for water pipe 5 Feeding station valve 2 Boiler water valve 6 Hose connection between feeding station valve and teat 3 Boiler 7 Mixer drain valve (optional) 4 Mixer 8 Feeding pump Technical data 1.3.1 Electrical connection... -
Page 13: Dimensions Of The Automatic Feeder
Introduction 1.3.2 Dimensions of the automatic feeder Depth when the fly protection door is opened ~ 690 mm 1.3.3 Weight Approximately 80 kg. 1.3.4 Water connector The water connection is made using a 1/2 inch hose with a 3/4 inch screwed connection. The water pressure to be provided by the customer must be between 2.5 and 6 bar. -
Page 14: Number Of Feeding Stations And Animals
Introduction 1.3.7 Number of feeding stations and animals Your automatic feeder has 2 feeding stations. You can feed up to 50 calves, with 30 calves per feeding station. Symbols and abbreviations 1.4.1 Symbols You can find a list of the symbols and abbreviations as used in this operating manual in the following. -
Page 15: Contact Details Of The Manufacturer
Introduction Manual feeding pump Milk substitute Maximum Min. temp. Minimum temperature mix. full Mixer full mixer cl. Mixer cleaning mixer dr.valve Mixer drain valve Number Clean teat Clean teat w/o entitlement Without entitlement w/o add. or w/o add. Without additive P 1-5 Periods 1 - 5 rel. - Page 16 Introduction Our contact details: Förster-Technik GmbH Gerwigstrasse 25 D-78234 Engen, Germany Phone: +49/ (0)7733/ 9406- 0 Fax: +49/ (0)7733/ 9406- 99 info@foerster-technik.de www.foerster-technik.de...
-
Page 17: Important Safety Instructions
Important safety instructions Important safety instructions SAVE THESE INSTRUCTIONS! This chapter outlines: • The hazards caused by your automatic feeder and how to avoid them. • The safety labels attached to the automatic feeder and what they mean. • How to operate the automatic feeder safely. The automatic feeder is state of the art and is produced in compliance with recognized safety regulations. - Page 18 Important safety instructions • Do not touch any moving components of the automatic feeder, for example the mixer blades. • Only use genuine spare parts from the manufacturer. • Turn off the automatic feeder and disconnect the mains plug before carrying out any main- tenance or cleaning work on the automatic feeder.
-
Page 19: Material Damage Caused By The Automatic Feeder
Important safety instructions tact and always wear chemical-proof protective gloves and goggles when handling the cleaning agent. • Excessive strain. The automatic feeder weighs 80kg. Never attempt to carry it alone as this can cause excessive physical strain. 2.3.1 Material damage caused by the automatic feeder The automatic feeder can cause the following types of material damage: •... -
Page 20: What Hazard Warnings Are Provided
Important safety instructions • Check the fitted safety equipment regularly to ensure that it functions properly. You will find a care and maintenance schedule in the Appendix (see 9.3.1.2 Maintenance intervals and activities on page 127), which provides recommendations of how often to check the differ- ent safety equipment. -
Page 21: Hazards Causing Death Or Injury
Important safety instructions • The hazard word (Danger, Warning, Caution, Attention). • The nature of the hazard (what could happen?). • The location of the hazard (where can it occur?). • The actions to take to prevent the hazard (what do I need to do?). 2.5.2 Hazards causing death or injury Depending on their severity and the probability of them occurring, hazards that can cause... -
Page 22: Material Damage
Important safety instructions • Excessive strain. • Crushing, clipping, cutting or cutting off. • Health hazards. • Chemical burns. 2.5.3 Material damage The word Attention indicates possible material damage. The automatic feeder or an object in its vicinity may be damaged, for example a calf. •... -
Page 23: Warning Signs On The Machine
Important safety instructions What are instruction notices? Instruction notices show a pictogram of what you are being instructed to do in a blue circle. They illustrate what you have to do. In the example, the pictogram means that you must always disconnect the plug first. Other labels Earthing label. -
Page 24: Safety Equipment On The Automatic Feeder
Important safety instructions Chemical burns due to cleaning agent Automatic start-up Safety equipment on the automatic feeder The automatic feeder may only be operated if the safety equipment is complete and intact. The automatic feeder has the following safety equipment: •... - Page 25 Important safety instructions Safety temperature limiter The heating of the automatic feeder is equipped with a safety temperature limiter which is trig- gered in the event of overheating (70°C) and consequently shuts down the heating. The safety temperature limiter is triggered if the water gets too hot or if the heating is running dry.
- Page 26 Important safety instructions 1 Mount for scraper 2 Scraper Risk of injury due to automatic start-up. Do not reach into the hazardous area of the mixer. The mixer can start up automatically at any time, crushing or cutting off your fingers. Always turn off the automatic feeder with the control switch and disconnect the mains plug.
-
Page 27: Hygiene
Hygiene Hygiene As a farmer with experience in calf rearing, you understand how unhygienic conditions affect the health of your calves. Diarrhea and respiratory infections are frequently occurring infec- tious diseases in calves. Every sick calf involves additional costs, for example for veterinarians and medication, and requires extra time for care. - Page 28 Hygiene Proper cleaning is an important way of ensuring hygienic conditions and also prevents infections. If the automatic feeder is not cleaned or is cleaned improperly, germs, which are abundant in the environment, can enter the nutrient-rich feed and multiply. When they drink the feed, calves can become infected, sick and even die.
-
Page 29: Operating The Automatic Feeder
Operating the automatic feeder Operating the automatic feeder This chapter explains how to operate your automatic feeder using the hand terminal. The hand terminal is directly connected to your automatic feeder by a cable. You switch it on and off together with the automatic feeder. It remains in operation as long as the automatic feeder is switched on. -
Page 30: Hand Terminal
Operating the automatic feeder 4.1.1 Automatic mode You perform most routine tasks, such as feeding, in automatic mode. In automatic mode, the Auto LED lights up green. You exit automatic mode by pressing After a prolonged period of inactivity, the automatic feeder automatically returns to automatic mode. -
Page 31: The 15-Key Hand Terminal
Operating the automatic feeder 4.2.1 The 15-key hand terminal 1 Keypad 2 Auto LED 3 Display... - Page 32 Operating the automatic feeder Keypad With this key, you open the Animal control menu and enter the numeral 1. With this key, you open the Main menu and enter the numeral 2. With this key, you open the manual functions menu and enter the numeral 3. With this key, you open the Search functions and enter the numeral 4.
- Page 33 Operating the automatic feeder You use this button to move the cursor upward and choose items from a list, for exam- ple [yes] or [no]. With this key, you enter the numeral 0. With this key you move the cursor downward and select items form a list. You use this key to change the sign of a number, for example from +1 to -1.
-
Page 34: The 12-Key Hand Terminal
Operating the automatic feeder 4.2.2 The 12-key hand terminal Older versions of the automatic feeder still have the hand terminal with 12 keys. 1 Keypad 2 Auto LED 3 Display The operation of this hand terminal differs from the operation of the 15-key hand terminal in the following ways: •... -
Page 35: Auto Led
Operating the automatic feeder • There are no freely assignable function keys. You access the animal list via the Animal control menu. • You cannot save the data of the automatic feeder to an SD card. 4.2.3 Auto LED The Auto LED (light-emitting diode) of your hand terminal displays important information about the status of the automatic feeder. -
Page 36: Symbols
Operating the automatic feeder Note: If you know that your automatic feeder has a component that is not being displayed, con- tact your service technician so that he/she can adjust your setup. Never adjust the setup your- self. Changing the setup can cause the automatic feeder to malfunction. If the auto- matic feeder malfunctions, your calves could suffer from malnutrition. -
Page 37: Navigation
Operating the automatic feeder This symbol indicates that the mixing jar is full. The tip of the bar electrode is in the liquid. This symbol indicates that the mixing jar is empty. The rod electrode is free. 4.3.1.5 Animal identification and feed consumption The aerial symbol after a station number, such as TR 1 for feeding station 1, indicates that a calf has been identified at this station. -
Page 38: Menus
Operating the automatic feeder • Navigate between the items of a list, for example between [yes] and [no]. You can use • Scroll screen by screen through a menu, for example to the submenus on the next page or directly to the last menu item. •... - Page 39 Operating the automatic feeder • Alarm. A list of calves that have triggered an alarm is displayed. • Plan over date. A list of calves that have a plan over date is displayed. • 40FIT Period. A list of calves currently in the 40FIT period is displayed. •...
- Page 40 Operating the automatic feeder When you press , the message Exit automatic mode? appears in the display. When you confirm the message by choosing , you switch the automatic feeder from automatic mode to manual mode. The Auto LED goes out. The automatic feeder automatically returns to automatic mode after 20 minutes of inactivity.
-
Page 41: Shutting Down And Restarting The Automatic Feeder
Shutting down and restarting the automatic feeder Shutting down and restarting the automatic feeder This chapter explains how to shut down the automatic feeder temporarily or permanently and restart it. Shutdown You can shut down the automatic feeder temporarily or permanently. To make the procedure easier and ensure that you do not miss any steps, see the check list Shutting down the automatic feeder in the appendix (see chapter 9.4 Automatic feeder shut- down checklist, page 129). - Page 42 Shutting down and restarting the automatic feeder disposing of cleaning agents. Follow the safety instructions listed in the safety data sheet for the cleaning agent and use the safety equipment specified. 1. Start the maximum possible number of cleaning programs (see chapter 6.4 Cleaning the automatic feeder, page 59).
-
Page 43: Permanent Shutdown
Shutting down and restarting the automatic feeder 8. Dispose of the hose. New hoses are available from your dealer. Risk of infection. To prevent infections, use a new hose when restoring the unit to service. 9. If your automatic feeder is equipped with a mixer drain valve, disconnect the hose that runs from the drain channel to the mixer valve. -
Page 44: Restart
Shutting down and restarting the automatic feeder Chemical burns from cleaning agents. The cleaning agent can cause chem- ical burns to the eyes or hands. Always wear goggles and chemical-proof protective gloves when disposing of cleaning agents. Follow the safety instructions listed in the safety data sheet for the cleaning agent and use the safety equipment specified. - Page 45 Shutting down and restarting the automatic feeder 5. Connect the teat to the feeding station valve (rationed mode) or the mixer jar (ad lib mode). Use a new hose for this connection. The hose must be installed at a gradient to the automatic feeder without sag- ging.
-
Page 46: Restart After Long-Term Shutdown Or Change Of Location
Shutting down and restarting the automatic feeder 10.Clean the automatic feeder. Start the cleaning programs for the mixer, hoses and the powder container (see chapter 6.4 Cleaning the automatic feeder, page 59). By doing this, you prevent germs that enter the automatic feeder from multiplying and in- fecting your calves. -
Page 47: Running The Automatic Feeder
Running the automatic feeder Running the automatic feeder This chapter explains how to operate your automatic feeder. Operating modes You can operate your automatic feeder in rationed mode or ad lib mode (emergency mode). 6.1.1 Rationed mode In rationed mode, the automatic feeder uses animal identification. You can custom-feed your calves. -
Page 48: Routine Tasks
Running the automatic feeder feeding is not possible. You can only feed calves together if they are the same age and have the same feed entitlement. If there are several feeding stations, then the respective feeding station valves are opened. Risk of burns on feeding station valves. -
Page 49: Transmitter And Animal Management
Running the automatic feeder • Animal control. • Care and maintenance. Weekly tasks: • Care and maintenance. Every 4 month tasks: • If the automatic feeder does not have a mixer scale, recalibrate the water, milk substitute and cleaning agent. •... -
Page 50: Managing Transmitters
Running the automatic feeder 6.3.1 Managing transmitters 6.3.1.1 Basics 6.3.1.1.1 Identification process at the box 1 Aerial 2 Collar transmitter 3 Earmark transmitter For identification purposes, each calf wears a collar with a transmitter or an earmark with a transmitter. The transmitter has a multi-digit number, which is also usually stamped into the transmitter housing. - Page 51 Running the automatic feeder no more than six digits. These animal numbers are then available and can be used to register the calves. 6.3.1.2.1 Reading transmitter numbers When creating new transmitter numbers, it is a good idea to have these read by the feeder. This saves you from typing in the numbers and eliminates the possibility of typing errors.
- Page 52 Running the automatic feeder 6.3.1.3 Assigning animal numbers If the transmitter numbers are automatically read when new numbers are created, an animal number is automatically suggested. When doing this, there are two schemes to choose from for number assignment. 6.3.1.3.1 Consecutive assignment of animal numbers There is a counter which counts up for each new transmitter number as it is read.
- Page 53 Running the automatic feeder 6.3.1.4 Editing transmitters or animal numbers If necessary, (e.g., if a transmitter is lost), a transmitter number can be subsequently changed or deleted. 6.3.1.4.1 Changing the transmitter number Manually changing the transmitter number You manually change a transmitter number as follows: 1.
-
Page 54: Registering Animals
Running the automatic feeder 2. Select the transmitter number to be deleted and confirm delete by choosing Note: You can only delete transmitter numbers from calves that are not registered (= status: available). 6.3.1.5 Deleting the transmitter number when cancelling an animal Generally, the collars (or earmarks) with the respective transmitters remain at the organization and are reused after the calf is taken out of the pen and cancelled. - Page 55 Running the automatic feeder The group to which you allocate the calves depends solely on the feed quantity, concentration and milk ratio that the end user wants to feed the calves. In this case, it does not matter which box the calves consume their feed in or which pen the calves have been housed in. 6.3.2.1 Registering animals manually You register animals manually as follows: 1.
- Page 56 Running the automatic feeder Overview of the three modes for automatic registration Automatic registration Transmitter number in identification mode available unknown deactivated Unknown transmitters Unknown transmitters warning warning available transmitters Animal is registered Unknown transmitters warning all transmitters Animal is registered Transmitter is created, new animal number is assigned, animal is registered 6.3.2.2.1 Deactivating automatic registration...
-
Page 57: Canceling Animals Or Animal Groups
Running the automatic feeder Note: Those calves that are to be removed should only be deregistered after they have left the pen, since they will otherwise be automatically reregistered when they enter the box and will then be returned to the start of the feeding plan. 6.3.2.2.1 Creating transmitter numbers and automatically registering calves In order to shorten the registration process even more, you can specify that calves can also be registered if their transmitter numbers are not known in the system. -
Page 58: Changing The Registration Of Animals
Running the automatic feeder 5. Confirm cancel? by choosing in order cancel a calf. Risk of malnutrition if calves do not receive any feed. Malnutrition can cause impaired growth and development, increased susceptibility to illness or even the death of your calves. -
Page 59: Cleaning The Automatic Feeder
Running the automatic feeder 3. Select the desired feeding group in Group. 4. Confirm the prompt Animal xx in group X change registration? by choosing Note: When registration is changed, the feeding day is retained; the calf is not reset to the start of the feeding plan (= to plan day 1). -
Page 60: Cleaning Agents
Running the automatic feeder • Perform all the cleaning steps recommended in this operating manual. Never use cleaning agents containing chlorine, as they can adversely affect the materials of the automatic feeder and impair its functioning (see chapter 9.2 Automatic feeder material list, page 125). -
Page 61: Cleaning
Running the automatic feeder • Prepare the cleaning agent next to the automatic feeder. 6.4.2.3 Manual cleaning • Powder discharge opening. Have the scraper ready for cleaning the powder discharge opening. The scraper is shipped with the automatic feeder. You can hang it up on the powder discharge. •... - Page 62 Running the automatic feeder 3. In Detergent, you enter the desired amount of detergent. You can enter values between 0 ml/l and 25 ml/l. The default setting is 0 ml/l. Note: Consult the data sheet for the cleaning agent to determine the amount recommended by the cleaning agent manufacturer recommends and enter this value.
- Page 63 Running the automatic feeder • In Cleaning/day, you enter the desired number of cleaning cycles. You can set a maximum of four cleaning cycles. Note: You should define at least one cleaning cycle per day in order to prevent unhygienic conditions.
- Page 64 Running the automatic feeder 6.4.3.2.1 Cleaning the mixer jar manually You must clean the mixer jar manually if it is visibly dirty, if you have disabled automatic clean- ing or perform automatic cleaning less than twice a day. Risk of injury caused by automatic startup. The automatic feeder automatically prepares a feed portion when it detects a calf with feed entitlement.
- Page 65 Running the automatic feeder 10. Insert the mains plug again and turn on the automatic feeder again using the control switch. 11. Press until the message Start automatic mode? appears in your display. 12. Confirm Start automatic mode? by choosing The automatic feeder is now operating in automatic mode again.
- Page 66 Running the automatic feeder 4. Confirm Exit automatic mode? by choosing 5. In Detergent, you enter the desired amount of detergent. Use the amount recommended in the data sheet for your cleaning agent. The automatic feeder starts Pre-cleaning. After the mixer has been automatically evacuat- ed, clear instructions are shown in the display.
- Page 67 Running the automatic feeder If a calf has finished the last portion of its feed entitlement, 0.25 l of warm water is dispensed into the mixer jar. If the calf drinks this warm water, this rinses the suction hose and removes residual milk from it.
- Page 68 Running the automatic feeder 5. Start automatic mode. Press until the message Start automatic mode? appears in the display and confirm it by choosing 6.4.3.6 Thorough cleaning of the powder container with the dosing unit During thorough cleaning of the powder container, milk powder deposits inside the powder container and dosing unit are removed.
-
Page 69: Feeding
Running the automatic feeder 10.Only add milk powder (MP) to the powder container if you want to restart the automatic feeder immediately. 11.Insert the mains plug and turn on the automatic feeder again using the control switch . 12.Enable milk powder dosing in order to fill the dosing star and the dosing unit. 12.1 Go to >... -
Page 70: Feed Preparation
Running the automatic feeder 6.5.2 Feed preparation During preparation of feed, the liquid components (milk or water) are dispensed first. These components are channeled from the to the mixer jar and heated up in the process. If the mixer jar is filled up to the bar electrode with fluid (water or milk), milk substitute (MP) is dispensed from the powder container into the feed box according to the feeding plan. - Page 71 Running the automatic feeder If a feeding period is defined as rationed, the feed quantity to which the calf is entitled is spread across multiple intervals. The standard A and B feeding plans correspond to the 40FIT feeding concept. The standard C and D feeding plans correspond to the rationed feeding concept.
- Page 72 Running the automatic feeder • One box and all calves that feed there. You set a preference as follows: 1. Choose > Feeding to go to the Priority submenu. 2. In Alarm choose [yes] to prefer or [no] in order not to prefer calves with alarm mes- sages.
-
Page 73: Checking And Changing Feeding Data For Individual Animals
Running the automatic feeder 4. In Temperature, specify the desired temperature for the extra portion. The temperature may not exceed 45°C . The default setting is the value that you defined in > Device data > Portion > Set temp.. 5. - Page 74 Running the automatic feeder 7. In Feed, you can check the feed quantity to which the calf is entitled for the defined period. After the validity period, your corrections expire and the calf is fed according to the feeding plan of its group again.
-
Page 75: Feeding Plans
Running the automatic feeder You change the total feeding duration as follows: 1. Choose > Feeding to go to the Animal submenu. 2. Choose to select the desired animal number. 3. In Plan day, you can check which day the calf is on in the feeding plan. 4. - Page 76 Running the automatic feeder • Quantity plan • Concentration plan • Quantity limitation plan When you registered your calves for the automatic feeder, you assigned them to a group (A, B, C or D). For each group, you can assign one of four feeding plans, for example quantity plan A for group A or concentration plan B for group B.
- Page 77 Running the automatic feeder 6.5.6.1 Changing the default quantity plan You can change the default quantity plan based on 2 feeding concepts: The 40FIT feeding concept (F) or the rationed feeding concept (R). Depending on the feed entitlement, the feed is distributed across one or more portions These portions can vary in size.
- Page 78 Running the automatic feeder 9. In Quantity, you can check the total feed quantity that a calf will receive according to this plan. Proceed as follows to change a default quantity plan based on the rationed feeding concept: 1. Choose >...
- Page 79 Running the automatic feeder Note: Many milk powder manufacturers recommend the MP concentration (MP = milk sub- stitute) per liter of feed on their packing drums. However, the program of the automatic feeder requires you to enter the MP concentration per liter of water . To make this conversion eas- ier, use the following conversion table, which is also included in the appendix (see chapter 9.1.3 Milk powder conversion table (MP), page 124).
- Page 80 Running the automatic feeder The period length of the concentration plans does not have to match the period length of the quantity plans. If the duration of the concentration plan is shorter than the duration of the quan- tity plan, a plan over date message appears at the end of the concentration plan in the display of your hand terminal.
-
Page 81: Winter Feeding Plan
Running the automatic feeder toward the end of the feeding period. This can lead to malnutrition, which causes impaired growth and development, increased susceptibility to illness or even the death of your calves. Ensure that the changes will not having any harmful effects, for example by rigorously moni- toring your calves. -
Page 82: Alarm Levels
Running the automatic feeder You set the winter feeding plan as follows: 1. Choose > Feeding > Plans to go to the Winter feeding plan submenu. 2. In the Active menu item, you choose [yes] to activate the winter feeding plan and [no] to deactivate the winter feeding plan. -
Page 83: Animal Control
Running the automatic feeder • In yesterday, you enter the minimum percentage of feed a calf must have consumed yes- terday so that no alarm is triggered. The preset default value is 80 %. You can enter values from 0 to 99%. •... -
Page 84: Entitled
Running the automatic feeder 2. In Column 1 or Column 2, choose to select the parameter to be displayed in the respective column. You call up an animal list as follows: • Choose to go to the Animal list submenu. •... - Page 85 Running the automatic feeder • Here you can check whether the select calf is entitled to feed and the amount of feed to which it is still entitled. • Variant 1: The calf has a feed entitlement. In as of, you can check the earliest time of day at which the calf has a feed entitlement and the feed quantity saved until this time.
-
Page 86: Alarm
Running the automatic feeder 6.6.3 Alarm You define limit values for parameters that are used for monitoring the feed intake of a calf. If a calf exceeds or falls below these limit values, an alarm is triggered. You can define limit val- ues for the following parameters: •... -
Page 87: Plan Over Date
Running the automatic feeder 6.6.4 Plan over date One day before an action with a time limit ends, such as an increase in the feed quantity, you will receive a plan over date message for this action. You receive plan date messages if: •... -
Page 88: Marked
Running the automatic feeder 6.6.6 Marked In this menu, you can view an overview of the drinking behavior of a calf that you have marked. You can also mark (see chapter 4.2 Hand terminal, page 30) another calf that you specif- ically want to monitor. - Page 89 Running the automatic feeder • Note: You can delete the feed block by pressing . Confirm Delete block? by choosing • In Cons. %, you can view feed consumption for today (left column) and yesterday (right column) as a percentage. •...
-
Page 90: New
Running the automatic feeder • In Last, you can view the time of day at which the selected calf last visited the feeding station today (left column) and yesterday (right column). • In With entitlement, you can see how often a calf visited the feeding station today (left column) and yesterday (right column) with a feed entitlement. -
Page 91: Double
Running the automatic feeder 2 days. Enter a positive value such as +2 in order to shorten the total feeding duration by 2 days. 8. In Date, you can view the registration date of a calf. 9. In Time, you can view the registration time of a calf. Proceed as follows to delete a calf from the list of newly registered calves: •... -
Page 92: All
Running the automatic feeder Proceed as follows to view and register unknown transmitters: 1. Choose to go to the Unknown submenu. 2. Use to scroll through the list of unknown animal numbers. 3. In No., you can view the unknown animal number. 4. -
Page 93: Total Consumption
Running the automatic feeder 6.6.11 Total consumption In this menu, you can view the amount of feed your calves have consumed. You can display the consumption amounts of all calves, individual groups and individual calves as well as the number of quantity of portions dispensed until the present time. 6.6.11.1 Consumption of all calves You display the consumption of all calves as follows: 1. -
Page 94: Print
Running the automatic feeder 6.6.11.4 Consumption of a group You display the consumption of all calves in a group as follows: • Choose > Animal control > Total consumption to go to the Group submenu. The left-hand column (today) shows the quantity of feed consumed today and the right- hand column shows the quantity consumed yesterday (yest.) in liters. -
Page 95: Care And Maintenance
Running the automatic feeder • Press and enter the number of the calf in the flashing field. The display goes di- rectly to this calf. If the animal number has not been assigned, the message Animal no. not existing appears. If the animal number has been assigned, but the calf has not been recorded in the selected menu, the message Animal is not entitled appears, for example in the Entitled menu. -
Page 96: Daily Care And Maintenance Tasks
Running the automatic feeder • RS3 must be performed every 36 months. Note: For quicker overview, see the care and maintenance schedule in the appendix (see 9.3.1.2 Maintenance intervals and activities on page 127). Lethal electric shock. The electrical components of the automatic feeder are live. -
Page 97: Care And Maintenance Tasks Every 4 Month
Running the automatic feeder • Check the teat and suction hoses for the following: • Leaks and wear. Immediately replace damaged or leaky teats or hoses. Leaky hoses draw in air, and this impairs the functioning of the automatic feeder. As a result, your calves could receive insufficient concentration of feed and would not be supplied with any or enough food. - Page 98 Running the automatic feeder cause impaired growth and development, increased susceptibility to illness or even the death of your calves. The first calibration is performed by your service technician during the initial startup process. You must manually recalibrate powder and liquid feed and cleaning agents because the actual quantity will deviate from the set quantity for various reasons, such as fluctuations in water pressure.
- Page 99 Running the automatic feeder • Tilt the empty mixer forward. • Hold the container for the milk substitute under the powder discharge. • Confirm start? by choosing • Confirm Exit automatic mode? by choosing . This message is only displayed if your automatic feeder is still in automatic mode.
- Page 100 Running the automatic feeder • In Date, you enter the current date. • Repeat the recalibration in order to check your results. • Calibrate additional liquid components using the same method. 6.7.2.1.1 Recalibrating using the calibration scale: The automatic feeder determines the actual value using the built-in automatic calibration scale (additional equipment).
-
Page 101: Annual Care And Maintenance Tasks
Running the automatic feeder 6.7.2.1.1 Replacing hoses and teats • Replace all feed-conducting hoses that run from the mixer to the feeding stations. This re- duces the risk of infection. New hoses are available from your dealer. • Replace all teats. This reduces the risk of infection. New teats are available from your deal- 6.7.3 Annual care and maintenance tasks •... - Page 102 Running the automatic feeder...
-
Page 103: Failures And Warnings
Failures and warnings Failures and warnings When an error occurs during operation of the automatic feeder, the Auto LED on the hand ter- minal flashes. The error is described in failure or warning messages in the display of your auto- matic feeder. -
Page 104: Heating
Failures and warnings An interruption in feeder operation means that your calves will not receive any feed. This can lead to malnutrition. Malnutrition can cause impaired growth and development, increased susceptibility to illness or even the death of your calves. You must use an alternative method to supply your calves with feed as long as feeder operation is interrupted. -
Page 105: Boiler Not Filled
Failures and warnings 2. In Boiler water start? hold down 3. Drain water from the boiler into the mixer jar until the failure message disappears. 4. Confirm Mixer: empty? by choosing Check the temperature of the supplied water if the Boiler is charged with preheated water. If the failure appears again: •... -
Page 106: Water Shortage
Failures and warnings 7.1.5 Water shortage If the bar electrode is not grounded in the mixer jar when water is being added , a water test is started. If the water test is not successful, then feed preparation and animal identification are switched off. -
Page 107: Heating
Failures and warnings 2. Check all feed-conducting components from the mixer up to the mixer drain valve or from the mixer up to the teat for clogs and remove them. The hose from the mixer drain valve to the drain shaft may not be lengthened. 3. -
Page 108: Calibration
Failures and warnings An interruption in feeder operation means that your calves will not receive any feed. This can lead to malnutrition. Malnutrition can cause impaired growth and development, increased susceptibility to illness or even the death of your calves. You must use an alternative method to supply your calves with feed as long as the automatic feeder is out of service. -
Page 109: Warnings
Failures and warnings An interruption in feeder operation means that your calves will not receive any feed. This can lead to malnutrition. Malnutrition can cause impaired growth and development, increased susceptibility to illness or even the death of your calves. You must use an alternative method to supply your calves with feed as long as the automatic feeder is out of service. -
Page 110: Temperature Sensor, Mixer
Failures and warnings • The mixer is evacuated. 3. Check the mixer drain valve if your automatic feeder has one. • Confirm the Mixer emptying warning by choosing • Confirm Mixer drain: open? by choosing • The mixer is evacuated. 4. -
Page 111: Calibration
Failures and warnings You eliminate the failure as follows: 1. Confirm Unknown transmitters warning by choosing 2. In No., you check the unknown transmitter number. 3. In Number, you check how many times the unknown transmitter number was identified. 4. In Time, you check when the transmitter was last registered by the identification system. 5. -
Page 112: Machine Capacity
Failures and warnings You change the double animal number as follows: 1. Confirm Double animal no. warning by choosing The Double menu in Animal control appears (see chapter 6.6.8 Double, page 91) 2. In No., you can view the full unknown transmitter number of the duplicate calf. 3. -
Page 113: Other Failures And Messages
Failures and warnings • If data is to be saved manually, but no SD card is present. • If data is to be saved manually, but the SD card is currently write-protected. • If data is to be saved automatically but the SD card is full. •... -
Page 114: Hand Terminal
Failures and warnings 7.3.1.4 Bootloader version obsolete Bootloader version obsolete is shown if the automatic feeder’s control program has an obsolete version of the internal bootloader. In this case, the application cannot be started. You must contact a service technician immediately. 7.3.2 Hand terminal 7.3.2.1 CAN bus off... -
Page 115: Bootloader
Failures and warnings 7.3.2.4 Searching When the hand terminal is in search mode, the message terminal Vxx.xx searching appears. You must contact a service technician immediately. 7.3.3 Bootloader 7.3.3.1 Waiting for update The following failures trigger the message bootloader Vxx.xx waiting for update: •... - Page 116 Failures and warnings • RS1 must be performed every 4 months. • RS2 must be performed every 12 months. • RS3 must be performed every 36 months.
-
Page 117: Disposal
Disposal Disposal All automatic feeder components, liquids and solids must be disposed of in compliance with the applicable official regulations for proper waste recycling and disposal in your country. If you are not certain which regulations apply to you, ask your service technician and use the Internet or the yellow pages to find out which government agency is responsible for your jurisdiction. -
Page 118: Processor Board
Disposal Processor board The automatic feeder contains a processor board with a battery. You must dispose of this com- ponent separately. Ask your waste disposal company where you can dispose of electronic waste. Disposing of the automatic feeder For disposal instructions, contact the appropriate authorities, such as your waste disposal company or local government agency. -
Page 119: Appendix
Appendix Appendix Feeding 9.1.1 Standard feeding plans 9.1.1.1 Group A... - Page 120 Appendix 9.1.1.2 Group B 9.1.1.3 Group C...
- Page 121 Appendix 9.1.1.4 Group D...
- Page 122 Appendix 9.1.1.5 Template for individual feeding plan...
-
Page 123: Basic Principle Of Interval Feeding
Appendix 9.1.2 Basic principle of interval feeding... -
Page 124: Milk Powder Conversion Table (Mp)
Appendix 9.1.3 Milk powder conversion table (MP) Desired Setting in Dry matter concentration concentration plan (in%/l feed) (in g/l feed) (in g/l water) 10.0 10.5 11.0 11.5 12.0 12.5 13.0 14.0 15.0 16.0 17.0 18.0 19.0 20.0... -
Page 125: Automatic Feeder Material List
Appendix Automatic feeder material list The materials used in the automatic feeder include: • Brass, Enzidor® • Silicon carbide • Carbon • V2A, V4A • Plastics: PET, TPE, silicon, PVC, NBR, ABS, PUR • Viton • Vulcanized fiber, graphitized • Rubber •... -
Page 126: User Maintenance Instructions
Appendix User maintenance instructions Care and Maintenance schedule / routine work 9.3.1 Regular maintenance work and functional checks on the automatic feeder and its accessories ensure that the required hygiene standards are maintained. Maintenance includes calibration, cleaning to maintain hygiene beyond the chapter on cleaning, as well as scheduled replace- ment of wearing parts. - Page 127 Appendix provide your calves with feed using an alternative method if the automatic feeder is not working properly or is out of service. 9.3.1.2 Maintenance intervals and activities Note: If you detect any failures or damage to the automatic feeder between the maintenance intervals recommended below, you must make sure they are remedied immediately by a ser- vice engineer as required.
- Page 128 Appendix Care/Maintenance interval Daily Weekly 4 months 12 months Shut-off valve/feeding pump • Open shutoff valve/feeding pump, clean; replace valve membranes with support rings if necessary. Powder conveyance • Check powder discharge opening for foreign bodies. • Calibrate, at least for every new MP delivery. ...
-
Page 129: Automatic Feeder Shutdown Checklist
Appendix Automatic feeder shutdown checklist Shutdown 1. Run cleaning cycle. 2. Drain water from boiler, solenoid valves, pressure valve, and volume control valve. (In case of frost risk) Close water tap. On hand terminal using > Water Bo. > Start? Dispense water into feeding box. Disconnect water hose between water solenoid valve and boiler. -
Page 130: Recommissioning Checklist
Appendix Recommissioning checklist Note: Before recommissioning the automatic feeder, you must carefully read and observe the operating manual, particularly the safety information. Important safety information Danger of death by electric shock. The electrical components of the automatic feeder are live. Turning off using the control switch does not disconnect the voltage to the unit. Always turn off the automatic feeder first using the control switch before carrying out any work on the automatic feeder or its components. - Page 131 Appendix Recommissioning Set up automatic feeder. Clean outside of automatic feeder with damp cloth. Fit powder hopper attachment protective grid. Connect automatic feeder water connection to water tap installed by service engineer using new hose. Connect teat to feeding station valve (rationed mode) or to feeding box (ad libitum mode) using new hose.
Need help?
Do you have a question about the TAP5-CH2-25 and is the answer not in the manual?
Questions and answers