
Subscribe to Our Youtube Channel
Summary of Contents for Legacy LEGACY24100
- Page 1 USER MANUAL FOR LITHIUM BATTERY ENERGY STORAGE SYSTEM VERSION 1.0 LEGACY24100/150/300 LEGACY48100/150/300 LEGACY51.2-100/150/300...
-
Page 2: Table Of Contents
User manual Contents 1. Introduction ....................................... 2 2. Battery Specifications ..................................... 3 3. Important Safety Warning..................................4 3.1. Before connecting ..................................4 3.2. Necessary installation Tools ..............................4 3.3. Personal protective equipments ............................4 3.4. During operation..................................5 4. Unpacking & Overview ..................................5 4.1. Packing list .....................................5 4.2. -
Page 3: Introduction
User manual 1. Introduction The Energy storage pack is an essential component of the photovoltaic power generation system. It can provide electricity for the connected load, and it can also store photovoltaic solar modules, fuel generators, or wind energy generators by charging the remaining energy in case of emergency. When the sun goes down, energy demand is high, or there is a power outage, you can use the energy stored in the system to meet your energy needs at no additional cost. -
Page 4: Battery Specifications
User manual 2. Battery Specifications Item General Parameter Combination method 51.2V Rated Capacity(Ah)(typical) 100/150/200 100/150/200 100/150/200 Factory Voltage(V) 25.6-26.4V 48-50V 51-53V Rate power(Wh) 2560/3840/5120 4800/7200/9600 5120/7680/10240 Charging Voltage(V) 28/28.8V 54/54.6V 57/57.6V recommend/max Charging Current(A) 0.2C/0.5C 0.2C/0.5C 0.2C/0.5C recommend/max Float charge Voltage(V) 27.6V 53.5V 55.5V... -
Page 5: Important Safety Warning
User manual 3. Important Safety Warning Do not expose the battery to flammable or harsh chemicals or vapors. Do not paint any part of the battery, include any internal or external components. Do not connect battery with PV solar wiring directly. ... -
Page 6: During Operation
User manual 3.4. During operation If the battery system needs to be moved or repaired, the power must be cut off first and the battery is completely shutdown; It is prohibited to connect the battery with different type of battery; ... -
Page 7: Installation
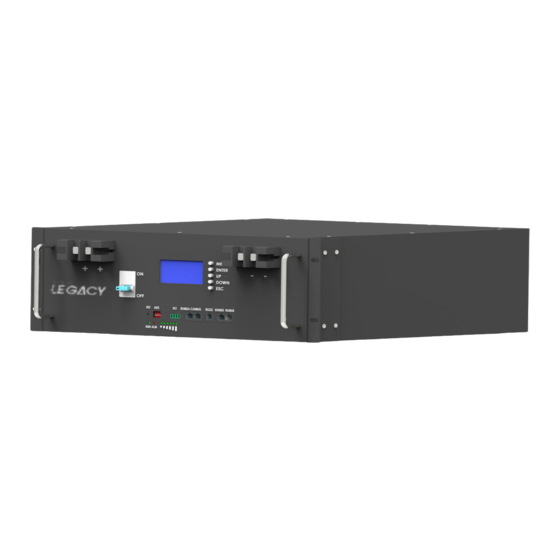
User manual Description Silk-screen Remark Pack positive pole Output terminal Pack negative pole Output terminal LCD key handle Fixed bracket Press and hold for 3 seconds to turn the battery on/off; long reset press for 6 seconds to reset the battery system Run LED indication ALARM LED indication Lift heavy objects... - Page 8 User manual bearing plates is about 205mm. We recommend that the installation distance be 205mm. Figure4. Step 3: Mark the position of the nut on the cabinet with the mounting bracket, and clamp the nut into the cabinet. See Figure5.
-
Page 9: Communication
User manual 6. Communication 6.1. Battery and PC communication(note:insert the RS232 port) 6.1.1 Prepare a computer (Win7 system or above), use a special cable to connect the battery and the PC 6.1.2 Install software(Please ask the manufacturer for the installation package) 6.1.3 After the installation is complete, run this program, the battery and PC communicate successfully Troubleshooting www.connectinglegacy.com... -
Page 10: The Communication Pin Of Battery And The Invterter
User manual 6.2. THE COMMUNICATION PIN OF BATTERY AND THE INVERTER: Battery Pack Inverter Pin1 Pin1 Pin2 Pin2 Pin3 Pin3 Pin4 CANH Pin4 CANH Pin5 CANL Pin5 CANL Pin6 Pin6 Pin7 Pin7 Pin8 Pin8 6.3. DIAL SETTINGS OF BATTERY ADS ADDRESS: www.connectinglegacy.com... -
Page 11: How To Connect Growatt Inverter(Rs485A
User manual 6.4. HOW TO CONNECT Growatt INVERTER(RS485A) 6.4.1 THE COMMUNICATION PIN OF BATTERY AND THE INVERTER(RS485A): ONE SET OF BATTERY: TWO SETS OF BATTERIES: THREE SETS OF BATTERIES: 15 SETS OF BATTERIES: www.connectinglegacy.com... - Page 12 User manual 6.4.2 RS485 COMMUNICATION SETTING OF THE INVERTER: 1)LCD SETTING AS BELOW: 2) CLICK ON “ENTER” AND “DOWN/UP” TO SELECT “05 “ AND “LI”(LITHIUM MODE): 3) CLICK ON “ENTER” AND “DOWN/UP” TO SELECT “36” AND “L04”: 4) CLICK ON “ESC”, THEN WAIT TILL THE CONNECTION DONE. www.connectinglegacy.com...
-
Page 13: How To Connect Growatt Inverter(Canbus
User manual 6.5. HOW TO CONNECT Growatt INVERTER(Canbus) 6.5.1 THE COMMUNICATION PIN OF BATTERY AND THE INVERTER(Canbus): ONE SET OF BATTERY: TWO SETS OF BATTERIES: THREE SETS OF BATTERIES: 15 SETS OF BATTERIES: www.connectinglegacy.com... - Page 14 User manual 6.5.2 RS485 COMMUNICATION SETTING OF THE INVERTER: 1) LCD SETTING AS BELOW: 2) CLICK ON “ENTER” AND “DOWN/UP” TO SELECT “05 “ AND “LI”(LITHIUM MODE): 3) CLICK ON “ENTER” AND “DOWN/UP” TO SELECT “36” AND “L52”: 4) CLICK ON “ESC”, THEN WAIT TILL THE CONNECTION DONE. www.connectinglegacy.com...
-
Page 15: How To Connect Deye Inverter
User manual 6.6. HOW TO CONNECT DEYE INVERTER 6.6.1 THE COMMUNICATION PIN OF BATTERY AND THE INVERTER(Canbus): ONE SET OF BATTERY: TWO SETS OF BATTERIES: THREE SETS OF BATTERIES: 15 SETS OF BATTERIES: www.connectinglegacy.com... - Page 16 User manual 6.6.2 THE COMMUNICATION SETTING OF THE INVERTER: 1) CLICK ON “SETTING” ON THE LCD: 2)CLICK ON “BATTERY SETTING”,SELECT “LITHIUM” AS BATTERY MODE: 3) AFTER LITHIUM MODE SUCCESSFULLY CONNECTED, BMS WILL UPLOAD THE DATA AS BELOW: www.connectinglegacy.com...
- Page 17 User manual Appendix 1 SOC Indicator & Status Indicator Guides Chart 1: Battery Status Chart2: LCD screen display. Display rendering Main menu page After BMS is activated, will show the welcome screen, press the “MENU” button to enter the main menu page. As shown in the figure below:...
-
Page 18: Warning
User manual When the cursor “》”is point to”Battery Status”,press “ENTER” key will enter the page of “Battery Status”,As shown in the figure below: Parameter Settings Screen can not set parameters Baud Rate:9600 ,Can not be set. Key description SW1----MENU,SW2----ENTER,SW3----UP,SW4----DOWN, SW5 ---- ESC. ... -
Page 19: Product Responsibilities And Consulting
In case of any questions, please contact us. THANK YOU FOR CHOOSING LEGACY LET’S DEVELOP TRUST AND BUSINESS www.connectinglegacy.com... - Page 20 User manual www.connectinglegacy.com...
Need help?
Do you have a question about the LEGACY24100 and is the answer not in the manual?
Questions and answers