Table of Contents
Advertisement
Quick Links
Advertisement
Table of Contents

Summary of Contents for Autel Smart Controller SE
- Page 1 Quick Start Guide Autel Smart Controller SE...
-
Page 3: Battery Safety
SE (hereinafter referred to as the "controller"), please strictly follow the operating instructions and steps in this guide. If the user does not abide by the instructions, Autel Robotics will not be responsible for any product damage or loss in use, whether direct or indirect, legal, special, accident or economic loss (including but not limited to loss of profit) and does not provide warranty service. - Page 4 • Do not block the vent of the controller to prevent overheating and diminished performance. • Do not disassemble the controller. If any parts of the controller are damaged, contact Autel Robotics After-Sale Support. 4. Item List DIAGRAM ITEM NAME...
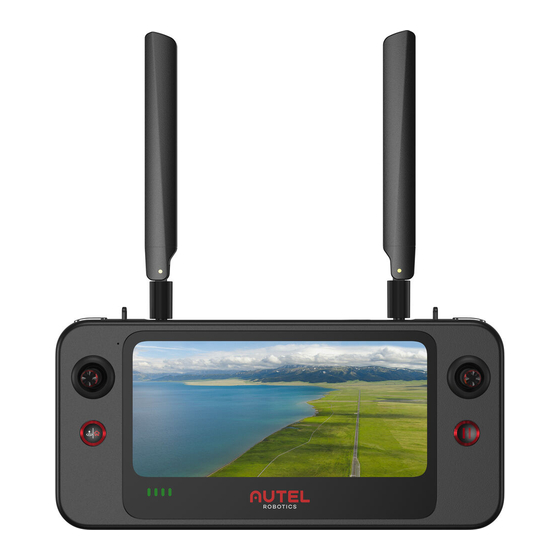
- Page 5 Documentation (Quick Start Guide) 5. Overview The Autel Smart Controller SE is integrated with a 6.4-inch touch screen which boasts a 2340x1080 pixel resolution. The controller f can transmit a live HD view from the aircraft at a distance of up to 15km[1] (9.32 miles).
- Page 6 maximum operating time of about 3 hours [1] In an actual flight environment, the maximum transmission range may be less than this nominal distance and will vary with the interference strength. [2] The above-mentioned operating time is measured in a lab environment at room temperature.
- Page 7 13.Power Button 17.Auto-takeoff/RTH Button 14.Antenna 18.Pause Button 15.Microphone 19.Battery Level Indicator 16.Touch Screen 20.Speaker Hole 23.Handle 21.Tripod Mount Hole 24.Sticks Storage Slot 22.Air Inlet 25.Battery Case...
-
Page 8: Charge The Battery
7. Charge the Battery 7.1 Check the Battery Level Press the power button to check the battery level. Battery Level Indicator (non-charging state) 1 light solid on: Battery≥25% 2 lights solid on: Battery≥50% 3 lights solid on: Battery≥75% 4 lights solid on: Battery=100% 7.2 Power On / Off... - Page 9 Note LED indication light will blink while charging. Only use the battery and charger provided by Autel Robotics. Recharge the battery at least every 3 months to prevent over discharging. The battery depletes when stored for an extended period. 8. Set Up the Controller 8.1 Install the Sticks...
- Page 10 2. Power on the Smart Controller and run the Autel Explorer app, enter the mission flight interface, click the gear icon in the upper right corner, enter the settings menu, click "remote control -> data transmission and image transmission linking>...
-
Page 11: Motor Starting
10. Takeoff / Landing (Mode 2) Note Mode 2 is the default control mode of the Smart Controller. The left stick controls the altitude and heading of the aircraft, while the right stick controls the forward, backward and sideward movements. Before takeoff, place the aircraft on a flat and level surface and face the rear side of the aircraft towards you. - Page 12 11. Control Stick Operation (Mode 2) Left Control Stick Left Side View Left Side View Ascend Descend Upward Downward Top View Top View Nose Rotates Left Nose Rotates Right Move Left Move Right Right Control Stick Left Side View Left Side View Forward Backward Upward...
-
Page 13: Firmware Update
1. Power on the controller and make sure it is connected to the internet. 2. Run Autel Explorer App. A pop-up will appear when new firmware is available. Tap the notification to enter the update interface. 3. Update will start automatically after downloading the latest firmware. - Page 14 Transmitter Power FCC:≤33 dBm CE:≤20 dBm@2.4G,≤14 dBm@5.8G (EIRP) SRRC:≤20 dBm@2.4G, ≤33dBm@5.8G/5.7G Wi-Fi Protocols Wi-Fi 802.11a/b/g/n/ac, 2×2 MIMO 2.400-2.4835GHz Operating Frequency 5.725-5.850GHz Transmitter Power FCC:≤26 dBm CE:≤20 dBm@2.4G,≤14 dBm@5.8G (EIRP) SRRC:≤20 dBm@2.4G,≤26 dBm@5.8G Bluetooth Protocols Bluetooth 5.0 2.400-2.4835GHz Operating Frequency Transmitter Power ≤11dBm (EIRP) Screen...
- Page 15 Battery Type Li-ion Capacity 1900mAh Voltage 7.7V Rated Power 14.63W Operating Time ~2 hours (Max. Brightness) ~3 hours (50% Brightness) Charging Time 90 minutes 5℃ to 45℃ (41℉ to 113℉) Charging Temperature Power Adapter Input 100-240V~, 50/60Hz, 1A Max Output 3A,...
- Page 16 >3 months: -20℃ to 25℃ (-4℉ to 77℉) Storage Temperature 1-3 months: -20℃ to 45℃ (-4℉ to 113℉) <1 month: -20℃ to 60℃ (-4℉ to 140℉) Ingress Protection IP43 226.3×137.7×31.5mm (antennas folded) Dimensions 226.3×215.4×31.5 (antennas unfolded) 617 g Weight **Supported Models EVO II Pro V3 EVO II Dual 640T V3 EVO II RTK Series V3...
- Page 17 FCC and ISED Canada Compliance This device complies with part 15 of the FCC Rules and ISED Canada licence-exempt RSS standards. Operation is subject to the following two conditions: (1) This device may not cause harmful interference, and (2) this device must accept any interference received, including interference that may cause undesired operation.
- Page 18 FCC Specific Absorption Rate (SAR) information SAR tests are conducted using standard operating positions accepted by the FCC with the device transmitting at its highest certified power level in all tested frequency bands, although the SAR is determined at the highest certified power level, the actual SAR level of the device while operating can be well below the maximum value, in general, the closer you are to a wireless base station antenna, the lower the power output.
- Page 19 18th Floor, Block C1, Nanshan iPark, No. 1001 Xueyuan Avenue, Nanshan District, Shenzhen, Guangdong, 518055, China 22522 29th Dr SE STE 101, Bothell, WA 98021 United States Toll-free: (844) MY AUTEL or (844) 692-8835 www.autelrobotics.com © 2022 Autel Robotics Co., Ltd. All Rights Reserved...
- Page 20 ���� Autel Robotics Co., Ltd. All Rights Reserved...
Need help?
Do you have a question about the Smart Controller SE and is the answer not in the manual?
Questions and answers