LG LRFC21755 User Manual
Lg lrfc21755: user guide
Hide thumbs
Also See for LRFC21755:
- Specifications (2 pages) ,
- User manual (35 pages) ,
- Owner's manual (34 pages)
Table of Contents
Advertisement
French Version
Spanish Version
Removing and Replacing
Your Refrigerator Handles
and Doors
TABLE OF CONTENTS
2
36
70
3
4
5-6
6
7
8-14
8
8
8
9-13
14
15-23
15
15
15
16
16
17
18
18
19
2
19
19
20
21
21
22
22
22
22
23
23
24-25
24
24
24
24
24
24
24-25
25
25
26
27-30
31-34
Advertisement
Table of Contents

Related Manuals for LG LRFC21755


Summary of Contents for LG LRFC21755
-
Page 1: Table Of Contents
Using Your Refrigerator Ensuring Proper Air Circulation Multi-Flow Setting the Controls Adjusting Control Settings Food Storage Guide Storing Frozen Food u u Refrigerator section Refrigerator Shelves Wine Holder Optibin Crisper TABLE OF CONTENTS Crisper Humidity Control Removing Crisper Crisper Cover with Lattice on inner... -
Page 2: Warranty (U.s.a.)
LG REFRIGERATOR LIMITED WARRANTY - USA Your LG Refrigerator will be will repaired or replaced, at LG’s option, if it proves to be defective in material or workmanship under normal use, during the warranty period ("Warranty Period") set forth below, effective from the date ("Date of Purchase") of original consumer purchase of the product. -
Page 3: Warranty (Canada)
LIMITED WARRANTY (CANADA) LG Electronics will repair or at its option replace, without charge, your product which proves to be defective in material or workmanship under normal use, during the warranty period listed below from the date of original purchase. This warranty is good only to the original purchaser of the product during the warranty period as long as it is in any Canadian Province. -
Page 4: Safety Instructions
Attention Installer Instructions that were taped to the front of the refrigerator. • After your refrigerator is in operation, do not touch the cold surfaces in the freezer compartment when hands are damp or wet. Skin may adhere to the extremely cold surfaces. -
Page 5: Grounding Requirements
Junked or abandoned refrigerators are still dangerous…even if they will sit for just a few days. If you are getting rid of your old refrigerator, please follow the instructions at right to help prevent accidents. Your old refrigerator may have a cooling system that used CFCs (chlorofluorocarbons). -
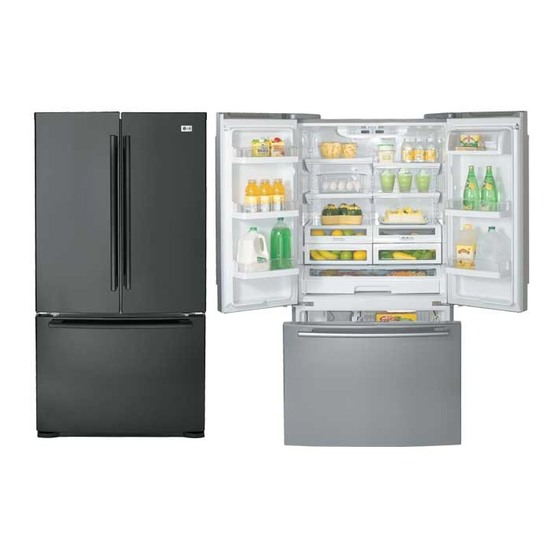
Page 6: Parts And Features
Use this page to become more familiar with the parts and features. Page references are included for your convenience. NOTE: This guide covers several different models. The refrigerator you have purchased may have some or all of the items listed below. The locations of the features shown below may not match your model. -
Page 7: Refrigerator Installation
They are packed together to prevent possible damage during shipment. 3. Let your refrigerator run for at least 2 or 3 hours before putting food in it. Check the flow of cold air in the freezer compartment to ensure proper cooling. - Page 8 HOW TO REMOVE DOOR/DRAWER HANDLES 1. Removing Refrigerator Handle NOTE: Handle appearance may vary. • Grasp the handle tightly with both hands and slide the handle up (1)(this may require some force). • The keyhole slots (2) on the back of the handle allow the handle to separate from the mounting screws (3).
- Page 9 HOW TO REPLACE DOOR/DRAWER HANDLES 1. Replacing Refrigerator Door Handle NOTE: Handle appearance may vary. • Align keyhole slots (1) on the top and bottom of the back of the handle with the screws (2) mounted on the front of the door.
- Page 10 1. Removing Refrigerator Door NOTE: Handle appearance may vary. IMPORTANT: Before you begin, turn the refrigerator OFF and unplug it. Remove food and any bins from doors. u u Left Door • Loosen the screw (1) and release hooks inside of cover.
- Page 11 2. Replacing Refrigerator Door u u Right Door • Lower the door onto the middle hinge pin(8). Make sure the door is aligned with the cabinet. • Replace the top hinge(7) by rotating the lever hinge (6) to counter clockwise to tighten it.
- Page 12 CAUTION: When laying down the drawer, be careful not to damage the floor and hurt your feet by the sharp edges on hinge side. REFRIGERATOR INSTALLATION 2. Installing Pullout Drawer • Pull both rails (1) out to full extension.
-
Page 13: Leveling And Door Alignment
LEVELING AND DOOR ALIGNMENT Leveling Your refrigerator has two front leveling screws—one on the right and one on the left. If your refrigerator seems unsteady or you want the doors to close easier, adjust the refrigerator’s tilt using the instructions below: 1. -
Page 14: Using Your Refrigerator
(See the Food Storage Guide section for details.) USING YOUR REFRIGERATOR SETTING THE CONTROLS • Your refrigerator has two controls that let you regulate the temperature in the freezer and refrigerator compartments. • Initially set the REFRIGERATOR CONTROL at 37°F (3°C) and the FREEZER CONTROL at 0°F (–18°C). -
Page 15: Adjusting Control Settings
Freezer compartment to make it colder. If you need to adjust temperatures in the refrigerator or freezer, start by adjusting the refrigerator. Then wait 24 hours before checking the freezer temperature. If it is too warm or too cold, then adjust the freezer control. -
Page 16: Storing Frozen Food
Successful freezing depends on correct packaging. When you close and seal the package, it must not allow air or moisture in or out. If it does, you could have food odor and taste transfer throughout the refrigerator and also dry out frozen food. Packaging recommendations: •... -
Page 17: U U Refrigerator Section
Failure to do so may result in the shelf falling or spilling food. Sliding Out Shelves You can slide glass shelves in and out of your refrigerator as follows. • To slide the shelf out, carefully pull front of shelf toward you. -
Page 18: Optibin Crisper
2. Lift the front of the crisper, then pull straight out. 3. To install, slightly tilt up the front and insert drawer into frame and push back into place. USING YOUR REFRIGERATOR u Crispers with rails To remove crisper: 1. Pull drawer out to full extension. -
Page 19: Crisper Cover With Lattice On Inner Surface
1. Lift up the glass after inserting a finger into a hole under the crisper cover. 2. Pull the glass up and out. USING YOUR REFRIGERATOR CRISPER COVER WITH LATTICE ON INNER SURFACE To remove the lattice on inner surface: 1. -
Page 20: Glide N Serve
1. Pull drawer out to full extension. 2. Tilt up the front and pull straight out. To replace Glide N Serve: 1. Push metal rails to the back of the refrigerator. 2. Place drawer onto rails and slide drawer back until it falls into place. -
Page 21: Dairy Bin
2. To replace, hook the end of the rack in the bracket, and push down until it locks into place. USING YOUR REFRIGERATOR DURABASE 1. To remove the Durabase, push it back to the end as much as possible. -
Page 22: Durabase Divider
PULL OUT DRAWER 1. To remove, lift basket up and pull straight out. 2. To Install, pull both rails out to full extension. Hook the basket supports into the rail tabs and push to the back of compartment. USING YOUR REFRIGERATOR... -
Page 23: Care And Cleaning
To help remove odors, you can wash the inside of the refrigerator with a mixture of baking soda and warm water. Mix 2 tablespoons baking soda to 1 quart of water (26 g soda to 1 liter water.) Be sure the baking soda is completely dissolved so does it not scratch the surfaces of the refrigerator. -
Page 24: Power Interruptions
CARE AND CLEANING WHEN YOU GO ON VACATION If you choose to leave the refrigerator on while you are away, follow these steps to prepare your refrigerator before you leave. 1. Use up any perishables and freeze other items. -
Page 25: About The Automatic Icemaker
• When the ice storage bin is removed for more than a minute or two. • When the refrigerator will not be used for several days. NORMAL SOUNDS YOU MAY HEAR • The icemaker water valve will buzz as the icemaker fills with water. -
Page 26: Connecting The Water Line
To determine how much tubing you need: measure the distance from the water valve on the back of the refrigerator to the water supply pipe. Then add 8 feet (2.4 m). Be sure there is sufficient extra tubing (about 8 feet [2.4 m] coiled into 3 turns of about 10″... - Page 27 NOTE: Be sure there is sufficient extra tubing (about 8 feet coiled into 3 turns of about 10 ″ diameter) to allow the refrigerator to move out from the wall after installation. CONNECTING THE WATER LINE 7.
- Page 28 • If your refrigerator does not have a water filter, we recommend installing one. If your water supply has sand or particles that could clog the screen of the refrigerator’s water valve.
- Page 29 Reattach the compressor compartment access cover. 11. PLUG IN THE REFRIGERATOR Arrange the coil of tubing so that it does not vibrate against the back of the refrigerator or against the wall. Push the refrigerator back to the wall. 12. START THE ICEMAKER Set the icemaker power switch to the ON position.
-
Page 30: Troubleshooting Guide
UNDERSTANDING SOUNDS YOU MAY HEAR Your new refrigerator may make sounds that your old one didn’t make. Because the sounds are new to you, you might be concerned about them. Most of the new sounds are normal. Hard surfaces, like the floor, walls and cabinets, can make the sounds seem louder than they actually are. - Page 31 The refrigerator will take up to 24 hours to cool completely. u See the Adjusting Control Settings section on page 16.
- Page 32 Rub a thin coat of appliance polish or kitchen wax on the gaskets after cleaning. the refrigerator. As the warm air cools, it can create a vacuum. If the door is hard to open, wait 5 minutes to allow the air pressure to...
- Page 33 Adding food warms the refrigerator. It can take a few hours for the refrigerator to return to normal temperature. u Wrap food tightly and wipe off damp containers prior to storing in the refrigerator to avoid moisture accumulation.
- Page 34 NOTE...
Need help?
Do you have a question about the LRFC21755 and is the answer not in the manual?
Questions and answers