Advertisement
Quick Links
Installation &
Quick Start Guide
V1.5
This guide will help you install and configure your Shift-I™. It covers connecting the 3
wires, as well as how to configure the unit to suit your vehicle. The "User Manual"
(other booklet) provides the specific details on all the features and how to configure
them. First, a brief background as to why these are becoming so popular.
Using an RPM Display...
Tacho gauges mostly go unused, because they are not visible for when you need them.
However to get the most from your engine, they are the most important as they provide
the accurate reference gauge for where the engine makes the most torque. Having a
gauge in your peripheral vision that shows this range of torque, provides a consistent
and focused reference. Up shifting, down shifting, identifying optimal corner entry/exit
gear selection, staging RPM etc... It also provides a reference for performance, to
maintain pace, tyre/fuel management and also to provide immediate feedback on
corner exit RPM vs line taken. It provides a tool to form new habits and break some old
ones, like over braking and coasting. This can increase your level of performance,
control and also engine life. Importantly, this is achieved without taking your eyes off
the road!
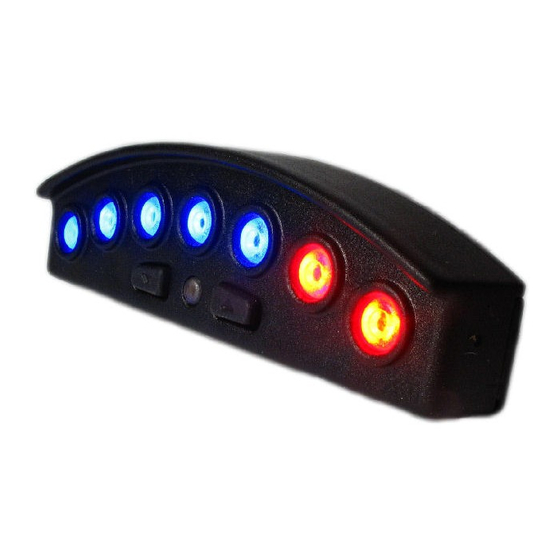
Shift-I™
Shift-I™ is a highly engineered progressive RPM indicator. The lights are user
programmable, to allow you to focus on the RPM range you need. You can set where
the first light turns on and where they flash. Usually this is from where the torque kicks
in through to redline. The lights in-between are automatically set at equally spaced
RPM points, which give you a predictable scale for anticipating a smooth & planned
gear change. Various display modes are included to suit your driving requirements.
Why seven lights? Extensive testing determined that within your peripheral vision you
can instantly and easily recognize how many of the seven lights are illuminated. Any
more and you need to concentrate, which would otherwise remove your attention from
where it needs to be. Any less and the RPM trend information is lost. During
acceleration, you will be able to distinguish the progression of the lights. The result is a
consistent reference point with smooth, anticipated shift points.
1
Advertisement

Related Manuals for Ecliptech Shift-I

Summary of Contents for Ecliptech Shift-I
- Page 1 Quick Start Guide V1.5 This guide will help you install and configure your Shift-I™. It covers connecting the 3 wires, as well as how to configure the unit to suit your vehicle. The “User Manual” (other booklet) provides the specific details on all the features and how to configure them.
-
Page 2: Installation & Wiring
Disclaimer: This wiring advice is a guide only and is only to be used at your own risk at your own risk. The Shift-I is very robust and it will not be damaged by connecting the wires incorrectly. be damaged by connecting the wires incorrectly. The most... - Page 3 Take the panel off above the pedals, which is where you usually find the fuse panel. Look around this area and there is often a bolt on the chassis frame with one or more wires bolted to it. Connect the Shift-I’s ground to one of these wires.
- Page 4 To route a wire going to a coil-on-plug, find a grommet going through the firewall near the pedals and poke a wire through to the engine bay. If you need wire, ask Ecliptech when ordering. Alternative if you find the same coil-on-plug wire colours at the ECU, connect there.
-
Page 5: Verifying Operation
Go to page 17 of the User Manual and reduce the Sensitivity Setting from the default of 6, down to 4. When you first turn on ignition, it will show battery voltage. As the Shift-I™ is not yet calibrated to the vehicle, press either button to exit this mode “before starting the engine”. - Page 6 Two settings need be set, Calibration Value and RPM Set-Points. Calibration Value The calibration value is a setting that tells the Shift-I™ how many pulses it receives for each revolution of the engine. This depends on your vehicle and how the tacho signal is connected.
- Page 7 • The Shift-I responds to RPM increasing very quickly. Often it’s considerably faster and more accurate than the instrument tacho gauge. Which means it may respond before the gauge needle does. Once a light turns on, the RPM has to drop a certain amount before it will turn off.
-
Page 8: Mounting The Display
(without leaving a residue), and without any chemicals. The Shift-I™ must be mounted behind a windscreen, where it is not subjected to the wind pressure or rain. Choose a place to mount the unit where the lights are clearly visible and it do not interfere or obstruct the drivers view.
Need help?
Do you have a question about the Shift-I and is the answer not in the manual?
Questions and answers