Table of Contents
Advertisement
Quick Links
HE-22
INSTALLER: Leave this manual with the appliance.
CONSUMER: Retain this manual for future reference.
Hybrid Energies Inc.
12285 Cardinal Street, Mission
BC V4S1L3, Canada
HYBRID ENERGIES A.T. Inc
Model: HE-22
Gas/Elecrical Fired Heater
SERIAL NUMBERS 1001 AND HIGHER
U
SERS'
Tested and listed
by
O
PERATION and
M
AINTENANCE
This appliance may be installed in an aftermarket
permanently located, manufactured home (USA
only) or mobile home, where not prohibited by local
codes.
This appliance is only for use with the type
of gas indicated on the rating plate. This appliance
is not convertible for use with other gases, unless a
certified kit is used.
*Conversion kit required for Propane use
I
NSTALLATION
M
ANUAL
LABTEST Certification Inc
Delta, British Columbia
ANSI Z21.88-2019 / CSA 2.33-2019,
CSA 2.17-2017 CAN/CSA P.4.1-15
Electrical listings:
CSA-C22.2 No. 46-13 (R2018)
UL 2021 "Fixed and Location-Dedicated Electric Room Heaters"
1
Advertisement
Table of Contents

Summary of Contents for Hybrid Energies HE-22
- Page 1 HE-22 HYBRID ENERGIES A.T. Inc Model: HE-22 Gas/Elecrical Fired Heater SERIAL NUMBERS 1001 AND HIGHER SERS’ NSTALLATION Tested and listed PERATION and AINTENANCE ANUAL This appliance may be installed in an aftermarket permanently located, manufactured home (USA only) or mobile home, where not prohibited by local codes.
- Page 2 Congratulations on choosing a Hybrid Energies patented heating appliance. The HE-22 is one of the most advanced Power Vented Gas heaters available today. It is solidly designed using the latest technology and manufactured to the highest quality. It is our aim to provide you with an appliance for many trouble-free years of reliable service.
-
Page 3: Table Of Contents
TABLE OF CONTENTS PAGE No. PAGE No. Lighting Instructions / Label Caution and Safety warnings Rating label Certification and code requirements Checking inlet and outlet pressure Manufactured Home or Mobile Home Front Glass removal ... - Page 4 HE-22 CAUTION SAFETY FOR YOUR SAFETY - Do not install or operate your HE-22 without reading and understanding this manual. Any installation or operational deviation from this instruction manual voids the Hybrid Energies Warranty and may prove hazardous. This appliance must be installed by a qualified gas installer and the installation must conform to the installation codes.
- Page 5 CAN/CSA P.4.1-15 – Testing Method for Measuring Annual Fireplace Efficiency. The listing label is attached to the appliance on the front fan housing. Please contact Hybrid Energies A.T. Inc., if you have any questions regarding the certification of this appliance.
- Page 6 HE-22 APPLIANCE FOR INSTALLATION IN MANUFACTURED OR MOBILE HOME Note: If this appliance is intended for mobile home, manufactured home or recreational vehicle please contact your dealer for the appropriate conversion kit...
- Page 7 HE-22 APPLIANCE FOR INSTALLATION IN MANUFACTURED OR MOBILE HOME (CONTINUED)
- Page 8 HE-22 SPECIFICATIONS Input rating / Entrée assignée 10,000—15,500btu (3.0—4.5kw) 12,700—15,500btu (3.7—4.5kw) Manifold pressure / Pression d’admission 3.5”. W.C. (0.9 kPa) 10” W.C. (2.5 kPa) Orifice size - Center/ Dimension de l’orifice 48# DMS (mm ) 60# DMS Orifice size - Outside/ Dimension de l’orifice...
-
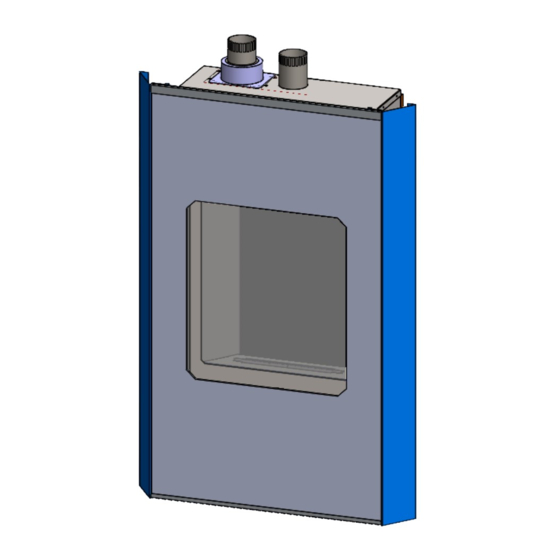
Page 9: Appliance Dimensions
HE-22 APPLIANCE DIMENSIONS All dimension are shown in inches 4.00... -
Page 10: Appliance Description
HE-22 APPLIANCE DESCRIPTION Circulating room air inlet DO NOT OBSTRUCT MAINTAIN 2.00” CLEARANCE Top View Combustion air Combustion inlet exhaust Combustion Heat exchanger Wall mount rails Glass viewing area Bottom Circulating fan Gas valve Ignition module Ducted warm air (4x 4.00” outlets) - Page 11 HE-22 Installers unpacking and installation road map...
-
Page 12: Attaching Air Circulating Pipes
Before mounting the unit into the wall the top combustion plug must be connected and the four outlet pots attached Remove label and Cap any outlets WARNING To prevent overheating of the HE-22 a minimum of 20sq” must left open at all times. Failure to do this may result in damage to compo-... -
Page 13: Installation / Framing
HE-22 Installation Instructions / Framing (24” 2X8 studs shown as example 0.00 Chase Clearances: The model HE-22 is zero clearance to combustibles Minimum Chase width (24” stud center). 22.50” Minimum boxed opening for air circulating pipes (optional for additional heat zones). - Page 14 HE-22 Installation Instructions (Top & bottom glass rail) Top glass Bottom glass rail rail Glass located into rail Attach bottom glass support with screws provided (5 x bottom, 2x side) Attach top front glass support with screws provided (5 x top, 2 x sides)
- Page 15 HE-22 Installation Instructions (Side rail installation) Attach Side 0.50 rails Typical side rail fitment for 2x8 wall cavity with 5/8” dry wall. Side rails (using middle hole on side brackets) Note: All screws required to mount the 2 x side rails can be found attached to the unit...
- Page 16 HE-22 Installation Instructions (Side rail installation) Attach side support brackets with 5 x screws each side. 4.50 1.5” Top View Using the middle hole in the bracket will set the unit to the correct depth in a standard 2 x 8” stud (7.50” cavity Recommended depth from depth).
- Page 17 HE-22 Installation Instructions Framing Circulating Ducts Note: Header across outer beams for support above circulating ducts. 4” insulated air circulating ducts. Zero clearance to combustibles 6” chase for circulating ducts Do not obstruct top air inlet grill with wall covering...
-
Page 18: Venting Clearances / Installation
HE-22 Venting Clearances and Installation... - Page 19 HE-22 Venting Clearances and Installation 4.00in (4cm) 4.00in (4cm) Zero Zero Zero Zero See local code See local code See local code See local code...
- Page 20 HE-22 Exhaust Venting Components Vertical termination Make Model Metalfab Metalfab 4DVT33FX Duravent 46DVA—GK 2.9” Amerivent 4DCAT33 2.9” Dura-vent Selkirk 4DT-33IK35 Selkirk Ameri-vent 3.0” Horizontal termination HORIZONTAL TERMINATIONS For horizontal termination, only the HE-B-100 horizontal termination must be used. Vent piping Any certified solid pipe ‘B”...
-
Page 21: Vertical Venting And Clearances
HE-22 Vertical Venting Clearances and Installation VENTING Clearance to combustibles The following clearances must be maintained around the vent pipe: Vertical runs: 1”, Horizontal runs 2”. IMPORTANT: This appliance venting system is any certified 3” ‘B’ Vent for exhaust outlet and 3 “ listed metal or plastic pipe for air inlet. - Page 22 HE-22 Venting Chart Self balancing power vent system does not require restrictors. Note: Air intake and exhaust must terminate at the same point. Maximum total run = 120ft If solid pipe is used a maximum of 6 elbows on the exhaust and 6 elbows on the air in- take (total of 12).
-
Page 23: Vent Pipe Clearances
HE-22 Venting Pipe Clearances and Installation VENT PIPE Any certified solid pipe ‘B” Vent may be used or the following 3” 2 ply flex pipe: • Selkirk 3” Flexi liner. • Duravent 3” duraflex liner • Ecco Heating 3” flex liner. - Page 24 HE-22 Rear Vent installation using HE-B-100—Dimensions Heat shield installed No heat shield installed Heat shield may be used as required. Clip into 4 slots to secure Vent Clearances: Non combustibles: Top, sides & bottom - Zero (all round) Combustibles 4.00”...
-
Page 25: Rear Vent Installation
HE-22 Rear Vent installation using HE-B-100 Cut rectangular hole in whole center of chase 17 3/4” x 5 3/4” Attach termination to wall using 4 x 2” wood screws provided Exhaust outlet Assemble 3” ‘B’ vent and secure to unit and... -
Page 26: Air Circulating Pipes Installation
50ft per outlet. • Clearance to combustible is zero. Note: To prevent overheating of the HE-22 a minimum of 20sq” must left open at all times. Failure to do this may result in damage to components if cycling on limit switch. -
Page 27: Gas Connection
HE-22 GAS CONNECTION Before connecting the appliance to the gas supply line, double check that the appliance you have purchased is designed for the gas type you are using. The gas type markings are located on the certification label and also on the appliance’s gas valve. -
Page 28: Electrical Connections
“Verify proper operation after servicing. 120v Connection The model HE-22 comes complete with a 120v power lead. This maybe replaced as required by local code. 240v Connection The model HE-22, 240v system is wired as any standard 240v system. -
Page 29: Final Installation Check
HE-22 FINAL INSTALLATION CHECK Each Hybrid Energies Gas Heater is checked and tested at the factory prior to being packaged and shipped to our dealers and finally installed in your home. Hybrid Energies recommends that before leaving this unit with the customer, the installer must ensure that the appliance is firing correctly and that the electrical system is in working order. -
Page 30: First Fire
HE-22 FIRST FIRE When operated for the first few times, the appliance will emit some odor and fumes. This is due to the heat from the appliance evaporating the oils and solvents used in fabricating the appliance. Close off the room to the rest of the house and open all windows. Keep the room well ventilated, as smoke alarm may sound. -
Page 31: Lighting Instructions / Label
HE-22 LIGHTING INSTRUCTIONS / INSTRUCTIONS D'ALLUMAGE WARNING: If you do not follow these instructions exactly, a fire of explosion may result causing property damage, personal injury or loss of life. ATTENTION: Si vous ne suivez pas ces instructions à la lettre, un feu d'une explosion entraînant des dommages matériels, des blessures ou la perte de la vie. -
Page 32: Rating Label
ANSI/NFPA 70 aux É.-U. Cet appareil est certifié pour l’installation dans une chambre à coucher ou une pièce qui sert de chambre. Made in Canada by / Fabrique au Canada par: Hybrid Energies A.T. Inc, Mission, B.C. HE-00001 July 2020... -
Page 33: Checking Inlet And Outlet Pressure
HE-22 CHECKING INLET AND OUTLET GAS PRESSURE 1. Remove the front glass and circulating fan housing. 2. The pressure test taps are located on the valve. The taps are located in the gas valve front face. The inlet is marked ‘IN’ and the outlet is marked ‘OUT’. -
Page 34: Front Glass Removal
HE-22 FRONT GLASS REMOVAL 1. Attach suction 3. Gently tilt glass cup to mid point on Clear of unit glass 2. Lift glass up until the bottom glass edge disengages from the bottom rail. 4. Drop glass down and then lift safely... -
Page 35: Switchable Glass Removal (Optional)
HE-22 SWITCHABLE GLASS REMOVAL Disconnect switchable glass power plug Attach suction cup to mid point on glass Lift glass up until the Drop glass down Gently tilt glass bottom glass edge and then lift safely Clear of unit disengages from the... -
Page 36: Mid Glass Removal
HE-22 MID GLASS REMOVAL 2. Lift glass up until the bottom glass edge disengages from the bottom rail. 1. Attach suction cup to mid point on glass 4. Drop glass down and then lift safely away from unit 3. Gently tilt glass... -
Page 37: Firebox Door Removal
HE-22 FIREBOX DOOR REMOVAL The door assembly locates into a bottom track. Remove the top door screws Gently tilt glass frame. Lift the frame up until the Note: Be careful to bottom edge disengages secure the glass in from the track. -
Page 38: Sit Remote Control Operation
HE-22 INSTALLER: PLEASE MAKE SURE THAT CUSTOMER HAS THE INSTRUCTION BOOKLET SUPPLIED WITH THE SIT REMOTE ALONG WITH THE SUPPLEMENT FOR SWITCHING THE ELECTRIC ELEMENT ON/OFF... - Page 39 HE-22...
- Page 40 HE-22...
- Page 41 HE-22 This appliance is equipped with an electric heating element. It can be turned on and off using the Proflame system. To activate this function use the mode key to select AUX. Use the Up/Down keys to select heating element on/off. When this function is selected it turns on the electric element automatically turns off the gas burner.
-
Page 42: Gas Electrical Circuit
HE-22 Gas electrical circuit Combustion fan SIT controller Heating J4 switch element relay Pilot Air pressure Limit switch switch Gas valve Heating element relay Heating element and thermostat circuit Circulating fan electrical circuit 24v transformer 120v thermodisk Gas circuit 120v thermodisk... -
Page 43: Electrical Circuit Diagram
HE-22 Electrical circuit diagram... -
Page 44: Maintenance
Regularly: • Frequent cleaning of the glass is required. Hybrid Energies recommends using a good quality “gas fireplace” glass cleaner that is available at any hearth retail location. DO NOT CLEAN WHILE HOT. -
Page 45: Servicing Under Warranty
HE-22 SERVICING UNDER WARRANTY Before servicing, read the terms and conditions of the Hybrid Energies warranty at the back of the manual. Contact the authorized Hybrid Energies dealer where you purchased the appliance from and provide them with details of the problem, along with the initial installation information (from the front of this manual). -
Page 46: Operational Flow Chart
HE-22 Gas on Cycle Gas off cycle Heating element on cycle Heating element off cycle... -
Page 47: Fault Finding Chart
HE-22 FAULT FINDING CHARTS Gas System PROBLEM POSSIBLE CAUSE ACTION REQUIRED Unit Does not fire Check thermostat, remote, breaker are Switch on all sources call for heat. calling for heat Combustion fan does not start Faulty SIT controller, pressure switch Check pressure switch is in start posi- or limit switch. -
Page 48: Parts List
HE-22 Replacement Parts The following replacement parts are available from your authorized Hybrid Energies dealer: Description Part Number Gas Valve HE-0010 SIT Controller HE-0015 SIT Wiring Harness HE-0017 Pilot Assembly HE-0020 24v Transformer HE-0025 Valve Tray—Relay Switch HE-0030 Combustion Blower... -
Page 49: Frequently Ask Questions
Q. How do I care for my plated trims. A. Hybrid Energies recommends a cleaning with a damp cloth. DO NOT use chemical cleaners as they may harm the finish, and void your warranty. NOTE: If the top louvers, or top overlay starts to discolor, check the door gasket seal and replace if necessary. -
Page 50: Note Sheet
HE-22 NOTES... -
Page 51: Warranty
A.T. Inc, hereinafter referred to as “Hybrid Energies”. Hybrid Energies war- rants to the original purchaser of an Hybrid Energies gas burning heater (s) that the product will be free of defects in materials and work- manship under normal use and service, for a “lifetime”. -
Page 52: Warranty Registration
POSTAGE WARRANTY REGISTRATION HYBRID ENERGIES TECHNOLOGIES FOLD DOWN AT LINE FOLD DOWN AT LINE & TAPE CLOSED Model # : Serial #: Date Installed: yyyy Name: Address: City: State/Prov: ZIP: Phone: ( _____ ) Dealer's Name & Address: City: State/Prov:...
Need help?
Do you have a question about the HE-22 and is the answer not in the manual?
Questions and answers