Table of Contents
Advertisement
Advertisement
Table of Contents

Summary of Contents for Zoomo Zero
- Page 1 Zoomo Zero User Manual...
- Page 2 Zoomo workshop or dealer. This user manual is part of the scope of delivery of your Zoomo e-bike. It is only valid for the product shipped along with it. Please make sure to store this manual in a safe place. Please also make sure you understand your national guidelines before using your Zoomo e-bike on public roads.
- Page 3 INSTRUCTIONS PERTAINING TO RISK OF FIRE, OR INJURY TO PERSONS INSTRUCTIONS RELATIVES AU RISQUE D'INCENDIE OU DE BLESSURE AUX PERSONNES GENERAL WARNINGS ! Read all the instructions before using the product. ! To reduce the risk of injury, close supervision is necessary when the product is used near children.
- Page 4 DURING RIDE WARNINGS ! The bike's components may become hot after heavy use. Do not touch the motor or brake components (calliper, disc rotor)as there is a burn risk. ! This EPAC cycle is designed for on-road use only. Do not ride off-road, off jumps, or down steep bumpy terrain.
- Page 5 AVERTISSEMENTS GÉNÉRAUX : ! Lisez toutes les instructions avant d'utiliser le produit. ! Pour réduire le risque de blessure, une surveillance étroite est nécessaire lorsque le produit est utilisé à proximité d'enfants. ! N'essayez pas de mettre les doigts ou les mains dans les systèmes électriques et les roues en mouvement.
- Page 6 PENDANT LA CONDUITE AVERTISSEMENTS ! Les composants du vélo peuvent devenir chauds après une utilisation intensive. Ne touchez pas les composants du moteur ou du frein (étrier, disque rotor) car il existe un risque de brûlure. ! Ce cycle EPAC est conçu pour une utilisation sur route uniquement. Ne roulez pas hors route, hors des sauts ou sur un terrain accidenté...
-
Page 7: Table Of Contents
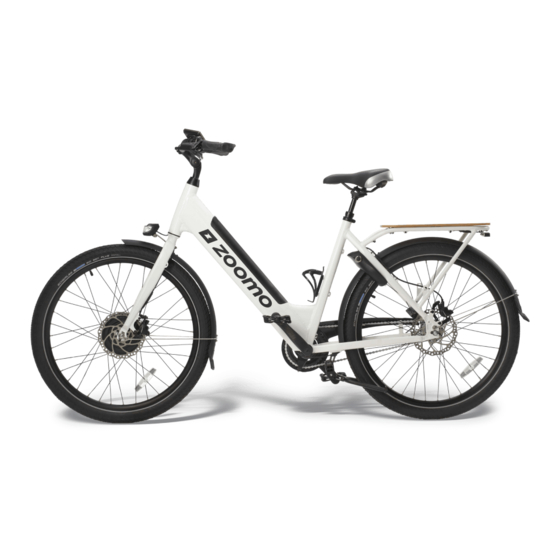
USB charging e. Pedal assist modes 9. Shutting Down the Bike a. With motor lock b. Without motor lock 10. Zoomo Batteries (Warnings) a. Removing the battery b. Charging the battery 11. Mudguards and Luggage Rack a. Mudguard clearance b. - Page 8 OVERVIEW DIAGRAM Display Battery Brake Lever Drink Bottle Holder Stem Saddle Headset Seatpost Front Light Carrier Fender Rear Light Fork Rear Lock (optional) Carrier Strap Brake Calliper Front Brake Calliper Rear Front Motor Rear Fender Rear Axle Rotor Reflector Kickstand Spokes Chainring Tyre...
- Page 9 RECOMMENDED TORQUE RATINGS (TABLE 1) Component Screws and bolts Torque Value TRANSMISSION Rear derailleur Fixation screw 8 - 10 Nm Cable screw 5 - 7 Nm Tension scre 3 - 4 Nm Gear lever Fixation screw 5 Nm Cassette Tightening screw 40 Nm Crank Fixation screw on crank axle...
-
Page 10: Saddle Height
INSTRUCTIONS D'INSTALLATION ET DE FONCTIONNEMENT RIDING POSITION & BIKE SETUP SADDLE HEIGHT The first set up to carry out on your Zoomo is the saddle height. Once again, your local workshop can help you do this. You must not hesitate to adjust this if you do not find the correct height immediately. -
Page 11: Saddle Position
SETTING SADDLE POSITION Adjust the angle and setback of the saddle as suits you. We have equipped our bikes with Tighten the screw, ensuring that it ergonomic saddles, but a careful set up is does not surpass the maximum required to ensure optimal comfort. In torque level indicated next to this section you will find advice for an the screw. -
Page 12: Brake Lever Position
(see Figure 7) The Zero bike has an “A-head“ head set: Adjust the distance of the brake this is adjusted using the round hood lever from the grip in order to easily which is found above the stem. -
Page 13: Pedals
PEDALS FITTING PEDALS To install your pedals, follow these steps: Put a small amount of mounting grease (you can find this at your local bike retailer) on the thread of each pedal. Tighten the right pedal (marked «R» Figure 13. Pedal threads. Make sure on the pedal, see Figure 13) in a you rotate the correct direction... -
Page 14: Rear Igh Axles
Nexus 3 internal hub gear. You need to set TYRE PRESSURE the tension of the chain before tightening the axle nuts. The Zoomo zero is fitted with puncture Set the chain tension by tightening resistant tyres, however it is always the axle tension bolts. M5 hex key. - Page 15 ADJUSTMENT OF CHAIN TENSION The chain is tensioned using the rear horizontal sliding dropouts. Ideally the chain should have no greater than 2cm of deviation from its fixed position. Too tight and it will affect the shifting of the hub. Too loose and the chain will come off.
-
Page 16: Brake Adjustment
Once the chain has been cleaned, we recommend a dry lubricant to protect the chain. Whilst rotating the cranks 4-5 drops of dry lubricant should be used on the chain. We recommend Finishline Dry Lubricant. Figure 24: Apply 3-4 drops of dry lubricant to the chain BRAKE ADJUSTMENT WARNING! -
Page 17: Starting / Shutdown Of System
The retaining clip can now be separated from the pads. Insert the new pads into the retaining clip and reinstall the pads. Figure 28: Pads and Retaining Clips STARTING / SHUTDOWN OF THE SYSTEM SWITCH ON PRESS AND HOLD SCAN KEY ‘ON’... - Page 18 ADJUSTING THE GEAR MECHANISM ADJUSTING THE GEAR MECHANISM REMOVAL OF THE REAR SHIFT MECHANISM You will need to remove the rear shift mechanism to lube the shifting rod, to change the gear cable or tighten the axle nut. Loosen the rear shift assembly bolt until the shift mechanism can be pulled sidewards exposing the RH side axle nut.
- Page 19 You will hear a sharp loud noise only if there is significant play in the head set. Your Zoomo Zero may be fitted with an adjustable stem. If this is the case the Pay attention to other noises, such as those of...
-
Page 20: Pedal Assist Modes
OPERATING PEDAL ASSIST MODES The Zero has five levels of pedal assist. Level 1 is the lowest level, level 5 is the highest. Battery drain is higher in the levels 4 and 5 with three being a good balance for range and power. You can select your pedal assist level by using the up and down arrows. -
Page 21: Zoomo Batteries (Warnings)
MOVING AND STORAGE INSTRUCTIONS FOR BATTERIES INSTRUCTIONS VISANT LE DÉPLACEMENT ET L'ENTREPOSAGE POUR PILES ZOOMO BATTERIES WARNING! AVERTISSEMENTS The battery may require a small amount La batterie peut nécessiter une petite of force to remove the battery from the force pour retirer la batterie du cadre. -
Page 22: Removing The Battery
REMOVING THE BATTERY CHARGING THE BIKE The bike's battery can be removed from Plug the socket into the battery before the bike for storage and charging. To plugging into the wall to initiate charging. remove the battery turn the key and the The battery will charge to 100% in around battery will pop out of position in the frame. -
Page 23: Mudguard Clearance
200 kg (cycliste + chargement). your bike. Keep to the size of tire equipped on your bike at sale in order to We have equipped Zoomo bikes with keep the right size gap. If the gap is less specific luggage racks. These luggage... - Page 24 Certain trailers may be used with the When attaching luggage / bags to the Zoom Zero provided the total weight of rack always ensure that the rear lights the trailer including payload does not and reflectors are not blocked by the load exceed 150kg.
- Page 25 MOVING AND STORAGE INSTRUCTIONS FOR BATTERIES INSTRUCTIONS VISANT LE DÉPLACEMENT ET L'ENTREPOSAGE POUR PILES MAINTENANCE EVERY MONTH The chain of your electric bike is subject to high stress, especially if you use the higher levels of assistance. Regularly check its wear Inspect for any possible play in the and replace it often.
- Page 26 RECOMMENDED CONSUMABLE SPARE PARTS Tyres Kenda Quick Drumlin 26×2.25 Tubes Kenda Tube TUBE932T Brake Pads Tektro Part Number E10.11 Chain KMC Z1 Grips Velo VLG 1179 Saddle Velo VLG 64950...
-
Page 27: Error Codes
Contact your dealer if these error messages are present. A troubleshooting guide in Contact your dealer if these error messages are present. A troubleshooting guide in reference to these codes is available on request through Zoomo customer service. reference to these codes is available on request through Zoomo customer service. -
Page 28: Battery
Tampering can void the warranty and render your bike not in compliance with the applicable laws and regulations. To ensure safety, quality and reliability, use only original parts or Zoomo authorized replacements for repair. Zoomo is not responsible for any direct, incidental or consequential damages, including, without limitation, damages for personal injury, property damage, or economic losses due to tampering.
Need help?
Do you have a question about the Zero and is the answer not in the manual?
Questions and answers