Table of Contents
Advertisement
Quick Links
OPERATION MANUAL
Thank you for purchasing this product.
This operation manual describes precautions that are important for preventing accidents as well
●
as procedures used to handle the product.
To ensure the product is used safely and correctly, read this operation manual and attached
●
warranty thoroughly before using the product.
After reading this manual, keep it carefully stored together with the warranty in an easily
●
accessible location.
Fiber Monitor
F-1 K
CODE 080000-1000
Advertisement
Table of Contents

Summary of Contents for Sibata F-1K
- Page 1 CODE 080000-1000 Fiber Monitor F-1 K OPERATION MANUAL Thank you for purchasing this product. This operation manual describes precautions that are important for preventing accidents as well ● as procedures used to handle the product. To ensure the product is used safely and correctly, read this operation manual and attached ●...
-
Page 2: Table Of Contents
Data Output Setting Screen (SERIAL) ······················································· 32 Previous Measurement Value (LAST DATA) ················································ 32 Calibration Method ············································································· 33 Factor Value Calculation Method ······························································ 33 List of F-1K Communication Commands ················································· 34 Troubleshooting ················································································· 36 Main Specifications ············································································ 36 Consumables and Optional Products ····················································· 37 Operating and Storage Precautions ·······················································... -
Page 3: Before Using The Product
Sibata Scientific Technology Ltd. owns the copyright for this manual. ● This manual may not be copied, reprinted, transcribed, or otherwise reproduced or altered, either in whole or in part, without prior written permission from Sibata Scientific Technology Ltd. Checking Package Contents Check to make sure the package contains the following items before using the product. -
Page 4: Safety Precautions
Safety Precautions The warnings and instructions in this operation manual are provided to ensure that the product is used safely, to prevent injury to the operator and others, and to prevent property damage. All the precautions are important for ensuring safety, so be sure to read, understand, and comply with the precautions before using the product. - Page 5 Do not burn the Do not operate the product in a fire. product near highly flammable or Prohibited Prohibited combustible items. Doing so could cause an explosion Doing so could cause an explosion or fire. or fire. Never attempt to Do not store the connect to product in strong...
- Page 6 Do not place objects Do not use the on the power cord, power cord if it is bend the cord damaged. excessively, bundle, Prohibited Prohibited modify, or damage the cord. Doing so could cause a fire, electric Doing so could cause a fire, electric leakage/shock, or other problems.
- Page 7 Check the power Unplug the power cord for cuts or other cord from the outlet damage to the cable before cleaning or jacket before inspecting the Disconnect Mandatory operating the Power Plug product. instrument. Using the product in an abnormal Not doing so could result in electric state could result in a fire, electric shock/leakage or other problems.
- Page 8 Do not install Do not install the equipment that product near things generates significant that become hot. vibration near the Prohibited Prohibited product. Doing so could cause injury, Doing so could cause a fire, equipment equipment damage, an accident, or damage, or other problems.
- Page 9 Keep hands and Do not use the fingers away from product near moving parts during combustible or operation. flammable materials. Prohibited Prohibited Doing so could cause a fire, Not doing so could cause injury, explosion, or other problems, which electric shock, or other problems. is extremely dangerous.
- Page 10 Mandatory Mandatory In the unlikely event some sort of problem occurs, Sibata accepts no responsibility for providing compensation for data that could Not doing so could cause a fire, not be acquired or recorded, loss of data or electric shock, or other problems.
-
Page 11: Product Description
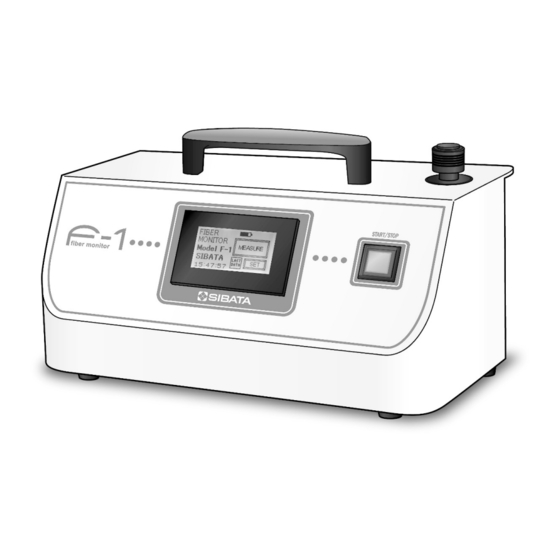
Product Description The F-1K fiber monitor is a measuring instrument that can selectively isolate only asbestos and other fibrous particles from among other airborne particles to calculate the relative concentration of fiber particles. The suction pump aspirates the sample air from the air sampling port into the monitor. -
Page 12: Names Of Parts
Names of Parts (10) (1) Touch panel LCD display (6) External power supply connector (2) [START/STOP] button (7) [BATT. CHARGE] lamp (3) Handle (8) Various ports (4) Air sampling port (9) Sampling holder (5) Power switch (10) Acrylic cover - 12 -... -
Page 13: Connecting Cables And Tubing
The AC adapter (RC60G-16D) is compatible with power supply voltages from 100 to 240 V AC, but the power cord portion that plugs into a power outlet is intended specifically for 100 V AC power supplies. Contact your Sibata representative before using the cord in an environment with a different power supply voltage. -
Page 14: Various Ports
A separate USB driver must be installed to use ● the USB port. The USB driver can be downloaded from the Sibata website. http://www.sibata.co.jp/technology/technology-27640/ Also, output settings can be configured to output data simultaneously during measurements. -
Page 15: Replacing The Sampling Holder
Replacing the Sampling Holder 1. Slide the sampling holder to the right to remove it from the plastic block. 2. Hold the tube with one hand and remove the sampling holder. While gripping the tube with one hand, ● grip the sampling holder and pull it out without pulling on the tube by rotating the holder. -
Page 16: Performing Measurements
Performing Measurements Touch Panel LCD Display The LCD display on this product is a touch panel, so it can be operated by directly touching the screen. To start a measurement, press the [START/STOP] button (except when using the timer to schedule measurements). -
Page 17: Preparing For Measurements
Preparing for Measurements 1. Make sure the sampling holder is connected to the back of the main unit. (Refer to Sampling Holder on p. 14.) 2. Slide the air sampling port cap downward. 3. Switch ON the power switch located on the back of the main unit. (Switch it to the “–” position.) 4. -
Page 18: Countdown Timer Measurements And (2) Manual Measurements
(1) Countdown Timer Measurements and (2) Manual Measurements On the main menu screen, touching the [MEASURE] button displays the [MEASURE TIME] sub-menu. Touching the underlined number (measurement time display) displays the [SET MEASURE TIME] setting screen. Enter the measurement time setting. (If zero is entered, it functions as the manual measurement mode.) After entering the setting value, touch the... -
Page 19: Scheduled Timer Measurement
(3) Scheduled Timer Measurement On the main menu screen, touching the [MEASURE] button displays the [MEASURE TIME] sub-menu. After entering the measurement time setting in the same manner as for the (1) countdown timer mode and when the sub- menu is displayed again, touch the [TIMER] button. -
Page 20: Screen Displayed During Measurements
Screen Displayed during Measurements TRBL Key lock Displayed if a problem occurs. → The [START/STOP] button is disabled. (Refer to Trouble Indicator Screen on p. 31.) → The [START/STOP] button is enabled. Battery charge level Screen switching Flashes when charge level is low. -
Page 21: Stopping Measurements
During measurements, if the measurement value exceeds the specified fibrous particle converted concentration value (refer to Alarm Setting Screen on p. 31), then the backlight of the touch panel LCD display will illuminate red. The backlight will remain red after the measurement is finished, but will revert to white after switching to a different screen, such as the [MENU] screen. -
Page 22: After Measurements Are Finished
After Measurements are Finished After measurements are finished, remove the air sampling port by turning it counterclockwise. Install the provided zero filter by turning the black portion clockwise. Zero filter ● Be sure to hold the black area with one hand during rotation. -
Page 23: Using The Data Logger
In the unlikely event some sort of problem occurs, note Sibata accepts no responsibility for providing compensation for data that could not be acquired or recorded, loss of data or other content, or for any other direct or indirect damages involved. -
Page 24: Outputting Data During Measurements
Outputting Data during Measurements Connect a cable properly between the equipment that will output data and the corresponding port on the back of the fiber monitor. (Refer to Various Ports on p. 14.) (1) Data Logger Interval Setting On the main menu, touch [SET] and then [INTERVAL] to display the screen shown to the right. -
Page 25: Menu Operations
Menu Operations Main Menu Screen (MAIN MENU) Battery charge level Flashes when charge level is low. Not displayed when powered by the AC power supply. TRBL Displayed if a problem occurs. (Refer to Trouble Indicator Screen on p. 31.) Current time Touching the [MEASURE] button displays the sub-menu screen. -
Page 26: Data Logger Setting Screen (Log)
Be sure to back up data regularly to be prepared in case of an accident or failure. Sibata recommends verifying functionality in advance and periodically inspecting the product. -
Page 27: Scheduled Timer Setting Screen (Timer)
Scheduled Timer Setting Screen (TIMER) Settings for starting measurements automatically at a specified time are specified on this screen. Directly touching the underlined value displays a numeric keypad. Enter year, month, day, hour, minute, and second setting values, respectively. Enter all values as two digits, such as “... -
Page 28: Default Setting Screen 1 (Set1)
Default Setting Screen 1 (SET1) Touching the [DATE/TIME] button displays the current time setting screen. Touching the [DISPLAY] button displays the display setting screen. Touching the [CAL.MODE] button displays the calculation process setting screen. Touching the [FACTOR] button displays the factor values setting screen. -
Page 29: Display Setting Screen (Display)
Display Setting Screen (DISPLAY) Touch the [BRIGHTNESS] button to adjust the brightness of the touch panel LCD display. Using the meter as a reference, touch the [+] or [-] button to adjust the brightness level. Touching the [ESC] button applies the setting. Touching the [ESC] button displays the default setting screen 1 again. -
Page 30: Factor Values Setting Screen (Factor)
Factor Values Setting Screen (FACTOR) This screen is used to specify values to be multiplied by the fibrous particle converted concentration values. Directly touching the underlined [Set Factor] value displays a numeric value entry screen. To change a factor value, enter a value and touch key (0.01 to 99.99). -
Page 31: Alarm Setting Screen (Alarm)
Alarm Setting Screen (ALARM) This screen is used to specify concentration alarm setting values. Directly touching the underlined value displays a screen for entering numeric values. To change the alarm setting value, enter a value and touch the key (0.1 to 999.9). Touching the [ENTER] button displays the default setting screen 2 again. -
Page 32: Data Output Setting Screen (Serial)
Data Output Setting Screen (SERIAL) This screen is used to switch data output ON/OFF for the indicated output port during measurements. Specify [ON] to simultaneously measure and output data. Specify [OFF] to download the data from the product ’ s internal memory after measurements are finished. -
Page 33: Calibration Method
Calibration Method Actual measurement values at the given measurement site must be recalibrated by the user before starting measurements. Official calibration methods are defined in JIS K 3850-1:2006 Determination of airborne fibrous particles Factor Value Calculation Method (1) With the sampling unit for the official method positioned at the same height as the air sampling port on the fiber monitor, use both systems to simultaneously measure airborne fibrous particles for at least 120 minutes. -
Page 34: List Of F-1K Communication Commands
List of F-1K Communication Commands Computer End Code <0d><0a> End Code <0d><0a> Ignore <0a> Include data terminating code in COM Reading Commands Computer Command Direction Response Measurement start time → ← YYMMDDhhmmss Invalid → Current time ← YYMMDDhhmmss Invalid Measurement time →... - Page 35 Content of Log Data Output of data that was previously recorded in the main unit includes the following data. • Equipment serial No. (S/N) • Year, month, day, hour, minute, and second when data was recorded • Fibrous particle converted concentration value (f/L) •...
-
Page 36: Troubleshooting
If the symptoms remain unchanged after implementing corrective measures, fill out a copy of the Problem Report Form and contact your Sibata representative. (Refer to Problem Report Form on p. 39.) Symptom What to Check... -
Page 37: Consumables And Optional Products
Sibata. To ship the product back to Sibata, include a completed copy of the Problem Report Form on p. 39 with the shipment. Also be sure to handle the product as instructed in Requesting Repairs for Products Exposed to Asbestos on p. -
Page 38: Requesting Repairs For Products Exposed To Asbestos
3. If a courier service is used to ship the product to the Sibata representative, in addition to the product model number, also enter “ AS ” in the “ Remarks ” or “ Description ” field of the shipping form. -
Page 39: Problem Report Form
F-1K Fiber Monitor Problem Report Form If a problem occurs, make a copy of this Problem Report Form, fill out the copy, and then contact the distributor where you purchased the product. - Page 40 Note: Due to product improvements, the product shape, dimensions, specifications, and other product information are subject to change without notice, to the extent that the changes do not affect product applicability or functionality.
Need help?
Do you have a question about the F-1K and is the answer not in the manual?
Questions and answers