Advertisement
Quick Links
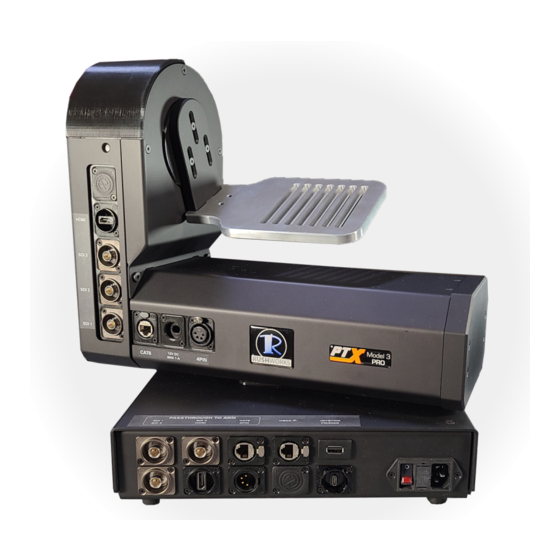
The PTX Model 3 PRO easily accommodates most camera/lens combinations,
including models from Blackmagic, Sony, Panasonic, Canon, Red, Arri and more.
The PTX Model 3 PRO is the third generation of our robotic pan/tilt heads.
Designed and built in Texas USA, it provides a rock solid, whisper quiet
platform for your camera and lens investment.
At 43 pounds/19.5kg it has the mass needed to manage large payloads, and the
torque generated by two large stepper motors that do the heavy lifting.
It communicates with controllers using VISCA over IP, and features multiple
passthrough connections for SDI, HDMI, USB, DC camera power and network.
User Guide
SUPPORT
888.894.7874 opt 2
odel 3
RO
M
Advertisement

Related Manuals for Rushworks PTX Model 3 PRO

Summary of Contents for Rushworks PTX Model 3 PRO
- Page 1 The PTX Model 3 PRO easily accommodates most camera/lens combinations, including models from Blackmagic, Sony, Panasonic, Canon, Red, Arri and more. The PTX Model 3 PRO is the third generation of our robotic pan/tilt heads. Designed and built in Texas USA, it provides a rock solid, whisper quiet platform for your camera and lens investment.
- Page 2 Connectivity The PTX Model 3 PRO provides passthrough connections between the base and arm, providing flexible connections for a variety of cameras and camcorders. This minimizes cable strain by centralizing cable routing through the central core of the fixture. SDI 1...
-
Page 3: Communications Interface
PRESET Reset ROM Version Socket Number Recall Preset Drive Speed PTX Model 3 PRO VISCA over IP is also integrated in the PTZ/PTX camera TALLY On/Off control software in RUSHWORKS VDESK™ Integrated Robotics Production Systems, as well as the RUSHCONTROL™ camera... - Page 4 Connecting your PTX Model 3 PRO head(s) Since the head requires an network connection, you need to identify an IP address and port number to establish communications. Using a CAT 5 or 6 cable, connect the PTX fixture to the network switch you wish to use.
-
Page 5: Basic Settings
Manually add network devices in IP VISCA mode. In IP VISCA and ONVIF modes, it will quickly switch to the CAM NUM bound device when adding a device via CAM Number keys 1~9 2,4,6,8 serve as direction keys as well, which can control pan and tilt rotation, and camera OSD. - Page 6 Maintenance & Firmware Updates In development is a simple and easy-to-use Web interface for the PTX Model 3 PRO. It will provide remote connectivity for monitoring and updating many operational parameters of the head. As more features and functionality are added, this will be a simple connectivity path for maintaining current and evolving configurations.
- Page 7 Securing your Camera to the Tilt Plate The aluminum tilt plate has seven (7) slots for mounting your camera/lens. There are two (2) threaded thumbscrews included with the PTX Model 3 PRO. These are secured into the plate for shipping only.
- Page 8 3 Rigging and Mounting Accessories The PTX Model 3 PRO has three (3) offset ⅜” threaded connectors on the bottom chassis plate for mounting and balancing the payload on heavy duty tripods and/or similar devices. If you plan to mount the fixture for inverted operation you’ll likely...
Need help?
Do you have a question about the PTX Model 3 PRO and is the answer not in the manual?
Questions and answers