Table of Contents
Advertisement
Advertisement
Table of Contents

Related Manuals for BESTEASY BE-G42S

Summary of Contents for BESTEASY BE-G42S
- Page 1 BE-G42S User Manual BESTEASY Tel.: +1 213 262 0251 Web: www.besteasy.top...
-
Page 2: Table Of Contents
BE-G42S User Manual Contents IMPORTANT SAFETY INSTRUCTIONS ....................1 CHAPTER 1 INTRODUCTION ......................4 1.1 Packing List ........................4 1.2 Appearance and Components ................... 5 1.3 Dimension .......................... 6 CHAPTER 2 SPECIFICATIONS ......................7 CHAPTER 3 INSTALLATION & USAGE ....................9 3.1 Media Loading ........................ - Page 3 BE-G42S User Manual 9.3 Linux Driver Installation ....................54 9.4 Detailed Linux Driver Settings ..................59...
- Page 4 BE-G42S User Manual ◼ Statement This manual content may be changed without permission and our company reserve the rights to make changes in technology, spare parts, hardware and software of the products. Please contract our company, if the user needs further information about the products. Without any written permission from our company, any section of this manual is prohibited to be copied or transferred in any form.
-
Page 5: Important Safety Instructions
BE-G42S User Manual Important Safety Instructions Before using the printer, please read carefully the following safety consideration in case of bodily injury or equipment damage. 1.Safety warning The print head will become very hot during printing, please do not touch the printhead and peripheral parts during printing and printing just finished. - Page 6 BE-G42S User Manual Note: Violating following instructions may cause slight damage of the appliance. 1) If you observe a strange smoke, odour or noise from the printer, unplug it before taking following measures. • Switch off the printer and unplug the set from the mains.
- Page 7 BE-G42S User Manual 3.Other Precautions The copyright for this user manual and various other manuals is property of our company. Any copying or conversion into electronic form and saving of this material without the express written permission is strictly prohibited. Use of the information contained in this manual is not subject to any patent liability.
-
Page 8: Chapter 1 Introduction
BE-G42S User Manual Chapter 1 Introduction 1.1 Packing List Note: 1.Unpack the printer and keep the packing materials in case you need to ship the printer in the future. 2.Any damages exist, please contact the local dealer. Note:The packing materials are based on the order. -
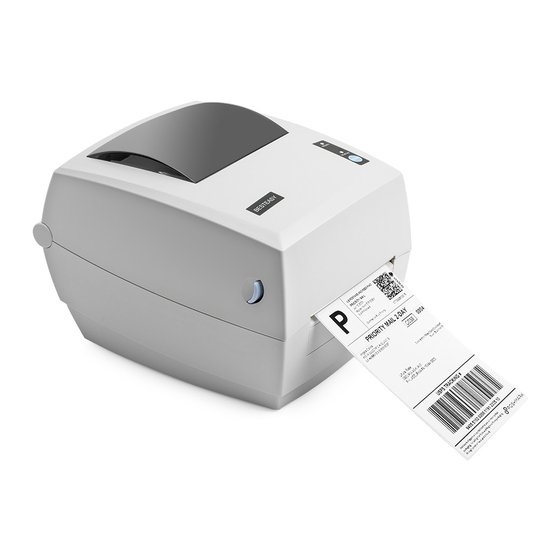
Page 9: Appearance And Components
BE-G42S User Manual 1.2 Appearance and Components ■ Front View ■ Rear View ■ Inside View Note:The views above are for your reference. Ports vary by your choice. -
Page 10: Dimension
BE-G42S User Manual 1.3 Dimension Unit: mm... -
Page 11: Chapter 2 Specifications
BE-G42S User Manual Chapter 2 Specifications (2/1) Items Parameter Printing method Direct thermal Resolution 203dpi(8dots/mm) Printing Printing speed 102mm/s Max. Printing width 108mm Max. Printing length 15mm - 300mm Processor 32 bits RISC CPU Memory Flash Paper out detection, seam label detection, black... - Page 12 BE-G42S User Manual (2/2) Items Parameter Code 39, Code 93, EAN 8/13 (add on 2 & 5), UPC A/E (add on 2 & 5), I 2 of 5, Codabar, Code 128 (subset A, Barcode B, C) QR Code Communication Interfaces...
-
Page 13: Chapter 3 Installation & Usage
BE-G42S User Manual Chapter 3 Installation & Usage 3.1 Media Loading 3.1.1 Paper Roll Loading 1.Press the left and right cover open lever with hands simultaneously and lift the printer cover. Hold the paper roll shaft and take out of the printer. - Page 14 BE-G42S User Manual 4.Then load the paper module from the top down to printer. 5.Pull some paper and pass it through paper guides, adjust paper guides according to the paper width. 6.Press down the top cover until it closes. Note: If your printer is under Thermal Line Printing Method, press down the printer...
- Page 15 BE-G42S User Manual 3.1.2 External Paper Roll Loading If the paper roll is extremely large, users can load the paper roll outside (See the graph at right). Pass the paper through the external feed slot and then through paper guides.
-
Page 16: Power Connection
BE-G42S User Manual 3.2 Power Connection 1. Make sure the printer’s power switch is in the off position. 2. Connect the AC adapter to printer. 3. Connect the power cord to AC adapter. 4. Connect the other end of power cord to the outlet. -
Page 17: Peripherals Connection
BE-G42S User Manual 3.3 Peripherals Connection 3.3.1 Interface Cable Connection The standard for the printer’s interface cable shows in the following. -- USB B-Type Cable 1) Turn off the power switch. 2) Connect the communication cable to the printer communication port to be used. -
Page 18: Operation Panel
BE-G42S User Manual 3.4 Operation Panel 3.4.1 Button Operation Power On When power off, turn on the power switch at the back of printer, then the indicator will light on. Power Off When power on, turn off the power switch at the back of printer, then the indicator will light off. -
Page 19: Basic Operation
BE-G42S User Manual 3.5 Basic Operation 3.5.1 Power on/power off Press “O” to power off the printer. Press “l” to power on the printer. 3.5.2 Feed Button Press the FEED button, and printer will feed paper to the specified position according to the paper type. - Page 20 BE-G42S User Manual 3.5.4 Printing Self-test Page The self-test checks the printer’s current settings, status and whether the printer has any problems or not. 1.Printing Manually 1) Make sure the roll is loaded properly. 2) Make sure the top cover and mechanism of the printer are closed properly. Then turn on the printer.
-
Page 21: Chapter 4 Interface
BE-G42S User Manual Chapter 4 Interface 4.1 USB Interface SIGNAL NAME VBUS... -
Page 22: Chapter 5 Maintenance & Adjustment
BE-G42S User Manual Chapter 5 Maintenance & Adjustment Adhesives and coatings of the media can transfer to the printer parts over time along the media path including the thermal print head and media sensor. This build-up can accumulate dust and debris. Failure to clean the print head, media path, and media sensor could result in inadvertent loss of labels, label jams and possible damage to the printer. -
Page 23: Cleaning Roller And/Or Paper Path
BE-G42S User Manual 5.3 Cleaning Roller and/or Paper Path 1) Open the printer cover and then remove the paper. 2) Remove any dust or foreign substance using dry cloth or cotton swab. 3) Soak the cloth or cotton swab in alcohol for medical use and use it to remove adhesive foreign substances or other pollution materials. -
Page 24: Chapter 6 Label Printer Utility Instructions
BE-G42S User Manual Chapter 6 Label Printer Utility Instructions 6.1 Installation Preparation Download BESTEASYUtilityForLabel in CD. e.g. BESTEASY Print Utility For Label V1.0.0.0. 6.2 Usage Note: The screen may vary slightly by different operating systems and models. Following takes BE-G42S (Windows 7) for example. - Page 25 BE-G42S User Manual (2).Add/Modify/Delete Printer, Connect Test. ●Click “Add Printer” to choose the printer and port (take USB for example), click “OK” and add successful.
- Page 26 BE-G42S User Manual ●Click “Delete Printer”, click “OK” to delete the printer.
- Page 27 BE-G42S User Manual ●Choose the printer currently use, connect it to computer. Click “Connect Test” to test whether the connection is ok or not. If connection is OK, the icon below will come out. If connection fails, normally shows following icon.
- Page 28 BE-G42S User Manual (3).Function. ●Click “Printer Information” to check the printer information. (Depend on your printer) ●Click “Print Test Text”, input the text you need to print. Set up the printing range (printable width & height). Click “Print” and the printer starts to print the text.
- Page 29 BE-G42S User Manual ●Click “Print Self Information”, then printer starts to print self-test page. Click “Label Auto Learn”, then printer will carry out the calibration. ● ●Click “Parameter Setting”. 1) Print density (choose range:0~15):...
- Page 30 BE-G42S User Manual 2) Judge Paper Mode (Label, Receipt, Blackmark): 3) Heat Adjust (Range:-50~50): 4) Print Speed (Range:2,3,4):...
- Page 31 BE-G42S User Manual 5) Click “Set” save all the above settings, click “ok” back to the main menu. 6) Click “Close” back to the main menu. ●Click “Restore Factory Settings”, click “OK” to restore factory settings, click “Cancel” to cancel the restore factory settings.
-
Page 32: Chapter 7 Windows Driver Instructions
Microsoft Windows Server 2012(64 bit) Microsoft Windows Server 2008 R2 Microsoft Windows Server 2008 SP2(32 bit/64 bit) Microsoft Windows Server 2003 R2 SP2(32 bit/64 bit) 7.2 Installation Preparation Download Windows Driver application program in CD. E.g. BESTEASY Label Printer Driver-v-2.7.2.2... -
Page 33: Installation
BE-G42S User Manual 7.3 Installation Warning: There are some differences under different operating system. Please operate it according to the tips. Recommend to close security software before installation in case of preventing installation. 1.Select one interface to connect your printer to computer. - Page 34 BE-G42S User Manual 5.Select the default installation port name of printer driver, then click “Next”. 6.Click "Finish".
- Page 35 BE-G42S User Manual 7.After installation, the icon will be found in “Start” → “Printers and Faxes”. Note: 1.If you already installed the driver (No matter what kind of port), when you connect the printer to computer, it will create a USB port automatically.
-
Page 36: Usage
BE-G42S User Manual 7.4 Usage 7.4.1 Printing Preferences 1.Click “Start” → “Devices and Printers”. Right click the icon and choose “Printing preferences”. - Page 37 BE-G42S User Manual 2.According to different needs, set the page.
- Page 38 BE-G42S User Manual ●Click “Paper Name”, then choose the paper type.
- Page 39 BE-G42S User Manual ●Click “Manager” to add a new stock. ●Choose “Rotate” or “Effect”, it will be showed in the “Preview”.
- Page 40 BE-G42S User Manual ●Click “Advanced” to set “Save Paper”, “Density”, “Speed”, “Test”, “Media Handing”, “Media Type”. 1) Save Paper Density...
- Page 41 BE-G42S User Manual Speed 4) Test...
- Page 42 BE-G42S User Manual 5) Media Handing 6) Media type...
- Page 43 BE-G42S User Manual 3.Click “Watermark”, it recommends to use BMP format.
- Page 44 BE-G42S User Manual 4.Click “Halftone”.
- Page 45 BE-G42S User Manual 7.4.2 Printer Properties 1.Click “Start” → “Devices and Printers”. Right click the icon and choose “Printer properties”.
- Page 46 BE-G42S User Manual 2.Click “General” → “Print Test Page”, and the printer will print the current settings.
- Page 47 BE-G42S User Manual 3.Click “Ports”, then choose the port needed.
- Page 48 BE-G42S User Manual 4.Click “Advanced” to set the available time for the printer.
-
Page 49: Removing
BE-G42S User Manual 7.5 Removing Note: Please turn off the printer or unplug the USB cable before removing the driver. 1.Double click Windows Driver. 2.Choose “Uninstall printer driver”, then click “Next”. - Page 50 BE-G42S User Manual 3.Choose the printer driver name needed to uninstall, then click “Next”. 4.Click"Yes".
-
Page 51: Chapter 8 Mac Driver Instructions
The driver of the installation file name is “Neflaca-BE-G42S-printer-driver-v1.3.0” 8.3 Driver Installation for macOS Warning: Under different operating system, the screen has slight difference. Please operate it according to the tips. Take BE-G42S (macOS 10.15) as example. 1.Double click the Driver, click “Continue”. - Page 52 BE-G42S User Manual 2.Select a destination and click “Continue”.
- Page 53 BE-G42S User Manual 3.Choose “Installation Type” and click “Continue”-> “Install”.
- Page 54 BE-G42S User Manual 4.Type in the password of your computer. 5.The installation was successful.
- Page 55 BE-G42S User Manual 6.Turn on the printer (for example: BE-G42S) and connect it to your computer (for example: via USB cable) 7.Click: Launchpad -> System Preferences -> Printers & Scanners.
- Page 56 BE-G42S User Manual 8.Under “Printer & Scanner”, printer BE-G42S is available.
-
Page 57: Chapter 9 Linux Driver Instructions
BE-G42S User Manual Chapter 9 Linux Driver Instructions 9.1 Manual Information This Linux Driver Installation Manual provides information on installation and usage of the printer’s Linux Driver according to PC operating system (OS). We maintain ongoing efforts to enhance and upgrade the functions and quality of all our products. - Page 58 BE-G42S User Manual 9.3 Linux Driver Installation Warning: Under different operating systems, the screen has slight difference. Please operate it according to the tips. Take Linux (64 bit) as example. 1.Unzip the installation package twice, right-click and select "Extract Here".
- Page 59 BE-G42S User Manual 2.Double click the file twice. 3.Right-click in the blank, choose the “Open in Terminal”.
- Page 60 BE-G42S User Manual 4.Open the terminal and input: chmod +x install, then press Enter key. 5.Input: sudo ./install, then press Enter key.
- Page 61 BE-G42S User Manual 6.Input the password for test and press the Enter key. 7. Installation completed; the terminal shows the following information:...
- Page 62 BE-G42S User Manual 8.Input “system-config-printer” to open the printer. 9.Connect the printer to the PC, the printer will be generated automatically.
- Page 63 BE-G42S User Manual 9.4 Detailed Linux Driver Settings 1.Add the printer and select the port of the device, then click “Forward”.
- Page 64 BE-G42S User Manual 2.Describe printer, then click “Apply”. 3.Choose whether to print a test page.
- Page 65 BE-G42S User Manual 4.Right click the “BE-N41”, choose the “Properties”. ⚫ Settings Choose the item for detailed setting, then click “Apply”.
- Page 66 BE-G42S User Manual ⚫ Access Control Choose the item for detailed setting. ⚫ Printer Options Choose “General”, “Logo Control”, “Buzzer Control” for detailed setting, then the printer will execute appropriate action according to the settings.
- Page 67 BE-G42S User Manual ⚫ Job Options Choose the item and the printer will execute appropriate action.
- Page 68 BE-G42S User Manual ⚫ Ink/Toner Levels...
Need help?
Do you have a question about the BE-G42S and is the answer not in the manual?
Questions and answers
Hi Can i get the Besteasy G42-S printer Window drivers please?? Thank you