Table of Contents
Advertisement
Available languages
Available languages
Advertisement
Table of Contents

Subscribe to Our Youtube Channel
Related Manuals for Taylor Swoden 8433325504823

Summary of Contents for Taylor Swoden 8433325504823
- Page 1 COFFEE MAKER INSTRUCTION MANUAL MODEL: 8433325504823 Read this manual thoroughly before using and save it for future reference The material in contact with the food is PP (polypropylene), PA(polyamides), Silicon, Stainless steel and Glass, 100% BPA free.
- Page 3 32-40 41-49 50-57 58-65...
-
Page 4: Important Safeguards
IMPORTANT SAFEGUARDS When using electrical appliance. Basic safety precautions should always be followed including the following: 1. Read all instructions. 2. Make sure that your outlet voltage corresponds to the voltage stated on the rating label of the coffee maker. 3. - Page 5 touch with hand. Use handles or knobs only. 17. Never leave the empty carafe on the keeping warm plate otherwise the carafe is liable to crack. 18. Never use the appliance if the carafe shows any signs of cracks or carafe having a loose or weakened handle. Only use the carafe with this appliance.
- Page 6 Notes on the cord plug This appliance has a polarized plug, To reduce the risk of electric shock, this plug is intended to fit into a polarized outlet only one way, If the plug does not fit fully into the outlet, reverse the plug, If it still does not fit, contact a qualified electrician, Do not attempt to modify the plug in any way.
-
Page 7: Control Panel
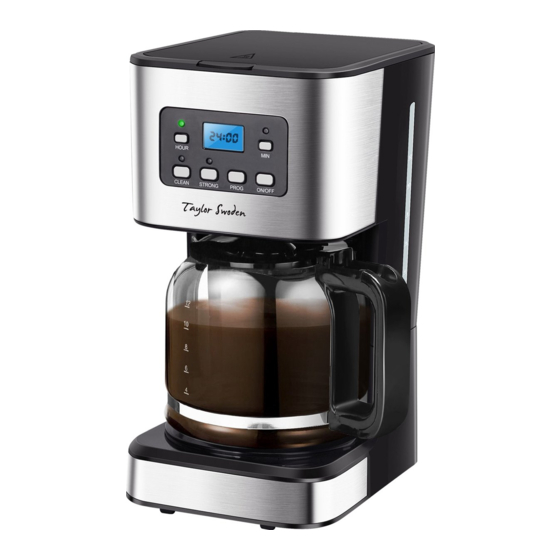
6. Sprayer 7. Water tank 8. Water gauge 9. Main housing 10. Warming plate 11. Bottom cover CONTROL PANEL ON/OFF Strength indicator indicator BEFORE THE FIRST USE Check that all accessories are complete and the unit is not damaged. Fill water into water tank to the MAX level and brew water for several times without coffee powder, then discard the water. -
Page 8: Delay Function
appliance will brew thick coffee. If you do not want to adjust the coffee strength, just follow the following operation to brew normal coffee. 6. Press ON/OFF button, the indicator will be illuminated red. The appliance will begin working. 7. The brewing process can be interrupted by pressing the ON/OFF button at any time, the indicator of ON/OFF button will be extinguished. -
Page 9: Delay Brew
DELAY BREW. Note: You may cancel the automatic start function by pressing ON/OFF. If you want to change the automatic start time, only following the above 2-4 steps again. 5) When the time is due, the LED will illuminate in red and the appliance starts brewing. When the process is finished, if you do not want to serve immediately, keep the coffee maker is energized, the coffee can be kept warm in the keep warm plate and the appliance will be cut off automatically after keeping warm for 30 minutes. -
Page 10: Hints For Great-Tasting Coffee
4. Switch on the appliance and allow it to “brew” de-scaling solution. 5. After “brew” one-cup solution, switch off the appliance. 6. Leave the solution stay for 15 minutes and repeat step 3-5. 7. Switch on the appliance and run off the solution until the water tank is completely empty. 8. -
Page 11: Instrucciones De Seguridad
INSTRUCCIONES DE SEGURIDAD Las siguientes instrucciones de seguridad básicas deben seguirse cuando se usan aparatos eléctricos: 1. Lea todas las instrucciones. 2. Verifique que el voltaje indicado en el aparato coincida con el voltaje local. 3. No sumerja el aparato, ni el cable eléctrico en agua u otros líquidos para evitar descargas eléctricas u otros daños. - Page 12 sin tirar del cable. 15. Levantar la tapa durante el Proceso podría provocar quemaduras. Extreme la precaución para evitar quemaduras producidas por el vapor. 16. Algunas partes del aparato están muy calientes durante su funcionamiento, no las toque con las manos. Sírvase únicamente de las asas.
-
Page 13: Know Your Coffee Maker
-Por clientes de hoteles, moteles y otros tipos de residencia -Establecimientos que ofrecen cama y desayuno CONSERVE ESTAS INSTRUCCIONES. SÓLO PARA USO DOMÉSTICO Información sobre el enchufe Este aparato contiene un enchufe polarizado. Para evitar riesgos de descargas eléctricas, el enchufe se encaja en una toma de corriente polarizada, en una sola posición. -
Page 14: Panel De Control
1. Embudo 2. Tapa de la jarra 3. Asa de la jarra 4. Jarra 5. Tapa superior 6. Pulverizador 7. Depósito de agua 8. Medidor de agua 9. Cuerpo principal 10.Placa calefactora 11.Cubierta inferior PANEL DE CONTROL Indicador Strength indicator intensidad ANTES DE COMENZAR A USAR Compruebe que el aparato contiene todos los accesorios y que la unidad no esté... - Page 15 3. Agregue el café molido en el filtro. Normalmente, para una taza de café, se necesita una cuchara de café molido, pero puede ajustarlo a su gusto. Cierre completamente la tapa. 4. Coloque la jarra de manera horizontal sobre la placa calefactora. 5.
-
Page 16: Limpieza Y Mantenimiento
Nota: Durante el proceso, los botones de “PROGRAM”,“DELAY BREW” ,“HR” y “MIN” no serán válidos. 3. Cuando el proceso haya terminado, si no desea servir el café inmediatamente, no desconecte la cafetera pues el café puede mantenerse caliente gracias a la placa calefactora que mantiene la temperatura. - Page 17 ATENCIÓN: Asegúrese de que el aparato está desenchufado antes de limpiarlo. Para evitar descargas eléctricas, no sumerja el cable, el enchufe, ni el aparato en agua u otros líquidos. Tras cada uso, asegúrese de desenchufar el aparato de la toma de corriente. 1.
- Page 18 paquete de café molido, vuelva a cerrarlo bien y consérvelo en el frigorífico para mantenerlo fresco. 3. Para un gusto óptimo, compre el café en granos y tritúrelos bien justo antes de añadirlos a la cafetera. 4. No reutilice el café molido ya que esto reduce el sabor del café.
-
Page 19: Ważne Wskazówki
WAŻNE WSKAZÓWKI Podczas korzystania z urządzenń elektrycznych tego typu należy zawsze przestrzegać podstawowych zasad bezpieczeństwa, w tym: 1. Przeczytaj wszystkie instrukcje. 2. Upewnij się, że napięcie wyjściowe odpowiada napięciu podanemu na tabliczce znamionowej ekspresu do kawy. 3. Aby uniknąć pożaru, porażenia prądem czy wyrządzenia szkód na zdrowiu, nie należy zanurzać... - Page 20 czyszczących, wkładek z wełny stalowej ani innych materiałów ścierających. 14. Aby odłączyć urządzenie, należy wyłączyć przełącznik, a następnie wyjąć wtyczkę z gniazda. Zawsze trzymaj urządzenie za wtyczkę, nigdy nie ciągnij za przewód. 15. Możesz się oparzyć, jeśli usuwasz pokrywę podczas cykli zaparzania.
- Page 21 -hotele, motele i inne środowiska mieszkalne; -miejscach typu bed&breakfast ZACHOWAJ TĘ INSTRUKCJĘ, JEDYNIE DO UŻYTKU DOMOWEGO Uwagi dotyczące wtyczki To urządzenie posiada wtyczkę polaryzacyjną, aby zmniejszyć ryzyko porażenia prądem, wtyczka powinna być umieszczona w polaryzowanym otworze wylotowym tylko w jednym kierunku.
-
Page 22: Panel Sterowania
3. Rączka dzbanka 4. Dzbanek (karafka) 5. Pokrywa górna 6. Opryskiwacz 7. Pojemnik na wodę 8. Wskaźnik poziomu wody 9. Główna obudowa 10.Płyta ogrzewająca 11.Dolna pokrywa PANEL STEROWANIA Przycisk Wskaźni włącz/wyłącz k mocy PRZED PIERWSZYM UŻYCIEM Sprawdź, czy wszystkie akcesoria są kompletne, a urządzenie nie jest uszkodzone. Napełnij wodę... - Page 23 dostosować ją do indywidualnego gustu. Zamknij całkowicie górną pokrywę. 4. Włóż karafkę z zamkniętą pokrywką za pomocą uchwytu na płytę nagrzewającą w pozycji poziomej. 5. Podłącz kabel zasilający do gniazdka. Jeśli chcesz wyregulować mocniejszy smak kawy, możesz raz nacisnąć przycisk "wskaźnik mocy" wtedy lampka kontrolna zaświeci się na pomarańczowo następnie urządzenie zaparzy mocniejszą...
- Page 24 "MIN" są nieważne. 3. Jeśli proces jest gotowy, jeśli nie chcesz, aby kawa była podana od razu, może ona stać na rozgrzanej ciepłej płycie. Urządzenie zostanie automatycznie wyłączone po 40 minutach. Aby uzyskać optymalnie dobry smak kawy, podaj ją od razu po zaparzeniu. 4.
-
Page 25: Usuwanie Kamienia
użyciu zawsze upewnij się, że wtyczka jest najpierw wyjęta z gniazdka. 1. Wyczyść wszystkie odłączalne części w gorącej wodzie po każdym użyciu. 2. Wyczyść zewnętrzną powierzchnię urządzenia miękką, wilgotną ściereczką, aby usunąć zabrudzenia. 3. Krople wody mogą gromadzić się w górnym obszarze lejka i kapać na podstawę urządzenia podczas zaparzania. - Page 26 szczelnie i przechowuj w lodó wce, aby zachować świeżość. 3. Aby uzyskać optymalnie dobry smak kawy, kup kawę w ziarenkach i delikatnie zmiel je przed zaparzeniem. 4. Nie używaj ponownie zaparzonej już kawy, ponieważ popsuje to jej smak. Ponowne podgrzewanie kawy nie jest zalecane, ponieważ kawa ma najlepszy smak natychmiast po zaparzeniu.
-
Page 27: Avvertenze Importanti
AVVERTENZE IMPORTANTI Quando si usa l'apparecchio elettrico, si devono sempre rispettare le precauzioni di sicurezza fondamentali: 1. Leggere tutte le istruzioni. 2. Assicurarsi che la tensione di uscita corrisponda alla tensione indicata sull'etichetta del produttore del caffè. 3. Per proteggersi contro il fuoco, scosse elettriche e lesioni alle persone non immergere il cavo, la spina o l'apparecchio in acqua o altro liquido. - Page 28 presa a muro. Tenere sempre la spina, non tirare mai il cavo. 15. La scottatura può verificarsi se la copertura viene rimossa durante i cicli di preparazione. Fare attenzione a non scottarsi con il vapore. 16. Alcune parti dell'apparecchio sono calde quando sono azionate, quindi non toccare.
- Page 29 CONSERVARE LE ISTRUZIONI. SOLO PER USO DOMESTICO Note sulla spina Questo apparecchio ha una spina polarizzata. Per ridurre il rischio di scosse elettriche, questa spina è destinata ad essere inserita in una presa polarizzata solo in un modo. Se la spina non si inserisce completamente nella presa, togliere la spina e riprovare;...
-
Page 30: Pannello Dei Comandi
CONOSCERE LA TUA MACCHINA DA CAFFE’ 1. Filtro 2. Coperchio della caraffa 3. Maniglia 4. Caraffa 5. Coperchio della macchina 6. Sprayer 7. Serbatoio d’acqua 8. Livello dell’acqua 9. Struttura principale 10.Base riscaldante 11.Coperchio PANNELLO DEI COMANDI Indicatore Pulsante ON/OFF di densità... -
Page 31: Prima Del Primo Utilizzo
PRIMA DEL PRIMO UTILIZZO Controllare che tutti gli accessori siano completi e che l'unità non sia danneggiata. Riempire l'acqua nel serbatoio dell'acqua fino al livello MAX e versare l'acqua per diverse volte senza polvere di caffè, poi eliminare l'acqua. Pulire e asciugare completamente tutte le parti rimovibili secondo la sezione “PULIZIA E MANUTENZIONE”... - Page 32 caffettiera alimentata, il caffè può essere mantenuto caldo grazie al mantenimento del caldo della piastra; l'apparecchio verrà interrotto automaticamente dopo 40 minuti se non sono stati scollegati manualmente al completamento della preparazione. Per un gusto ottimale del caffè, servirlo subito dopo la preparazione. 10.
-
Page 33: Pulizia E Manutenzione
(significa che il caffè entra nello stato di preselezione). 3) Impostare l'ora di inizio ritardata premendo ripetutamente il tasto HR e MIN, cioè 13:00. 4) Premere il pulsante DELAY BREW, il LED si illumina in verde. Dopo pcoo, l'LCD visualizzerà l'ora corrente. È possibile visualizzare l'ora di avvio automatico premendo DELAY BREW. - Page 34 sul manometro (la portata dell'acqua e della decalcomania è di 4: 1, il dettaglio si riferisce all'istruzione del decalcificatore. Si prega di utilizzare "decalcificatori domestici", si può anche usare l'acido citrico anziché il decalcificante (cento parti d'acqua e tre parti di acido citrico).
-
Page 35: Wichtige Sicherheitsmassnahmen
WICHTIGE SICHERHEITSMASSNAHMEN Verwendung Elekrogeräten. Grundlegende Sicherheitsvorkehrungen sollten immer eingehalten werden, einschließlich folgendem: 1. Lesen Sie alle Anweisungen durch. 2. Vergewissern Sie sich, dass Ihre Ausgangsspannung der Steckdose, der auf dem Typenschild der Kaffeemaschine angegebenen Spannung entspricht. 3. Zum Schutz vor Feuer, Stromschlag und Verletzungen von Personen dürfen Kabel, Stecker oder das Gerät nicht in Wasser oder andere Flüssigkeiten eingetaucht werden. - Page 36 13. Reinigen Sie den Behälter nicht mit Reinigungsmitteln, Stahlwollkissen oder anderem Schleifmittel. 14. Zum Ausschalten, den Schalter ausschalten und den Stecker aus der Steckdose ziehen. Halten Sie den Stecker immer fest. Ziehen Sie niemals am Kabel. 15. Verbrühungen können auftreten, wenn die Abdeckung während des Brühens entfernt wird.
- Page 37 – Persönliche Küchenbereiche in Geschäften, Büros und anderen Arbeitsumgebungen; – Bauernhäuser; – Von Kunden in Hotels, Motels und anderen Wohnumgebungen; – Bed and breakfast Typ Umgebungen. BEHALTEN SIE DIESE BEDIENUNGSANLEITUNG. AUSCHLIEßLICH HAUSHALTSVERWENDUNG...
- Page 38 Hinweise zum Kabelstecker Dieses Gerät hat einen polarisierten Stecker, um das Risiko eines elekrischen Schlags zu verringern. Diesen Stecker können Sie nur passend in einer Richtung in die polarisierte Steckdose stecken, wenn der Stecker nicht vollständig passt, drehen Sie den Stecker um. Falls er noch nicht passt, kontaktieren Sie einen qualifizierten Eletriker, versuchen Sie nicht den Stecker in irgendeiner Weise zu modifizieren oder verändern.
-
Page 39: Vor Der Ersten Verwendung
4. Karaffe 5. Deckel 6. Spritzgerät 7. Wasserbehälter 8. Wassersäule 9. Hauptgehäuse 10.Warmhalteplatte 11.Bodenabdeckung BEDIENFELDER Kaffeestärk ON/OFF Anzeige e-Anzeige VOR DER ERSTEN VERWENDUNG Vergewissern Sie sich, dass alle Zubehörteile vollständig sind und das Gerät nicht beschädigt ist. Füllen Sie Wasser in den Wasserbehälter auf den Max.-Level und brühen Sie Wasser mehrmals ohne Kaffeepulver, dann werfen Sie das Wasser weg. - Page 40 Sie die obere Abdeckung vollständig. 4. Setzen Sie die Karaffe mit dem Griff waagerecht auf die Wärmeplatte. 5. Stecken Sie den Netzstecker in die Steckdose. Wenn Sie die Kaffeestärke auf stark einstellen wollen, drücken Sie auf die “Strength” (stark) Taste, die “Strength” (stark) Anzeige leuchtet orange auf und das Gerät beginnt, einen starken Kaffee zu machen.
- Page 41 Hinweis: Während des Brühvorgangs sind die Tasten “PROGRAM”, “BRÜHVORGANG UNTERBRECHEN”, “HR” und “MIN” ungültig. 3. Wenn der Prozess beendet ist und Sie den Kaffee nicht sofort servieren möchten, lassen Sie die Energiezufuhr an, um die Platte warm zu halten. Das Gerät schaltet sich automatisch nach 40 Minuten ab, sofern es nicht Manuell abgeschaltet wurde bei dem Brühprozess.
-
Page 42: Reinigung Und Wartung
REINIGUNG UND WARTUNG ACHTUNG: Vor dem Reinigen umbedingt den Stromstecker ziehen. Zum Schutz gegen elektrischen Schlag darf das Kabel, Stecker oder das ganze Gerät nicht in Wasser oder Flüssigkeiten eingetaucht werden. Nach jedem Gebrauch immer darauf achten, dass der Stecker zuerst aus der Steckdose gezogen wird. 1. - Page 43 TIPPS FÜR GESCHMACKVOLLEN KAFFEE 1. Eine saubere Kaffeemaschine ist wichtig für die Herstellung von großartigen Kaffee. Reinigen Sie die Kaffeemaschine regelmäßig wie im Abschnitt “REINIGUNG UND WARTUNG” beschrieben. Verwenden Sie immer frisches, kaltes Wasser in der Kaffeemaschine. 2. Ungebrauchtes Kaffeepulver an einem kühlen, trockenen Ort aufbewaren.
- Page 44 BELANGRIJKE VEILIGHEIDSVOORSCHIFTEN Bij gebruik van een elektrisch apparaat dienen de basis voorzorgsmaatregelen altijd te worden nageleefd, inclusief het volgende: 1. Lees voor gebruik alle instructies 2. Sluit het apparaat aan op een enkele Stopcontact met de spanning dat overeenkomt met die op het typeplaatje.
- Page 45 12.De container is speciaal ontworpen voor het gebruik van dit apparaat. Het mag niet samen gebruikt worden met andere apparaten. 13.Maak de container niet schoon met reinigingsmiddelen, stalen sponsjes of een andere schuurmiddel. 14. Om uit te schakelen, zet de schakelaar uit, verwijder de stekker uit het stopcontact.
- Page 46 GEDAAN WORDEN DOOR EEN GEAUTORISEERDE SERVICE MEDEWERKER. DOMPEL HET APPARAAT IN GEEN ENKELE VLOEISTOF. 22. Het apparaat is bedoeld voor huishoudelijk gebruik zoals: personeelskeukens winkels, kantoren andere werkomgevingen; - boerderijen - door gasten in hotels, motels en andere vergelijkbare verblijven - Bed en breakfast verblijven BEWAAR DEZE INSTRUCTIES.
- Page 47 Uitleg 1.Trechter 2. Kan deksel 3. Kan handgreep 4. Koffiekan 5. Top deksel 6. Spuiter 7. Water reservoir 8. Water meter 9. Basis unit 10. Warmhoudplaat 11. Onderkant Besturings paneel Sterkte AAN/UIT instellings knop knop...
-
Page 48: Voor Het Eerste Gebruik
VOOR HET EERSTE GEBRUIK Controleer of alle accessoires compleet zijn en het apparaat niet beschadigd is. Vul het waterreservoir tot de MAX markering en zet het water meerdere malen zonder koffiepoeder. Vervolgens het water legen. Maak alle afneembare onderdelen grondig schoon en droog volgens de rubriek “REINIGING EN ONDERHOUD”. - Page 49 worden (ongeveer een minuut later nadat de koffie is gestopt met druipen). Note: de hoeveelheid koffie zal minder zijn dan de hoeveel water dat is ingeschonken. Dit komt doordat er wat water wordt geabsorbeerd. 9. Wanneer het brouwproces is voltooid en u niet meteen wilt serveren, kan de koffiekan warm gehouden worden op de warmhoudplaat.
-
Page 50: Reiniging En Onderhoud
1. Druk eenmaal op de PROGRAM knop (nu 8:10 am). Note: de tijdscyclus is 12 uur. 2.Druk één keer op de PROGRAM knop, de LED wordt groen en knippert. Dit betekent dat het apparaat de “vooraf instellen” functie start. 3.Stel de gewenste starttijd in door de HR en MIN knop herhaaldelijk in te drukken. Dat is dus 1:00 PM. - Page 51 4. Gebruik een vochtige doek om de warmhoudplaat voorzichtig schoon tevegen. Gebruik nooit een schuurmiddel om dit gedeelte te reinigen. 5. Vervang alle onderdelen en bewaar voor het volgende gebruik. VERWIJDEREN VAN ACHTERGEBLEVEN RESTEN Om ervoor te zorgen dat het apparaat efficiënt blijft werken, moet u de achtergebleven resten, gekeken naar waterkwaliteit van de omgeving en de gebruiksfrequentie, regelmatig schoonmaken.
- Page 52 olie veroorzaakt. Kleine oliedruppels op het oppervlak van gebrouwen zwarte koffie is geheel te wijten aan de extratie van olie uit de koffiepoeder. 6. Wanneer er zwaar geroosterde koffiebonen wordt gebruikt, kan olieachtigheid sneller optreden. GARANTIE: 2 JAAR...
-
Page 53: Consignes Importantes
CONSIGNES IMPORTANTES Lors de l’utilisation d’appareils électriques, des consignes de sécurité doivent être respectées, y compris les suivantes: 1. Lisez toutes les instructions. 2. Assurez-vous que le voltage de votre prise murale corresponde au voltage indiqué sur l’étiquette de la cafetière. 2. - Page 54 12. La carafe est conçue pour être employée avec cet appareil. Nejamais l’utiliser sur une plaque chauffante. 19. Cet appareil n’est pas destiné à être utilisé par des personnes (ycompris des enfants) avec des capacités physiques, sensorielles ou mentales réduites, ou manquant d’expérience et de connaissance sur lamanipulation de ce type de produit à...
-
Page 55: Votre Cafetière
Remarque sur la prise électrique Cet appareil est doté d’une prise polarisée. Pour éviter tout risque d’électrocution, cette prise s’adapte à une prise murale polarisée, dans une seule position. Si la prise ne rentre pas complètement dans la fiche murale, tournez la prise. Si elle ne s’adapte toujours pas, contactez un électricien qualifié. -
Page 56: Panneau De Commande
9.Corps principal 10.Plaque chauffante 11.Cache inférieur PANNEAU DE COMMANDE Indicateur Indicateur de force ON/OFF AVANT LA PREMIÈRE UTILISATION Vérifiez que les accessoires sont au complet et que l’appareil n’est pas endommagé. Remplissez d’eau claire le réservoir jusqu’à la marque MAX et chauffez l’eau à plusieurs reprises sans ajouter de café... -
Page 57: Fonctionnement De La Cafetière
7. Vous pouvez interrompre le processus de préparation du café en appuyant sur l’interrupteur ON/OFF à tout moment, le témoin s’éteindra. L’appareil poursuivra la préparation si vous appuyez à nouveau sur l’interrupteur ON/OFF. Note: Vous pouvez retirer la carafe pour server du café chaque fois que vous le souhaitez, la cafetière s’arrêtera de couler automatiquement. -
Page 58: Nettoyage Et Entretien
FONCTION DE DÉMARRAGE AUTOMATIQUE Si vous ne souhaitez pas commencer la préparation immédiatement, s’il est par exemple 8h10 AM et que vous souhaitez le café prêt à 1h00 PM, suivez les étapes 1 à 5 de la section précédente puis réglez la fonction de démarrage automatique comme suit: 3) Pressez une fois le bouton PROGRAM, il est 8h10 AM. -
Page 59: Élimination Des Dépôts Minéraux
propre et sec après chaque utilisation. 3. Passez un chiffon humide délicatement sur la plaque chauffante. N’utilisez jamais de nettoyant abrasif pour la nettoyer. 9. Replacez toutes les pièces et conservez l’appareil prêt pour une prochaine utilisation. ÉLIMINATION DES DÉPÔTS MINÉRAUX Pour que votre cafetière fonctionne efficacement, vous devez la détartrer afin d’éliminer les dépôts minéraux laissés par l’eau en fonction de la qualité... -
Page 60: Garantie: 2 Ans
café. Il est recommandé de ne pas réchauffer le café, il est plus savoureux immédiatement après sa préparation. 5. Nettoyez la machine à café lorsqu’elle est grasse. Les petites gouttes d’huile sur la surface du café sont dues à l’extraction de l’huile du café moulu. 6. - Page 61 IMPORTANTES SALVAGUARDAS Ao usar o aparelho elétrico. As precauções básicas de segurança devem sempre ser seguidas, incluindo o seguinte: Leia todas as instruções. Certifique-se de que a sua voltagem de saída corresponde à voltagem indicada na etiqueta de classificação da cafeteira. Para proteger contra incêndio, choque elétrico e lesões corporais, não mergulhe o cabo, a ficha ou o aparelho em água ou outro líquido.
- Page 62 12. O recipiente foi feito para usar com este aparelho. Nunca deve ser usado em uma gama superior. 13. Não limpe o recipiente com produtos de limpeza, esponjas de lã deaço ou outro material abrasivo. 13. Para desligar, desligue o interruptor, remova a ficha da tomada.
- Page 63 UTILIZADOR NO INTERIOR.A REPARAÇÃO DEVE SER FEITA PELO PESSOAL DE SERVIÇO AUTORIZADO APENAS.NÃO MERGULHE EM L QUIDOS. 22. Este aparelho destina-se a ser utilizado em aplicações domésticas e similares, tais como: - Cobertura de cozinhas em lojas, escritórios e outros ambientes de trabalho;...
- Page 64 1) A classificação elétrica marcada do cabo de alimentação ou do cabo de extensão destacável deve ser tão grande quanto a classificação elétrica do aparelho. 2) Deve ser arranjado um cabo mais longo para que este não cubra o contador ou o topo da mesa, pois pode ser puxado por crianças e podem tropeçar.
-
Page 65: Painel De Controlo
PAINEL DE CONTROLO Indicador Indicador LIGAR/D de potência ESLIGAR ANTES DO PRIMEIRO USO Verifique se todos os acessórios estão completos e a unidade não está danificada. Encha o recipiente de água até ao nível MAX e coloque em funcionamento apenas com água por várias vezes e sem o café, retire a água. - Page 66 DESLIGAR a qualquer momento, o indicador do botão LIGAR / DESLIGAR será extinto. O aparelho continuará a preparar se o botão LIGAR / DESLIGAR for pressionado novamente. Nota: Pode tirar a garrafa, despejar e servir a qualquer momento. O aparelho deixará de pingar automaticamente.
-
Page 67: Limpeza E Manutenção
1:00 PM, primeiro siga os passos 1 a 5 da secção acima, e então pode configurar a função de iniciar automáticamente do seguinte modo: 1)Pressione o botão PROGRAMAR uma vez, ou seja, AM 8:10. Nota: O ciclo do tempo é de 12 horas. 2) Pressione o botão PROGRAMAR uma vez, a LED acende-se em verde e pisca (significa que o café... - Page 68 REMOÇÃO DE DEPÓSITOS MINERAIS Para manter a sua cafeteira a funcionar de forma eficiente, deve limpar periodicamente os depósitos minerais deixados pela água de acordo com a qualidade da água na sua área e a frequência de uso, recomendamos remover os depósitos minerais da seguinte maneira: 1.
- Page 69 BENSON IMAGE B.V Wijnstraat 227, 3311BV, Dordrecht, The Netherlands CIF: NL852321211B01 MADE IN P.R.C WWW.TAYLORSWODEN.COM...
Need help?
Do you have a question about the 8433325504823 and is the answer not in the manual?
Questions and answers