Advertisement
Q1
W1
Ø3 × 16
1 szt. / pcs
8 szt. / pcs
Q2
M1
1 szt. / pcs
8 szt. / pcs
U1
U2
Ø4 × 30
2 szt. / pcs
2 szt. / pcs
TZ1
ZM1
1 szt. / pcs
8 szt. / pcs
DO MONTAŻU POTRZEBNE SĄ DWIE OSOBY!
INSTALLATION REQUIRES TWO PEOPLE!
INSTRUKCJA MONTAŻU
ASSEMBLY INSTRUCTIONS
Akcesoria / Fittings
W3
W4
Ø3,5 × 16
Ø4 × 16
20 szt. / pcs
2 szt. / pcs
M2
K1
ø8 × 35
8 szt. / pcs
8 szt. / pcs
B1
P1-A
12 szt. / pcs
2 szt. / pcs
ZW1
20 szt. / pcs
HAPPY RW01
W5
W6
Ø4 × 35
Ø6.3 × 50
1 szt. / pcs
20 szt. / pcs
S1
N1
4 szt. / pcs
1 szt. / pcs
P1-B
2 szt. / pcs
2 szt. / pcs
Narzędzia / Tools
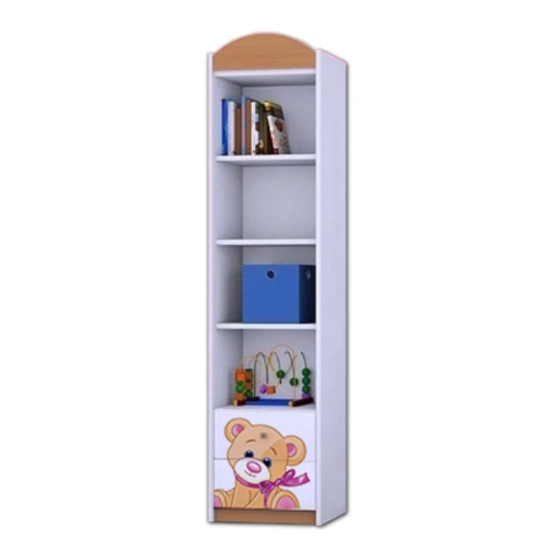
Regał RW01 / Bookstand RW01
1
G1
20 szt. / pcs
N2
1 szt. / pcs
P2-A P1-B
2 szt. / pcs
Advertisement
Table of Contents

Related Manuals for Happy Babies HAPPY RW01


Summary of Contents for Happy Babies HAPPY RW01
- Page 1 HAPPY RW01 INSTRUKCJA MONTAŻU ASSEMBLY INSTRUCTIONS Akcesoria / Fittings Ø3 × 16 Ø3,5 × 16 Ø4 × 16 Ø4 × 35 Ø6.3 × 50 1 szt. / pcs 8 szt. / pcs 20 szt. / pcs 2 szt. / pcs 1 szt.
- Page 2 BARDZO WAŻNE! NALEŻY UWAŻNIE PRZECZYTAĆ ZACHOWAĆ DO PÓŹNIEJSZEGO STOSOWANIA INSTRUKCJA OBSŁUGI By zapobiec zadławieniu lub uduszeniu opakowanie z akcesoriami należy trzymać w miejscu niedostępnym dla niemowląt i dzieci. Wszystkie połączenia w meblu muszą być dobrze dokręcone, żaden z elementów łączących nie może być luźny. Nie należy używać...
- Page 3 Paczka 1 z 1 / Package 1 of 1 Wymiary (mm) / Numer elementu / Ilość / Dimensions (mm) Item no. Quantity 1800 x 340 x 18 1800 x 340 x 18 414 x 140 x 18 414 x 307 x 18 414 x 307 x 18 414 x 307 x 18 414 x 56 x 18...
- Page 4 P2-A P1-A P1-A P2-A Regał RW01 / Bookstand RW01...
- Page 5 A = B Regał RW01 / Bookstand RW01...
- Page 6 Regał RW01 / Bookstand RW01...
- Page 7 A = B Na widocznych śrubach (W6) należy umieścić dostarczone Na mimośrodach (M1) należy zaślepki samoprzylepne (ZW1). umieścić dostarczone plastikowe zaślepki (ZM1). On the visible screws (W6) P1-B P2-B should be placed supplied On the eccentrics (M1) should be adhesive caps (ZW1). placed supplied plastic caps (ZM1).
- Page 8 REGULACJA PROWADNIC SZUFLAD 1. Poluzować wkręty DRAWER RUNNERS ADJUSTMENT 1. Loosen the screws 2. Przesunąć prowadnicę w górę lub w dół o pożądaną odległość 2. Adjust the runner up or down for the desired distance 3. Dokręcić poluzowane wcześniej wkręty. 4.
Need help?
Do you have a question about the HAPPY RW01 and is the answer not in the manual?
Questions and answers