Table of Contents
Advertisement
Quick Links
Item #1007572528
Model #1906VA60-312925
ASSEMBLY INSTRUCTIONS
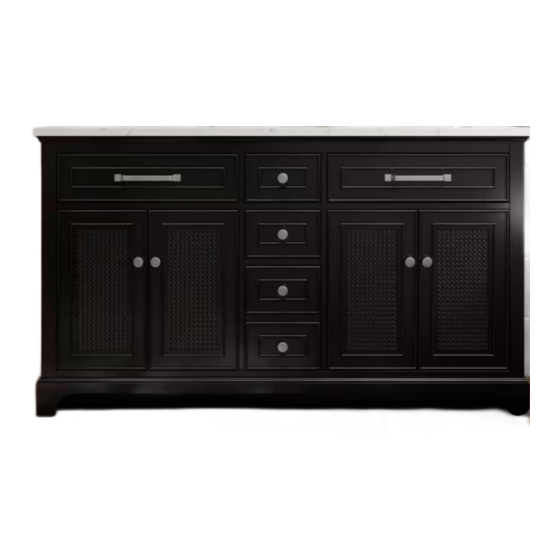
GILLINGER 60 IN.W X 22 IN. D RATTAN VANITY IN BLACK
WITH ENGINEERED CARRARA TOP AND WHITE SINK
Questions, problems, missing parts?
Before returning to the store, call Home Decorators Collection Customer Service
8 a.m. - 7 p.m., EST, Monday - Friday, 9 a.m. - 6 p.m., EST, Saturday
1-800-998-7021
HOMEDEPOT.COM/HOMEDECORATORS
THANK YOU
We appreciate the trust and confidence you have placed in Home Decorators Collection through the purchase of this bathroom furniture.
We strive to continually create quality products designed to enhance your home. Visit us online to see our full line of products available for your
home improvement needs. Thank you for choosing Home Decorators Collection!
Advertisement
Table of Contents

Related Manuals for Home Decorators Collection GILLINGER 1906VA60-312925


Summary of Contents for Home Decorators Collection GILLINGER 1906VA60-312925
- Page 1 THANK YOU We appreciate the trust and confidence you have placed in Home Decorators Collection through the purchase of this bathroom furniture. We strive to continually create quality products designed to enhance your home. Visit us online to see our full line of products available for your...
-
Page 2: Table Of Contents
Table of Contents Table of Contents ........2 Pre-Installation . -
Page 3: Warranty
Home Decorators Collection products are manufactured with superior quality standards and workmanship and are backed by our limited lifetime warranty. Home Decorators Collection products are warranted to the original consumer purchaser to be free of defects in materials or workmanship. We will replace FREE OF CHARGE any product or parts that proves defective. -
Page 4: Pre-Installation
Pre-Installation PLANNING INSTALLATION Before beginning assembly of product, make sure all parts are present. Compare parts with package contents list and hardware contents list. If any part is missing or damaged, do not attempt to assemble the product. Estimated Assembly Time: 45 minutes (24 hours for silicone caulk to dry). TOOLS REQUIRED (NOT INCLUDED) Phillips Utility Knife... -
Page 5: Package Contents
Pre-Installation (continued) PACKAGE CONTENTS Part Description Quantity Vanity Backsplash Tip-out Door (preassembled to Vanity [A]) Left Door (preassembled to Vanity [A]) Right Door (preassembled to Vanity [A]) Floor Plumbing Cutout Lid Shelf HOMEDEPOT.COM/HOMEDECORATORS Please contact 1-800-998-7021 for further assistance. -
Page 6: Installation
Installation Removing the top □ Remove the top (B) from the vanity (A). □ Place the top (B) and backsplash (C) face down onto a scratch-free surface such as a protection sheet that came in the packaging. B a c k B a c k... - Page 7 Installation (continued) Installing vanity cabinet NOTE: Clean area where the vanity (A) will be permanently located prior to beginning installation, ensuring the vanity (A) will not interfere with any water supply and drain lines once mounted. □ With two people, carefully place the vanity (A) against the wall in its final location. Place a level on the unit in both directions, across the front and on both sides to properly adjust the levelers on the unit.
- Page 8 Installation (continued) Installing the top □ Apply silicone caulk to the top edge of the wood cabinet. □ With the help of another adult, gently lower the stone top with the assembled sink onto the cabinet. NOTE: Make sure the stone top is flush with the back side of the wood cabinet and the stone overhang is equal on both sides over the wood cabinet left and right side walls.
- Page 9 Installation (continued) Installing the floor plumbing cutout lids □ Insert the floor plumbing cutout lid (H) into the gap of bottom panel to add more storage space if installing the plumbing from the gap of back panel. Installing the shelves □...
- Page 10 Installation (continued) Aligning the doors (optional) If you need to adjust the doors, do so in the following manner. □ To adjust the door up or down, loosen screws (a) on both hinges, adjust door, and retighten screws. □ To adjust the door left or right, turn screws (b) on both hinges, in or out. □...
- Page 11 Installation (continued) Reinstalling the drawers (optional) □ Fully extend the metal glide tracks, gently lower and slide the drawer box into the rear glide catch. □ Lower the drawer box down to completely rest on extended glides and push plastic levers to lock the drawer box in place. □...
- Page 12 Installation (continued) Changing the handle (optional) NOTE: This vanity base comes with two different handle options. □ To change the handle on the tip-out door, gently open the tip-out door (E) and use the Phillips screwdriver to loosen the screws holding the solid wood tip-out tray.
- Page 13 Installation (continued) Reinstalling the wood tray (optional) □ Re-hang the wood tray back inside of the top tip-out door (E). Changing the knobs (optional) NOTE: This vanity base comes with two different knobs options. □ One set of knobs (CC) are packaged separately in the box. If you would like to switch knobs, simply remove the existing knobs and attach the other finish, as illustrated in the diagram.
- Page 14 Installation (continued) Adjustment the door panels (optional) NOTE: The pre-installed door panel can be switched from front to back. □ Remove the silicone trim along the outer edges of the panel on the inside of the door. Start at a corner and pull to remove the four pieces.
-
Page 15: Care And Maintenance
Care and Maintenance □ Dust the vanity regularly with a soft, non-lint producing cloth or household dusting product. □ You can clean the vanity with a gentle, non-abrasive household cleaner. □ Make sure to dry the wood immediately with a soft cloth or towel. □... -
Page 16: Service Parts
Service Parts MODEL TYPE Part Description Part # Part Description Part # 2500VT-60-925 1906VA48/60-312-L Large Drawer Front DRAWER FRONT Backsplash PUBS-25-925-60 Touch-Up Pen OX-0180Y Sink PU17-18x14-SQUARE Handle-brushed nickel 1906VA-HANDLE-BN 1906VA60-312-TIP-OUT Tip-out Door DOOR Handle-Soft Gold 1906VA-HANDLE-SG Left Door Knob-brushed nickel 1906VA-KNOB-BN 1906VA60-312-DOOR SET Right Door... - Page 17 Questions, problems, missing parts? Before returning to the store, call Home Decorators Collection Customer Service 8 a.m. - 7 p.m., EST, Monday - Friday, 9 a.m. - 6 p.m., EST, Saturday 1-800-998-7021 HOMEDEPOT.COM/HOMEDECORATORS Retain this manual for future use.
Need help?
Do you have a question about the GILLINGER 1906VA60-312925 and is the answer not in the manual?
Questions and answers