
Summary of Contents for AddLife Ropox 40-25023
- Page 1 Ropox Showerbed User manual This manual should always be in close proximity of the product. TF 200.01.0049 / Date 27-09-2022...
-
Page 2: Table Of Contents
TF 200.01.0049_ENG Table of content Symbols used in this manual ........................4 General safety ............................4 Product Unit label ........................6 General requirements ..........................7 3.1 Product information ......................... 7 3.2 Product description ......................... 8 3.3 Intended purpose ..........................8 3.4 Intended operator .......................... - Page 3 TF 200.01.0049_ENG Cleaning ..............................28 Component part list ..........................29 8.1 Change of spare parts ........................29 Environmental protection ........................30 10. Electromagnetic compatibility ......................30 10.1 Suitable Environments ......................30 10.2 Basic safety and Essential performance ................30 10.3 Adjacent and stacked use ......................
-
Page 4: Symbols Used In This Manual
TF 200.01.0049_ENG 1. Symbols used in this manual Warning Symbol Indication of potentially hazardous situation. If not avoided it can result in serious injury or death. Caution Symbol Indication of potentially hazardous situation which may result in minor or moderate injury. It may also be used to alert against unsafe practices. - Page 5 TF 200.01.0049_ENG Do not perform repairs, disassembly or assembly operations, add-ons, re-adjustments or modification of the product beyond what is described in this manual. These must be carried out by Ropox or Ropox authorized personnel. Do not perform service while in use. This appliance can be used by adults who have read and understood the user manual.
-
Page 6: Product Unit Label
TF 200.01.0049_ENG 2.1 Product Unit label xxxx-xx 40-250XX-X This product is UKCA-marked in accordance with: UK SI 2002 No. 618 - The Medical Devices Regulations 2002, and its amendments UK SI 2008 No. 1597 - The Supply of Machinery (Safety) Regulations 2008, and its amendments This product is CE-marked in accordance with: European Medical Device Directive 93/42/EEC, including... -
Page 7: General Requirements
TF 200.01.0049_ENG Consult manual for important safety related information, warnings and safety precautions. Class II, double isolated electrical components. Do not dispose as unsorted municipal waste. Product must be returned to a designated recycling station. Operating and storing temperatures may not exceed 5-40C° 3. -
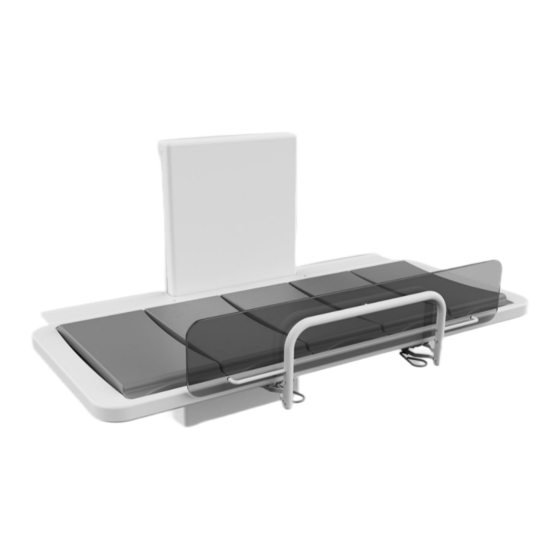
Page 8: Product Description
TF 200.01.0049_ENG Materials in contact Component Material description with patient Unit Cover PMMA Slats PUR FLEX 200 Coverplate Steel powder coated Accessories Item Number Model/specification 40-25034 Bedguard for 146cm 40-25036 Bedguard for 178cm 40-25035 Bedguard for 210cm 40-25038 End gard rail 40-25031 Back rest for showerbed with slats 40-25090... -
Page 9: Product Dimensions
TF 200.01.0049_ENG 3.7 Product dimensions Length of shower bed Part No. (excl. back support) Part No. (incl. back support) 146cm 40-25023 40-25073 178cm 40-25026 40-25076 210cm 40-25029 40-25079... -
Page 10: Instructions For Use
TF 200.01.0049_ENG 4. Instructions for use 4.1 Installation of product Make sure that you allow free space on all sides of the unit as shown below. 4.1.1 Placement of the Main 100-240 V socket, the hot and cold water and the drain The drain must be placed in the free area beside the lifting unit and underneath the bed in the lowest position. - Page 11 TF 200.01.0049_ENG 4.1.1.1 Placement of Electrical outlet outside of lifting unit The main power cable has a total length of approx. 320cm of which 250cm is outside the lifting unit. The cable can be pulled out in either left or right side.
-
Page 12: Receiving The Shower & Changing Bed
TF 200.01.0049_ENG 4.1.2 Receiving the Shower & Changing Bed The Ropox Lifting unit with cover Shower & Changing Bed will come in two packages. One for the “Lifting unit” and one for Right Shelf the “Shower tray unit”. Left Shelf Middle Cover Plate Shower tray 4.1.3 Remove the cover... -
Page 13: Mounting To The Wall
TF 200.01.0049_ENG 4.1.4 Mounting to the wall Place the lifting unit in the desired location. Be especially aware of the position of the drain, electrical and water inlet on the wall, as described previously. Attach the frame securely to the wall by using adequate bolts and rawlplugs suitable for the type of wall construction / material on site. -
Page 14: Mounting The Wires
TF 200.01.0049_ENG To gain access to all the bottom holes, the control box will need to be temporarily removed. This is done by unlocking it from the holder at the top, pressing it back and sliding the control box down. Remember to securely re-attach the controlbox, before putting the cover back on the lifting unit. -
Page 15: Re-Mount The Plastic Cover
TF 200.01.0049_ENG 4.1.6 Re-mount the plastic cover The cover can either be clicked in place from the front or slide down from above. Make sure that the cover reaches the floor and is in contact with the wall at the top. This step can also wait until the end of the installation process if ease of access to the electrical components is required. -
Page 16: Mount The Shelves On The Lifting Unit
TF 200.01.0049_ENG 4.1.7 Mount the shelves on the Lifting unit Use 4 pcs. M6x6 screws to mount the shelves on both sides of the lifting unit. 4.1.8 Mount the Shower tray on the Lifting unit Slide the shower tray in between the lifting unit and the support arms on the lifting unit. -
Page 17: Mount The Cover Plate On Shower Tray
TF 200.01.0049_ENG Fasten the Shower tray to the Lifting unit with 8 pcs. M8x12 through the bushings in the support arms. 4.1.9 Mount the cover plate on Shower tray Place the cover plate between the two support arms underneath the Shower tray. Fasten it with 4 pcs M5x8 screws. -
Page 18: Mount The Drain And Flexible Hose On The Shower Tray
TF 200.01.0049_ENG 4.1.10 Mount the Drain and Flexible hose on the Shower tray Screw the plastic nut on the scuttle and tighteen it firmly. Connect the flexible hose to the drain tube and connect it to the drain in the wall or on the floor. -
Page 19: Mount The Middle Cover Plate
TF 200.01.0049_ENG 4.1.11 Mount the middle cover plate If the large plastic cover has not yet been installed, do this before starting this step. Set the middle plate against the plastic cover at an angle, as shown. Rotate the cover into place Push it down until you hear the locks snap into place Double check that it sits flush... -
Page 20: Operating The Product
TF 200.01.0049_ENG Warning! The product should always be able to travel the full range of actuation without colliding with objects. Failing to do so will compromise the product stability. Special care should be taken in ensuring that no children or adults are sited under the product as severe injury from entrapment may occur. -
Page 21: How To Fold Changing Bed Up And Down
TF 200.01.0049_ENG 4.2.2 How to fold changing bed up and down The changing bed can be secured against inadvertent folding while in the upright position by locking the table with the locking pin. When worktop is folded up, press and hold the red button while inserting the split. The shower bed is now locked against folding down. -
Page 22: Bed Guard
TF 200.01.0049_ENG Recommendations for use Make sure that the unit has been placed correctly in the shower tray so that the two side rails of the • bottom frame rest properly on the sides of the tray. See that the horizontal supporting rod has snapped into place before leaning on the back support. •... -
Page 23: Electrical Component Diagram
TF 200.01.0049_ENG 4.4 Electrical component diagram 4.4.1 Wire diagram The shower bed is delivered with the control box already mounted on the frame. The diagram shows how the cables which are connected to the control box. All the plugs are watertight, and therefore they can be a little tricky to connect / disconnect. -
Page 24: Connecting Cables
TF 200.01.0049_ENG 4.4.2 Connecting cables The shower bed is delivered with the control box already mounted on the frame. Motor cable connects to socket 1. Sockets 2 and battery are not in use and are blocked. Sockets 3 & 4 are capped from factory Hand control connects to ”HB”. -
Page 25: Residual Risk
TF 200.01.0049_ENG 4.5 Residual risk Warning Be aware that there are no persons under the showerbed when it is moving down, as a danger of impact, entrapment and head trauma may occur. Caution Do not place the hand in the slits of the cover, as a danger clamping may occur. -
Page 26: Trouble Shooting
TF 200.01.0049_ENG 5. Trouble shooting Problem Solution The showerbed does not move Check if: up or down when pressing the 100-230 V is connected, and if the power is on. hand control The engine is connected to the control box. ... -
Page 27: Maintenance
TF 200.01.0049_ENG Maintenance Notification! Failing to comply with periodic maintenance may result of degrading of product function and safety. 6.1 Periodic maintenance The Shower & Changing Bed is maintenance free. For reasons of safety and reliability, we recommend inspection of the unit once a year: At inspections, the following must be checked: ... -
Page 28: Cleaning
TF 200.01.0049_ENG 7. Cleaning Do not use a pressure cleaner to clean this product. Any limescale buildup should be removed with suitable bathroom cleaning agents. Dirt and grime should be removed after each use, which can be done with lukewarm water and a suitable all-purpose cleaning agent. Use a cloth or soft sponge to wash the product. Dry the product off with a wrung cloth. -
Page 29: Component Part List
TF 200.01.0049_ENG 8. Component part list Notification! Ropox will make parts list and circuit diagrams available for extraordinary maintenance and repair beyond what is described in this manual. Repair beyond what is described in this manual may only be done by Ropox designated service personnel. 8.1 Change of spare parts 97001799 Actuator/motor... -
Page 30: Environmental Protection
TF 200.01.0049_ENG 9. Environmental protection The product is not intended to be disposed as municipal waste. Proper disassembly, sorting and disposal of components must be done by waste disposal professionals. Part Disposal recommendation Hard plastic Slats Residual Waste Frame & unit Steel Control box Electronics...
Need help?
Do you have a question about the Ropox 40-25023 and is the answer not in the manual?
Questions and answers