Table of Contents
Advertisement
Quick Links
Advertisement
Table of Contents

Related Manuals for Trailblazer BBQ Grillmaster 600S

Summary of Contents for Trailblazer BBQ Grillmaster 600S
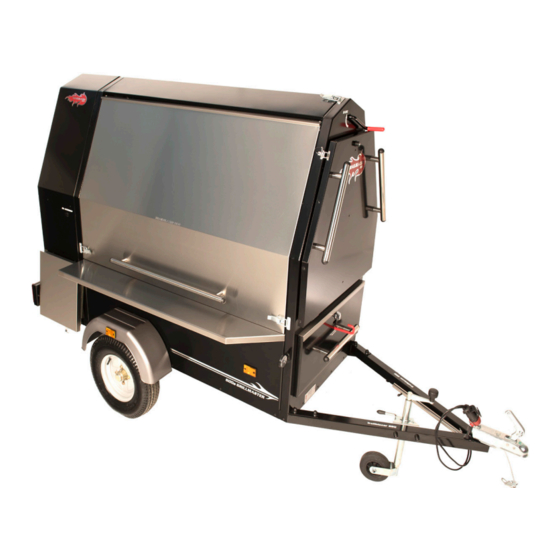
- Page 1 KNOW YOUR 600S TRAILBLAZER 600S GRILLMASTER USER MANUAL...
- Page 2 Barbecuing for large Groups? The Trailblazer 600S Grillmaster has got it all...
-
Page 3: Table Of Contents
CONTENTS TRAILBLAZER 600S GRILLMASTER USER MANUAL INTRODUCTION BEFORE YOU START YOUR TRAILBLAZER AT A GLANCE DON’TS LIGHTING UP OPERATION BEFORE YOU LEAVE CLEANING TOWING SAFETY FOOD SAFETY MAINTENANCE & ADJUSTMENT ACCESSORIES TROUBLESHOOTING WARRANTY TRAILBLAZER NETWORK... -
Page 4: Introduction
Take time to sign up as a Trailblazer Network member to assist in helping your business grow and run more smoothly. From all at Trailblazer BBQ, Welcome to the Trailblazer community! Lester Manley, Founder &... -
Page 5: Before You Start
BEFORE YOU START Your Trailblazer 600S Grillmaster is a very powerful and versatile machine that will serve you well throughout its life. It is essential that you have a good knowledge of your 600S Grillmaster in order to ensure a long and trouble free service. When you take delivery, unwrap all packaging material inside and out. - Page 6 YOUR TRAILBLAZER 600S GRILLMASTER AT A GLANCE Front positioning handles Door latch Rear prop stand Wheel & Mudguard Gull wing door 12v Lighting socket (optional) Upper warming tray Lift up side table (optional) Cooking surface Drop down front table (optional) Rear storage compartment Storage shelves...
- Page 7 BEFORE YOU START Cooking surface wind up handle Front positioning handles Scraper blade handle Ash Box Jockey wheel Tow hitch Secondary hitch Rear lockable door Rear lockable door handle Side work surfaces Rear Lights Number plate position Top opening vents Vent fixing latch Vent fixing stay Cooking surface wind up handle...
-
Page 8: Don'ts
DON’TS DON’T light BBQ with doors closed DON’T travel with Prop stand or Jockey wheel down DON’T travel with cooking surface raised up DON’T forget to latch and lock rear storage unit DON’T forget to attach secondary latch DON’T over soak charcoal with lighter fluid DON’T forget to lock trailer when leaving it unattended DON’T leave trailer unattended while still hot DON’T over load rear storage, max load 20kg... -
Page 9: Lighting Up
LIGHTING UP STEP 1 Always light up with both doors and both vents open in order to allow maximum air and prevent the machine from overheating and causing damage. STEP 2 Use good quality charcoal. We recommend Trailblazer South African Premium Charcoal. -
Page 10: Operation
OPERATION The Trailblazer is designed to operate with at least 1 door open at all times with both doors being the normal mode of operation. GRILL HEIGHT ADJUSTMENT The height of the grill may be adjusted easily from, at its lowest, sitting on top of the fire box to fully raised as seen in the picture above. - Page 11 Gull wing doors provide protection from sun and rain whilst cooking and fully enclose the grill whilst not in use or whilst travelling. They are secured with clasps at both front and rear. These can be adjusted if necessary by loosening the retaining nuts and moving forward or rear as required before re-securing.
- Page 12 ROAD LIGHTS Your Trailblazer BBQ is a fully approved road legal trailer and does not require any ancillary equipment for use on the road. The requirements include indicator, side...
- Page 13 JOCKEY WHEEL / PROP STAND Your Trailblazer BBQ is equipped with a Jockey wheel that is useful when manoeuvring by hand and then to level the BBQ during use. It is adjusted by winding the top handle to raise or lower the front of the Trailblazer.
- Page 14 OPERATION ROOF VENTS The Trailblazer 600S Grillmaster is equipped with independent roof vents that can be left closed or opened at one or both sides whilst cooking. The right hand vent has a clasp (same as gull wing doors) that fastens to the front gable to secure both vents for travelling.
- Page 15 CLEANING OUT FIRE BOX After coals are cold, draw the ash into the ash box with the integral scraper and dispose of in an appropriate manner. Lift up scraper handle at front to release cross bar, pull scraper the whole way to scrape ash into ash box then unlatch ash box and remove to dispose of ash safely.
- Page 16 WHEELS AND TYRES ENSURE THAT ALL WHEEL NUTS ARE ADEQUATELY TIGHTENED AND CHECK PERIODICALLY ENSURE THAT ALL WHEEL NUTS ARE ADEQUATELY TIGHTENED AND WHEEL NUT INDICATORS REMAIN IN THE CORRECT POSITION. ENSURE THAT THE TYRE PRESSURES ARE BOTH EQUAL AT 20PSI Tyres should be checked periodically for any damage, cuts or bulges.
-
Page 17: Before You Leave
BEFORE YOU LEAVE BEFORE LEAVING • Always attach the secondary hitch to a suitable anchor point on the towing vehicle. • Ensure that the hitch is fully engaged and locked into position by pulling up hard on the handle without depressing the release latch located beneath this. -
Page 18: Cleaning
STEP 7 Remove ash box and clean separately after disposal of ash. Leave out for next steps. STEP 8 Once the Trailblazer BBQ is cool the interior may be cleaned with a power hose. - Page 19 STEP 9 Hose the firebox from the rear towards the opening where the ash box is normally situated to allow any debris remaining to exit the Trailblazer BBQ. STEP 10 If the exterior has become dirty from road use, power hose the exterior of the BBQ.
-
Page 20: Towing
Trailblazer BBQ. Whilst all necessary steps have been taken by Trailblazer BBQ to ensure that all is correct and in good working order before leaving the factory it is essential that routine checks are carried out before each journey. - Page 21 TOWING HITCHING TO YOUR VEHICLE OPERATING INSTRUCTIONS FOR COUPLING HEAD In order to open the coupling head, push the safety bolt “a” fig “B” with the index finger upward and turn the coupling handle “b” fig “B” forward. The coupling head is opened when the indicator is in the open position, In order to couple a coupling head, place the opened coupling head on the ball and push the coupling handle “b”...
- Page 22 When exiting side roads or crossing junctions remember to allow sufficient time to safely cross with the additional length that your Trailblazer BBQ makes. • When reversing take care to manoeuvre safely. Your Trailblazer BBQ responds in exactly the same way as any other road trailer.
-
Page 23: Safety
Take into account the wind direction and other weather before setting up. Consider relocating the Trailblazer BBQ if you are concerned about the risk of fire due to the wind direction. Position the Trailblazer BBQ a suitable distance from the serving area to reduce the risk of burns. -
Page 24: Food Safety
FOOD SAFETY The most basic rule – Wash those hands! Before touching foods and particularly after handling raw food, especially meat. RAW FOODS HANDLING RAW FOODS Raw foods such as meat, poultry, fish, eggs and uncooked vegetables sometimes contain germs that can cause food poisoning. You can very easily pick up germs from raw foods on your hands or utensils, and then spread them to anything else you touch, including food that’s cooked and ready to eat. - Page 25 FOOD SAFETY COOKING MEAT (CONT.) You can use a probe thermometer to check items are fully cooked. Aim for an internal temperature of 75c or higher to ensure any harmful bacteria are destroyed. The following tips apply to all meat including burgers, sausages, chicken and pork. There are a few simple things to remember when checking if meat is cooked before serving.
- Page 26 CHILLED FOOD SERVING CHILLED FOODS It is important to keep some foods cool to prevent food-poisoning germs multiplying. You should also take care not to leave food out of the fridge for more than 2 hours, and never leave food in the sun. If you are away from the fridge why not use a cool box and ice packs to keep food cool.
-
Page 27: Maintenance & Adjustment
MAINTENANCE AND ADJUSTMENT In the rear storage compartment of your 600S Grillmaster there is a small tool kit. This tool kit consists of: - 2 X door stay key (left side) 2 X door stay key (right side) 1 X 10mm spanner INSERTING THE DOOR STAY KEYS To ensure there is no chance of the gull wing doors closing throughout use we have added a set of door stay keys. - Page 28 STEP 2 Once step one is complete, rotate the face with ‘L’ towards the floor, allowing part of the key to guide through to the far side of the door stay. STEP 3 Finally rotate the key clockwise until you hear it click into position.
- Page 29 ALTERING THE FRICTION BLOCK If the grill does not stay at the selected height, the tension can be adjusted at the friction block. This is found bolted around the winch bar on the inner side of the front gable. To tighten the friction block simply use the 10mm spanner that is included in your pack or adjustable wrench.
- Page 30 REPLACING GRILL WIRE CLIPS The grill on your 600s is attached to the grill frame by quick release clips. The clips can be effortesly unclipped to allow for the grill mesh to be removed and deep cleaned. There are two types of clips holding the grill mesh in place. Before removing any clips take note of how they are applied.
-
Page 31: Accessories
ACCESSORIES FRONT DROP DOWN TABLE (OPTIONAL) Remove “R” clips attached to lanyards from latches and unclip Lift up leg to raised position and engage with plug on underside of drop down table. Take care not to let table drop without leg support in place, as you will damage the table. - Page 32 ACCESSORIES Lift up side table (Optional) To open 1. Unlatch table from underneath. 2. Lift up until hinges click firmly into position. To close 1. Pinch the levers of the hinges underneath the front corners of table 2. Lower table into the closed position. 3.
- Page 33 Tool accessories (optional) 2. Towel holder 3. Bottle holder 1. Tool holder Position the top of the tool holders underneath the work shelves on either side of the Trailblazer or on the horizontal edges of the Gull wing doors. Pull the accessory forward until it has firmly clipped to the lower flange.
- Page 34 Clip on Blue Roll Holder Clip on Front Condiment Holder Clip On Condiment holder can be placed on either front Designed to clip to the underneath of the side table on a 600s this accessory will ensure your blue roll is within or rear gable at a height tailored to suit your needs.
- Page 35 TRAILBLAZER CHARCOLAL Trailblazer BBQ now supply high grade South African restaurant grade charcoal. Trailblazer Charcoal is quite simply revo- lutionary and outperforms any other catering grade charcoal on the market. Each 12kg weather resistant bag contains extremely clean and well graded wattle made purely from eucalyptus wood that suits the Trailblazer range like a glove! We have had our Trailblazer 600s lit and ready to cook on in 10 minutes using this product.
-
Page 36: Troubleshooting
TROUBLE SHOOTING COOKING SURFACE WILL NOT STAY UP Check Friction block and adjust with 2 x 10mm spanners. See section 12 “Altering friction block”. JOCKEY WHEEL BENT This happens when the jockey wheel is accidently left in the down position while towing. -
Page 37: Trailblazer Network
TRAILBLAZER NETWORK As a Trailblazer owner you will be able to take advantage of the unique online marketing tool and booking engine, region by region, wherever our Trailblazers go, we are committed to growing a network of owners so that there is sure to be a Trailblazer available near your potential market helping you maximize the business opportunities. - Page 38 Trailblazer BBQ LTD provides a Limited Warranty to the original purchaser for the period of 1 year from the date of sale. It is warranted that the Trailblazer BBQ will be free from defects in material and workmanship for the period of the warranty.
- Page 39 NOTES...
- Page 40 NOTES...
- Page 42 Barbecuing for large Groups? The Trailblazer 600S Grillmaster has got it T: +44 (0)28 9057 9000 E: info@trailblazerbbq.com © Trailblazer 2016...
Need help?
Do you have a question about the Grillmaster 600S and is the answer not in the manual?
Questions and answers