
Summary of Contents for Smart water SW900
- Page 1 Wireless Tank Level System User Guide Phone: +64 9 278 6430 Freephone: (NZL) 0800 40 14 14 (AUS) 1800 76 47 25 YEAR www.smartwateronline.com...
- Page 2 P a g e |...
-
Page 3: Features
“Time to Empty” indication based on your actual tank usage. Just like the trip computer in your car, Smart Water will estimate the time you have until your tank level gets low! “One Glance” LCD Keypad design for the ultimate in simple, intuitive, user-friendly operation ... -
Page 4: Table Of Contents
P a g e | INDEX FEATURES INDEX INTRODUCTION FCC COMPLIANCE AND RF RADIATION EXPOSURE STATEMENT INSTALLATION INSTRUCTIONS Tank Sender WiFi LCD Kaypad Connecting the Tank Sender to the WiFi LCD Keypad Tank Settings Tank Sender Installation WiFi Gateway Instructions Tank Components MAIN SCREEN SUMMARY ICON DEFINITIONS... - Page 5 P a g e | MENU -> SETTINGS -> PUMP SETTINGS -> CONTROL MENU -> SETTINGS -> PUMP SETTINGS -> SOURCE MENU -> SETTINGS -> PUMP SETTINGS -> DESTINATION MENU -> SETTINGS -> PUMP SETTINGS -> START MENU -> SETTINGS -> PUMP SETTINGS -> NAME PUMP MENU ->...
- Page 6 P a g e |...
-
Page 7: Introduction
TWO-YEAR full replacement warranty coupled with dedicated after sales technical support. The latest SW900 Smart Water system takes another huge step forward in tank monitoring and fluid management technology. The system boasts unmatched LoRa wireless communications performance to easily conquer even the most challenging installations. -
Page 8: Fcc Compliance And Rf Radiation Exposure Statement
P a g e | FCC COMPLIANCE AND RF RADIATION EXPOSURE STATEMENT The Smart Water equipment complies with FCC RF radiation exposure limits set forth for an uncontrolled environment. The devices and their antennae must not be co-located or operating in conjunction with any other antenna or transmitter. -
Page 9: Installation Instructions
P a g e | INSTALLATION INSTRUCTIONS The Smart Water SW900 system is very simple to install. However, it is important that the installation instructions are followed in the specified step by step sequence as illustrated below. This will ensure the correct function of the product and long term reliable service. -
Page 10: Wifi Lcd Kaypad
Plug in the USB power adaptor to an AC mains power supply and connect the USB cable to the rear of the Desk Mount WiFi LCD Keypad. You will hear an audible “beep”, and the LCD will display the Smart Water logo and then the “Add Device”... -
Page 11: Connecting The Tank Sender To The Wifi Lcd Keypad
“Fault-Finding” section at the rear of this manual. If additional Tank Senders need to be connected to the system (your Smart Water system can monitor up to twelve different Tank Senders) simply repeat the above procedure prior to proceeding to Step 5. -
Page 12: Tank Settings
P a g e | Step 4 – Tank Settings: Smart Water recommends entering the approximate height of your tank before final installation. Set the tank height of your water tank through the MENU screen. After touching the MENU icon on the main screen, go to the SETTINGS ->... -
Page 13: Tank Sender Installation
Stainless Steel screws. These can be used to mount the Tank Sender to the top of your tank. The Tank Sender does not need to be screwed onto your tank, but Smart Water does recommend this step as part of a good installation. -
Page 14: Wifi Gateway Instructions
P a g e | WiFi Gateway Instructions Firstly, connect the antenna to the gold SMA connector on top of the WiFi Gateway. Turn the antenna clockwise until it is gently tightened. Once the antenna is fitted connect the 12VDC power pack to mains power and then connect it to the DC jack on the base of the WiFi Gateway. -
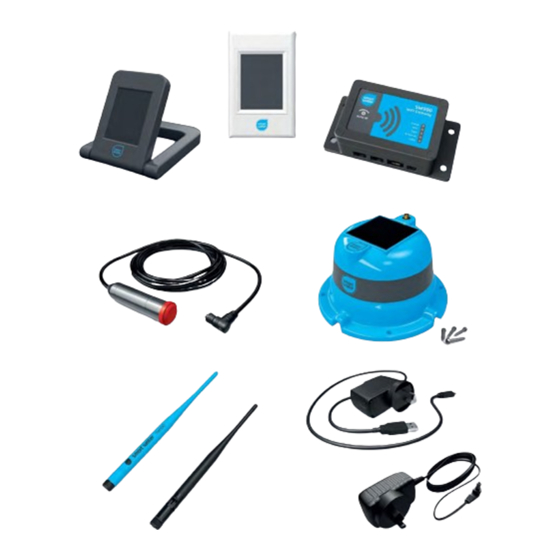
Page 15: Tank Components
P a g e | Dipole Antenna Solar Panel Mounting Holes Drain Vents... - Page 16 P a g e | Congratulations… your Smart Water system is installed! For further information please view our installation video online: www.smartwateronline.com...
-
Page 17: Main Screen Summary
P a g e | MAIN SCREEN SUMMARY Time to Empty System Status Menu Trend Indicator Tank Percentage Tank Level Next Tank Connected Tanks Previous Tank Tank Name Next System Icon Signal Strength Tank Battery... -
Page 18: Icon Definitions
“time to empty” would increase. The maximum “time to empty” is displayed as 100+ days. When Smart Water is first installed the status button will default to 200+ days once your water usage has been learned and stored into memory by the... -
Page 19: Tank Number
Please note that this function is only applicable if you have more than one tank connected to the system. A maximum of twelve (12) tanks can be connected to a single Smart Water WiFi LCD Keypad or WiFi Gateway. -
Page 20: Trend Indicator
Tank Sender or WiFi LCD Keypad/WiFi Gateway to a position with better reception. Alternatively consider fitting an external high-power antenna (a range of antenna options are available from Smart Water to suit most installation requirements). If two bars only are shown this is still adequate for reliable operation. -
Page 21: Replace Filter
P a g e | Make sure that the Tank Sender solar panel has clear access to direct sunlight. Even if the Tank Sender battery has a low state of charge, it will recharge when moved/returned to a position with exposure to direct sunlight. -
Page 22: Pump
P a g e | Pump The pump icon is displayed when a Pump Controller has been connected to the system. When the pump icon is rotating this shows that a Pump Controller connected to the system is in operation. Touch the pump icon to control the pump (also see MENU ->... -
Page 23: Tank/Pump Selection Matrix
P a g e | Tank (or Pump) Selection Matrix The “Selection Matrix” is displayed when multiple Tank Senders or Pump Controllers are connected to the system. The numbers highlighted in blue represent the number of devices connected, simply touch on the device number you want to edit to move forward to the next screen. -
Page 24: History Screen
P a g e | History Screen Touch the tank percentage icon on the main screen to display the HISTORY graph. This screen shows a graph of the recorded tank level for the preceding 30 days. Touch the centre of the graph to scroll through the different tanks connected to your system. - Page 25 P a g e |...
-
Page 26: Menu Options
P a g e | MENU OPTIONS MENU Touch the MENU icon on the main screen to access all menu options in the Smart Water system. MENU -> ADD DEVICE Use to connect any device to the system including Tank Senders and Pump Controllers. -
Page 27: Menu -> Settings -> Tank Settings -> Outflow Height
CAUTION: If the tank height is set too high then it is possible that the system will read incorrectly. Smart Water strongly recommends that the tank height be set lower than the actual height of your tank. The system will then automatically calibrate 100%. This technique will provide the most accurate ongoing performance. -
Page 28: Menu -> Settings -> Tank Settings -> Filter Timer
P a g e | MENU -> SETTINGS -> TANK SETTINGS -> FILTER TIMER This useful feature will remind the user when a tank filter needs to be replaced. Simply select the number of months for replacement and touch SET. The filter replace icon will be displayed and an alert generated when the timer expires. -
Page 29: Menu -> Settings -> Pump Settings -> Auto Pump
MENU -> SETTINGS -> PUMP SETTINGS -> SOURCE and the MENU -> SETTINGS -> PUMP SETTINGS -> SOURCE -> DESTINATION screens. When operating in AUTO mode Smart Water recommends to also set the run timer to provide additional system redundancy. -
Page 30: Menu -> Settings -> Pump Settings -> Start
P a g e | MENU -> SETTINGS -> PUMP SETTINGS -> START The START menu must be completed when in AUTO mode and when the destination is set to a TANK. Set the START level that the destination tank must reach before the pump will automatically turn on. When multiple tanks are connected to the system the tank selection matrix will appear, prompting the user to confirm the tank. -
Page 31: Menu -> Settings -> Reset -> Usage Reset
P a g e | MENU -> SETTINGS -> RESET -> USAGE RESET USAGE RESET will reset only the recorded historical data stored in the system memory. All connected devices will remain connected to the system. If this option is selected the system data will be lost, including level history, usage, and time to empty. -
Page 32: Menu -> Settings -> Display -> Days To Empty
30 seconds. This allows for the screen to be cleaned without any unwanted touch commands being entered. Smart Water recommends using a mildly moist cloth, or dedicated LCD screen cleaner if cleaning is required. Harsh detergents may damage the LCD and void the warranty. -
Page 33: Menu -> Settings -> Diagnostics
The DIAGNOSTICS screen shows system information on connected devices. Diagnostic information presented are raw data values and are generally only used for fault finding and by Smart Water technicians. Touching the centre of the screen will allow the user to scroll through the different devices connected to... -
Page 34: Solar Panel Set-Up Guide
P a g e | SOLAR PANEL SET-UP GUIDE Optimising Tank Sender Solar Panel Performance: The angle that your Tank Sender is mounted to the tank is of particular importance. The following steps (in order of importance) will help ensure maximum charging performance: 1.) Ensure that the Tank Sender solar panel has as much access to sunlight as possible. -
Page 35: Appendix
Positioning the antenna vertically will also assist reception performance. Alternatively, consider utilising an external mount antenna to connect your wall mount LCD Keypad • Smart Water strongly recommends the wall mount LCD Keypad should be installed by a qualified/certified electrician •... -
Page 36: Operational Notes
If a RED flashing light is noted on the Tank Sender, record the number of red flashes (1 through to 5), and contact Smart Water. This is an error code issued by the Tank Sender that will require Refer to the last page of this user manual for contact details •... -
Page 37: Tank Sender Led Status Codes
P a g e | APPENDIX Tank Sender LED Status Codes: GREEN • Booting up sequence Flashing until boot up is complete, then as below • Failed boot-up flashes Serial number fault flashes RF module fault • Successful binding BLUE (for 2 seconds), then WHITE, WHITE (Pressure) •... -
Page 38: Active Repeater Led Status Codes
P a g e | Active Repeater LED Status Codes: BLUE (for 3 seconds), then WHITE, WHITE • Successful Boot-Up (Status LED) Failed Boot-Up flashes Serial number fault • (Status LED) flashes RF module fault Receive signal BLUE • (Status LED) •... -
Page 39: Wifi Lcd Keypad Led Status Codes
P a g e | • Transmit signal Pump ON GREEN constantly on, flashes once if OFF is pressed • Pump OFF constantly on, flashes once if ON is pressed • WiFi LCD Keypad LED Status Codes: ORANGE • Successful Boot-Up continuously flashing (STATUS LED) (not blinked up) •... -
Page 40: Blinkup Led Status Codes
P a g e | BlinkUp LED Status Codes:... -
Page 41: Warranty
P a g e | WARRANTY Smart Water provides a full TWO-YEAR workmanship warranty on its products. The Smart Water replacement warranty is void if the product has been tampered with, opened or damaged outside the range of normal use (including acts of God). -
Page 42: Privacy Policy
PRIVACY POLICY Introduction Ivent Solutions Limited built the Smart Water app as a free and paid subscription app. This Privacy Policy is used to inform customers regarding our policies with the collection, use, and disclosure of personal information if anyone decided to use our app. If you choose to use our app, then you agree to the collection and use of information in relation to this policy. - Page 43 P a g e | • To assist us in analysing how our app is used. We want to inform users of this app that these third parties have access to your personal information. The reason is to perform the tasks assigned to them on our behalf. However, they are obligated not to disclose or use the information for any other purpose.
-
Page 44: Frequently Asked Questions
we needed to develop a fresh new advanced communications protocol and software suite. The SW900 is vastly superior to the SW800, however it did mean that the two systems were deemed incompatible. Will the battery in the Tank Sender run flat if it is cloudy? No. - Page 45 What is the “Blink Up” process? The blink up process is how you get the Smart Water system online. It is an ingenious way of transferring your WiFi network details into the LCD Keypad or WiFi Gateway. Blinking up is very intuitive and there are simple steps to follow on the app to guide you through the process.
- Page 46 The Tank Sender is supplied as standard with a 12VDC power pack for this purpose. Can I measure different liquids other than water with the Smart Water system? Yes. Smart Water allows for different liquids to be measured. For example, Urea and ...
-
Page 47: Contact Details
P a g e | CONTACT DETAILS Physical Address: Ivent Solutions Limited - trading as Smart Water Technology 7H Echelon Place East Tamaki 2013 Auckland NEW ZEALAND Postal Address: SMART WATER TECHNOLOGY PO Box 38807 Howick 2145 Auckland NEW ZEALAND...
Need help?
Do you have a question about the SW900 and is the answer not in the manual?
Questions and answers
the LCD screen is not showing anything but if you touch the screen, it makes noice, sometimes the light comes on but flickering
The issue could be due to the LCD screen being in "CLEAN SCREEN" mode, which disables touch input for 30 seconds but does not turn off lights or sounds. Another possibility is a power issue or fault indicated by LED status codes. For example, a flashing RED light may signal a battery warning (below 3.3V) or other hardware faults. Check power supply and LED codes for further diagnosis.
This answer is automatically generated