
Summary of Contents for S.I.T.A. 400 Series
- Page 1 ULTRAVIOLET DISINFECTION EQUIPMENT FOR THE TREATMENT OF DRINKING WATER 400 SERIES DS PLUS MANUAL OF INSTALLATION, USE AND SERVICING English 01-2012 Rev. A...
-
Page 2: Table Of Contents
INDICE Introduction ..............................2 General Principles ............................3 Instruction for installation and servicing......................5 Installation scheme recommended......................6 The UV Chamber Installation........................7 Assembling of the UV chamber ........................7 UV Controller .............................12 Operation Flow Chart:..........................13 Menu Readings:............................14 Menu Settings: ............................15 5.3.1 Alarm Thresholds Settings ........................16 5.3.2 Flow Rate Settings (Optional on Request) .....................17 5.3.3 Intermittent Operation..........................18 5.3.4 Lamp Post Burn............................18... -
Page 3: Introduction
Introduction This manual is for the following models of UV 400 Series. This Pressure UV Systems is manufactured by S.I.T.A. s.r.l. Warning: This equipment requires regular maintenance to ensure the requirements of the drinking water treated and the maintenance of the improvements as stated by the manufacturer. -
Page 4: General Principles
General Principles The UV 400 SERIES sterilizers have been planned specially for destroying harmful bacteria and viruses present in your water. Their working is based on a physical principle which is a warrant of security: the output of ultra- violet irradiation. - Page 5 Attention: Working on live equipment is forbidden. INSTALLATION GUIDANCE The reactor control panel utilises air cooling. The following guidelines must be adhered to when locating the unit. The reactor and control panel must not be located in a position where the ambient air temperature exceeds 40ºC.
-
Page 6: Instruction For Installation And Servicing
Instruction for installation and servicing General premise The installation of the UV 400 SERIES sterilizer units must be carried out by specialized staff, scrupolously following the instructions given hereby. It has been moreover considered necessary to give some general information about the electrical and water connections. -
Page 7: Installation Scheme Recommended
Installation scheme recommended... -
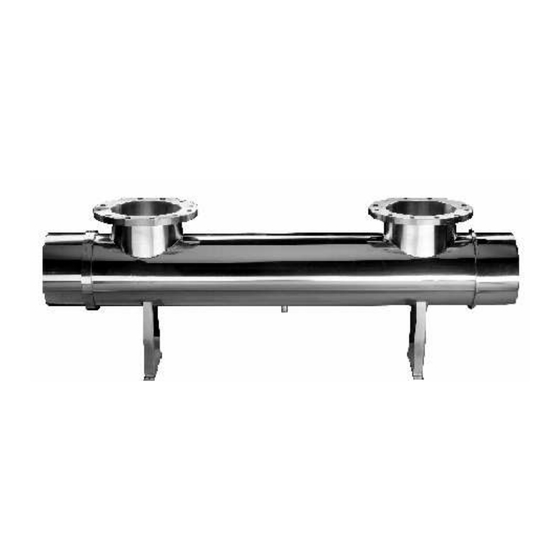
Page 8: The Uv Chamber Installation
The UV Chamber Installation Assembling of the UV chamber Unscrew the s/s sleeve bolts (A) from both sides by using the key supplied. Insert the quartz sleeves (B) by using the special bar supplied and the o-rings 38x4 (C) on both sides of the quartz sleeves. - Page 9 Screw again the s/s sleeve bolts (A) on both sides of the UV chamber, and carry out the hydraulic test, verifying that the o-rings are watertight and that no water leaks outside the sleeve bolts or inside the quartz sleeves. On the closed side of the UV chamber, mount the blind cap in black polyethylene (D), with the o-ring 2112 type (E) inserted and block by screwing the Ø...
- Page 10 On the openable side of the UV chamber, insert the UV-C lamps (G) into the quartz sleeve previously mounted.
- Page 11 Connect to the UV-C lamps the 4-pins connectors (H) mounted as on the figure together with the Ø 1 ¼” ring nuts (I), the PG9 nipples (L), and the 4-pins holders in black polyethylene (M) with the pertinent o-rings 2112 type. Screw the Ø...
- Page 12 Mount the o-ring (N) (3043 type) on the probe holder (O) and screw this one on the Ø ¼” bush welded in the middle part of the UV chamber. Finally, connect the pertinente electrical cable.
-
Page 13: Uv Controller
UV Controller The UV Controller has a 2 line x 16 character backlight LCD display, one general alarm LED and 4 Function Keys: Function Keys START/STOP/OK -) When it’s pushed for more than 5 sec. it turns ON/OFF the UV System -) In the menu of the display it ENTER the menu and confirm the parameters or the operation -) Back one level in the menu... -
Page 14: Operation Flow Chart
Operation Flow Chart: System OFF! Cycling View Level Menu Directory Level > 3 MENU Readings UV system 10:47 4/09/2010 MENU Settings H Tot: Start UP H Lamp: 8.924 MENU > 3 Operations Irradiance: 400 J/m MENU Password Cycling View Level It’s the standard working level. -
Page 15: Menu Readings
Menu Readings: It is the Menu in which the user can read all the parameters that the system is reading or had memorized. MENU Flow Rate: Visible if a flow meter is connected to the UV System. Readings It shows the water flow in m /h passing through the UV system. -
Page 16: Menu Settings
Menu Settings: It’s the Menu in which the user can set all the parameters useful for the measurements and the system working. MENU Settings Set Up Language English Set Up Timer Alarm Thresholds ENTER Flow Rate Settings ENTER Intermittent Operation ON/OFF Lamp Post Burn: ON/OFF... -
Page 17: Alarm Thresholds Settings
5.3.1 Alarm Thresholds Settings In this menu the user can set the alarm values: Max Temperature Chamber: 80° C Alarm Threshold Pre-Alarm Low ENTER Irradiation.: 500 J/m Low Irradiation: 400 J/m Max Temperature Chamber: Visible in case of Rack Plus or SMP systems. This threshold level define the max allowed water temperature in the UV chamber. -
Page 18: Flow Rate Settings (Optional On Request)
5.3.2 Flow Rate Settings (Optional on Request) Available only in case that the UV system is provided with a flow meter or connected to an external one. Set the parameter useful for the flow rate alarms and/or readings (see section “Flow Rate Settings”). -
Page 19: Intermittent Operation
5.3.3 Intermittent Operation Menu visible only if the remote ON/OFF option is disconnected in the password menu. In this menu the user can set the automatic start up and shut off hour of the UV Lamp(s). Intermittent Operation ON: 08:30 ON/OFF OFF: 17:30 If the system is OFF the next start up hour will be visualized in the display. -
Page 20: Irradiance 4/20 Ma Settings (Optional On Request)
5.3.5 Irradiance 4/20 mA Settings (Optional on Request) The UV system can have an 4/20 mA output available as optional. This signal is available for the chamber temperature and the UV irradiance. The temperature signal is 4 mA for 0 °C and 20 mA for 100°C. The Irradiance 4/20 mA signal can be set by the user: 4/20 mA IRR Setting: 20 mA = 100% ENTER... -
Page 21: Menu Operation
Menu Operation: In this menu the user can do some operations on the UV system. The operation that may be done are: restart the lamps hour meter, put the system in maintenance mode and calibrate the sensor (only in Rack Plus / SMP UV versions): MENU Operations... -
Page 22: Maintenance Menu
5.4.2 Maintenance Menu Maintenance Mode Maintenance Mode ON/OFF In this configuration the system can work and the lamp remains on but no alarm will switch. In this way the user can do maintenance (work on the sensor without alarms that may close the valves). 5.4.3 Sensor Calibration Irradiance in % With this operation the user confirms that the signal read by the UV sensor matches the 100% of the... -
Page 23: List Of Alarms And Troubleshooting
List of alarms and troubleshooting Each alarm switches the main relays (free contact and 230 V contact) and a red led is lighted in the el. Panel.. The following alarms can be shown in the UV System Display: Each lamp of the UV system is identified with a number. Lamp Failure This message is visualized when lamp number X is not working. - Page 24 It’s visible in case of DS Plus or SMP systems. It’s visualized in case the UV Low IRR Irradiance (or Dose) is under the threshold level. Possible Causes: Solutions: Deposits on quartz sleeves lamp Clean the quartz sleeve protection Significant variation Filter the water transmittance of the water...
- Page 25 It’s visible in case the system is connected to a flow meter. It’s visualized in case Low Flow the flow meter signal is lower then the settable threshold level. Possible Causes: Solutions: Low water flow Check valves and pumps Error on the flow meter signal Check the flow meter and it’s cable connection IMPORTANT...
-
Page 26: Replacement Of Motor Shaft Gasket For Uv 400 Ra Series
Replacement of motor shaft gasket for UV 400 RA series Disconnecting electrical power interrupt the water flow and discharge the UV system. Open the metallic cover which protecting the motor shaft joint. Unscrew the M6 nuts of electrical motor ties and unthread the motor. - Page 27 Unscrew the locking grains of joint mounted on the threaded rod and extract the joint.
- Page 28 Remove the disc mounted on gasket housing unscrewing its M5 bolts. Helping with screwdriver, remove the old gasket and insert the new.
- Page 29 Reassemble all and restart the UV system.
-
Page 30: Spare Parts
028118 Lamp for 400 series 028201 Quartz for 400 series 028203 Quartz for UV 400/1 RA 028207 O-ring for quartz single lamp 400 series 028034 Contact cover MP1137/T Quartz Cleaning Brush Reactor Dimensions (see the attachments to the manual) 10. Technical Data Sheet (see the attachments to the manual) 11. -
Page 31: Warranty Condition
Warranty Condition WARRANTY CONDITIONS SITA works in compliance with ISO 9001-2008 quality procedures and subjects all equipments to accurate checks and tests. The SITA supplies and progressing are anyway guaranteed only in the limits of technical specifications and request and/or of the certificates and/or of the specific checks as agreed, for 24 months from the purchase date, provided that eventual defects are stated as fixed by art. -
Page 32: Declaration Of Conformity
S.I.T.A. Italian Company for Water Treatment EC DECLARATION OF CONFORMITY The undersigned hereby declares, under full responsibility, that the unit: UV STERILIZER 400 SERIES DS PLUS MODELS IS IN COMPLIANCE WITH 2006/95/CE (low voltage directive) 2004/108/CE (electro-magnetical compatibility) 2002/95/CE (RoHS)
Need help?
Do you have a question about the 400 Series and is the answer not in the manual?
Questions and answers