Table of Contents
Advertisement
Quick Links
EFOS
USER'S MANUAL
Rev. 2.0 - May 2022
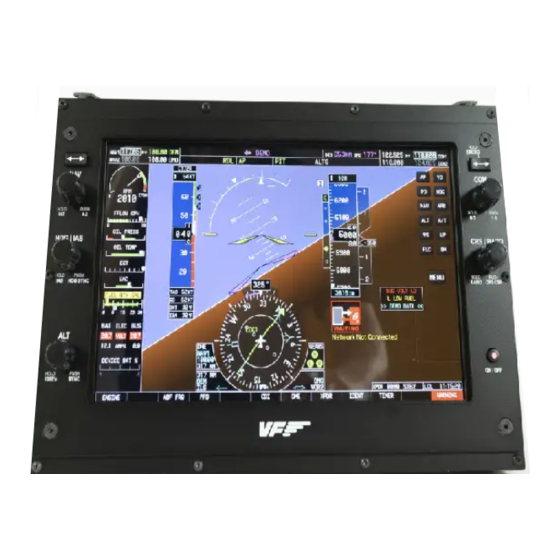
1. IN THE BOX
A) Switcho EFOS module
B) Anti-slip leg
C) "H"connecting piece between modules
D) "L" connecting piece between modules
E) Network cable (Ethernet)
F) Ethernet to USB adapter
G) Power supply (with four regional
interchangeable heads)
H) Allen keys (n.2, n.3)
For support, contact us at
support@virtual-fly.com
2x
1x
1x
© 2022 Virtual Fly, SL
All trademarks and brand names are
trademarks or registered trademarks of their
respective owners. All rights reserved.
1x
A
B
C
2x
E
1x
H
C. Maria Aurèlia Capmany, 21
P.I. La Fàbrica – 08297 Castellgalí (Spain)
Phone: (+34) 938 333 301
https://www.virtual-fly.com
D
2x
G
1x
Advertisement
Table of Contents

Summary of Contents for Virtualfly EFOS
- Page 1 EFOS USER’S MANUAL Rev. 2.0 - May 2022 1. IN THE BOX A) Switcho EFOS module B) Anti-slip leg C) “H”connecting piece between modules D) "L" connecting piece between modules E) Network cable (Ethernet) F) Ethernet to USB adapter G) Power supply (with four regional interchangeable heads) H) Allen keys (n.2, n.3)
-
Page 2: Hardware Setup
Introduce both anti-slip legs (B) in the lower slots from the backside, as indicated below. Using the n.2 Allen key (H), Slide in the SWITCHO Clamp into the lower slots of the EFOS tighten the screw on each anti-slip leg as displayed below as displayed in the diagram below, and attach the clamp onto until you feel resistance. -
Page 3: Module Assembly
Connect the USB-C power supply cable (E) to the back of the If you own another SWITCHO module, you can combine the EFOS labelled as “Power 5V” and the USB-A to USB-C cable modules with the provided connecting pieces (C). -
Page 4: Software Setup
3. SOFTWARE SETUP X-Plane 11 To set up the EFOS with X-Plane 11, you only need to install the To interact with your PC, the EFOS requires installing some VFConnect version suitable for X-Plane 11. You can download additional software depending on the flight simulation software it from the link below: you use. - Page 5 1. Start your preferred flight simulation software (MSFS, Prepar3D or X-Plane 11). 2. After the EFOS is connected to the PC, press the push button (a) indicated below to start the EFOS. 3. Press the Windows icon and “R” key simultaneously to pop up the screen below, and type “ncpa.cpl”.
- Page 6 "Connected" status until a flight has been loaded. If a connection has not been established yet between the EFOS and PC, the EFOS’ screen will display either one of the messages below: 6. Execute the VFConnect version that corresponds to the simulation software running.
- Page 7 If you have issues establishing the connection between the EFOS and your computer, please contact Virtual Fly's Technical support at support@virtual-fly.com. 4.2 DEACTIVATING PROCEDURES Press the push button of the EFOS and wait until everything has stopped before unplugging the EFOS from the power source. ON/OFF...
- Page 8 Press the “Aircraft Model” option from the Menu. Once the EFOS and PC are connected, you must select which aircraft you wish to fly in the EFOS. To do so, you must first press the button indicated in the image in the left below, which will pop up the buttons indicated in the right below.
-
Page 9: Touchscreen Buttons
Check the Aircraft Compatibility table from Chapter 7 to learn • NAV: Selects/deselects the Navigation Select Mode. about which aircraft’s instruments you can display in the EFOS • APR: Selects/deselects the Approach Mode. with MSFS, Prepar3D and X-Plane 11. •... - Page 10 BACK: Returns to the previous menu. • DME: Displays the DME Tuning Window. • XPDR: Displays transponder mode selection softkeys. • STBY: Selects standby mode (transponder does not reply to any interrogations). • ON: Selects mode A (transponder repllies to interrogations). EFOS | User’s manual...
-
Page 11: Physical Buttons
5.3 PHYSICAL BUTTONS (2) Transfers the active COM source to the standby The EFOS also contains physical push buttons (keys) and frequency of the same COM source. (3) Sets the MHz of rotary switches (knobs) to control various aspects of the flight the active COM frequency. - Page 12 FD ROLL NAV DME DISTANCE GPS BEARING NAV GS NEEDLE GPS DESTINATION NAV LOC NEEDLE GPS DME DISTANCE NAV1 RADIAL GPS FLAGS NAV TO FROM FLAG GPS NEEDLE NAV STBY FREQUENCY GPS PITCH MODE NAVAIDS STATUS EFOS | User’s manual...
- Page 13 OUTSIDE AIR TEMPERA- CABIN PRES DIFFERENTIAL TURE CAS MESSAGES PARKING BRAKE ON LAND GEAR LEFT PRESSURISATION ALTI- LAND GEAR LEVER TUDE SET CHANGE RATE LAND GEAR NOSE UTC TIME LAND GEAR RIGHT WIND DIRECTION LOCAL TIME WIND SPEED EFOS | User’s manual...
-
Page 14: Troubleshooting
Check connection of network cable nº 3 between SOLO and MFS / P3D / X-Plane computer. X-Plane 11 is loaded but an aircraft is Execute MFS / P3D / X-Plane. not loaded. EFOS does not connect to Restart VFConnect. VFConnect3 MSFS/ Prepar3D/ X-Plane 11 do not connect to the “VFConnect3.exe”... - Page 15 Restart the EFOS. has been closed and reopened display correct values. after successful connection. EFOS screen does EFOS software has been shut down display aircraft Restart the EFOS. by exiting it from the menu. instrument panels. EFOS | User’s manual...
- Page 16 7. AIRCRAFT COMPATIBILITY The EFOS is compatible with the following aircraft in MSFS, Prepar3D and X-Plane 11: MSFS Prepar3D X-Plane 11 Beechcraft Baron 58 Beechcraft Baron 58 Beechcraft Baron 58 Beechcraft King Air 350 Beechcraft King Air C90 Beechcraft Bonanza 36...
Need help?
Do you have a question about the EFOS and is the answer not in the manual?
Questions and answers