Table of Contents
Advertisement
Advertisement
Table of Contents

Summary of Contents for Pecole PE-18
- Page 1 DOG TRAINING COLLAR User Manual Model: PE-18 *Please read this manual before use...
-
Page 2: Table Of Contents
Contents ..................1. Warranty ............2. Important safety information ..................3. Components ................... 4. Function ............4.1 Remote transmitter..................4.2 Receiver collar ................. 4.3 Key definitions ............... 4.4. Main characteristics ..............5. Product setting steps 5.1 Remote transmitter and receiver collar charging ....5.2 Installation of contact points and conductive silicone prongs.. -
Page 3: Warranty
This product has a warranty period of 1 year. The full details of the warranty and its terms applicable to this product can be found in www.pecole.vip. If you have any questions, please attach your order number to us: support@pecole.vip in your email and we will reply as soon as possible. - Page 4 Safety during training: your dog should have a strong leash. The leash should have a certain length, so as to enable your dog to chase an object and prevent your dog from reaching the road or other unsafe places. When your dog tries to chase, you must also have enough physical strength to restrain it.
-
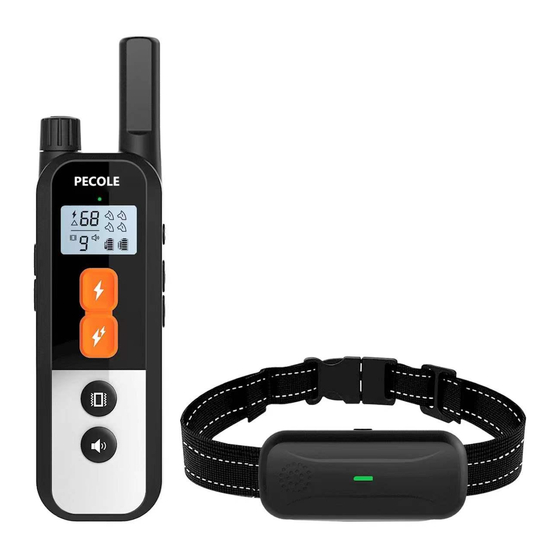
Page 5: Components
3. Components Used to remotely control the Remote receiver collar to train pets. transmitter Wear it on your dog to receive the command from the Receiver collar remote transmitter. USB charging Used to charge the remote transmitter and receiver collar. -
Page 6: Function
2 long contact points for dogs Contact points with thick hair 2 short contact points for dogs with short hair Sleeve on the contact point to Conductive make the contact point softer. silicone prongs 4. Function 4.1. Remote transmitter Antenna ON &... -
Page 7: Receiver Collar
Static Static Level Display(00-99) Channel Display (1-4) Warning Beep Battery Status (Receiver collar) Vibration Keypad Battery Status Level(0-9) Lock (Remote transmitter) 4.2. Receiver collar ON & OFF Switch Sound Speaker LED Status Light Contact Points Magnetic Charging Port... -
Page 8: Key Definitions
4.3. Key definitions The remote transmitter rotates the switch ON&OFF switch knob and controls the strengthof vibration and shock. (level regulator) Panel display Control panel display Keypad lock Remote transmitter keypad lock button Vibration Vibration mode button... -
Page 9: Main Characteristics
4.4. Main characteristics Vibration, beep and shock training model 9 adjustable vibration levels and 99 adjustable shock levels Dual battery status display of remote transmitter and receiver collar The waterproof grade of receiver collar is IPX7 (the... -
Page 10: Product Setting Steps
5. Product setting steps *In accordance with the following product steps before using the dog training collar. 5.1. Remote transmitter and receiver collar charging When the charging is completed, the green light will be on. 5.2. Installation of contact points and conductive silicone prongs 1. -
Page 11: Adjustable Receiver Collar
5.3. Adjustable receiver collar 1. Untie the strap from the slide buckle (4A). 2. Adjust the slide buckle according to the size of the dog (4B). 3. Pass the strap through the slide buckle (4C). 4. Thread the excess strap through the buckle (4D). - Page 12 2. Turning off the receiver collar Press receiver collar button for 3 seconds until the red LED light appear. Note: in order to prolong the battery life, please turn off the receiver collar when not in use.
-
Page 13: How To Use Test Light Tool
5.5. How to use the test light tool 1. Shock function test - Turn on the receiver collar. - Attach the contactor of the test light tool to the contact points (or conductive silicone prongs). - Press the shock button, and the test light tool will light up. It will light up according to the increase of shock degree. -
Page 14: Installing The Receiver Collar
3. Controller pairing: press and hold the channel selection button D to pair the receiver collar. 4. Pairing succeeded: the receiver collar will beep and the green light will flash slowly. 5.7. Installing the receiver collar NOTE: The contact point must directly contact the skin of the dog's neck, check the tightness of the receiver collar, and insert two fingers tightly between the receiver collar and neck. -
Page 15: Turning On The Remote Transmitter And Receiver Collar
5.8. Turning on the remote transmitter and receiver collar Rotating the regulator “A” to turn on the remote transmitter Press the button to turn on the receiver collar, the green LED flashes When the collar is not used, please turn off the remote transmitter and receiver collar to increase the battery life. -
Page 16: Three Training Mode Instructions
5.10. Three training mode instructions 1. Beep instruction Give an instruction to the receiver collar to beep at a unadjustable volume 2. Vibration instruction Give a vibration instruction to the receiver collar. Adjustment of vibration strength: hold down the vibration level button B and simultaneously rotate the level regulator A of the remote transmitter. -
Page 17: Multiple Receiver Collar Systems
3.Shock instruction Static Static + 5.11. Multiple receiver collar systems (NOTE: If you only use one receiver collar, please skip this step. This setting only applies to multiple receiver collar with one remote transmitter.) Step 1: Pairing the 2nd, 3rd or 4th receiver collar. - Page 18 Step 2: Receiver collar switching You can train 4 dogs by switching channels. Press and hold the pairing/channel selection button D, and simultaneously rotate the level regulator A to select the dogs to be trained. Press and hold Step 3: Reset all paired receiver collars.
-
Page 19: Matters Needing Attention In Pet Training
5.12. Matters needing attention in pet training 1. Select contact points andconductive silicone prongs. For the best effect, please choose the right contact point according to your dog's coat. For dogs with thick hair, please use 2 long contact points and conductive silicone prongs. -
Page 20: Frequently Asked Questions
6. Frequently asked questions The answers to these questions may help you solve most of the problems on the dog training collar. If your problems cannot be solved, please contact our customer service center. 1. My pet doesn't respond - Check whether the receiver collar is turned on. -
Page 21: Replacement Parts And Accessories
7. Replacement parts and accessories Replacement parts or accessories for your dog training collar can be purchased by visiting www.pecole.vip or by contacting our Customer Care Center at support@pecole.vip. Part Description Replacement Part Number Remote Transmitter PER-001... - Page 22 Scan the QR code for more details. www.pecole.vip service pecole.vip PECOLE Dog Training Collar Model: PE-18 Manufacturer: Dongguan Dirui Electronic Technology Co., Ltd. Address: Floor 5, Building G, Tailian Science and Technology Park, Xiaobian Community, Chang'an Town, Dongguan Made in China...
Need help?
Do you have a question about the PE-18 and is the answer not in the manual?
Questions and answers
I have a PE-18 and when I went to charge only one battery charged and it is brand new
The Pecole PE-18 dog training collar system includes dual batteries—one in the remote and one in the collar. If only one battery is charging, it may be because the USB charging cable is not properly connected to both units, or there may be an issue with the cable or charging port. Also, the transmitter is non-waterproof, so exposure to water could damage it and affect charging.
This answer is automatically generated
collar will not stop vibrating, will not turn off when button pushed
The Pecole PE-18 collar may be vibrating continuously and not turning off when the button is pushed due to the vibration button being held down too long or stuck. Continuous pressing is not recommended and may cause unintended operation. It could also be a malfunction in the remote transmitter or a pairing issue. Check the keypad lock and ensure the remote is functioning correctly. If the issue persists, turn off the receiver collar and re-pair it with the remote.
This answer is automatically generated
What does the warning light me on the remote of the shock collar when you push the shock button?
Need to order 2 replacement collar straps. Per 003