Table of Contents
Advertisement
Quick Links
Advertisement
Table of Contents

Summary of Contents for HEXCAL STUDIO
- Page 1 ™ User Manual...
- Page 3 Presented by Hexcal Indoor Systems, a Hexcal™ Company...
-
Page 4: Important Safety Instructions
Hexcal Grounded Outlet Studio. If your product is damaged through • WARNING: Risk of instability, ‘Cover’ Max 101 misuse or abuse, it will not be covered under lbs load, ‘Upper main frame’ 22 lbs load. - Page 5 • To disconnect, turn all controls to the off • Always unplug this furnishing from the • This product may be used by children of at position, then remove the plug from the outlet. electrical outlet before cleaning, servicing, least 10 years of age, as long as they are putting on or taking off parts.
- Page 6 • Do not pull the cord over sharp edges, clamp it, • To clean Hexcal Studio, use only clean • The manufacturer accepts no responsibility or allow it to hang down. cleaning tools. and the warranty will not apply for any commercial use, inappropriate handling or •...
- Page 7 • Hexcal is not responsible for any data loss or • The product should be placed on a suitable, • All Hexcal products pass stringent controls. device damage through misuse or abuse. stable, long enough surface which should be at Reliability tests under practical conditions are most 1 meter (3.3 ft) from the ground.
- Page 8 Your Next Generation Workstation is Here...
- Page 9 Strap Extension feet are hidden inside the For organizing cables Please see Firmware Upgrade Please see Data Bridging Studio’s chamber. Please see First Time inside the chamber. on p.28 for more details. on p.22 for more details. Use on p.11...
-
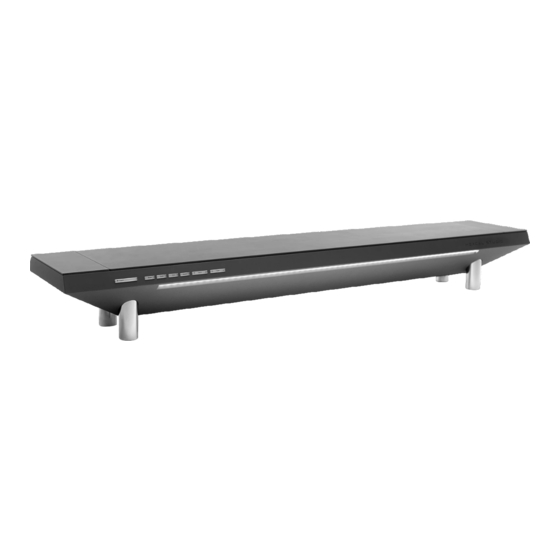
Page 10: Front View
Functions FRONT VIEW Detachable Aluminum Surface Wireless Charging Pad Task Lighting Bar Detach to access cord chamber. Please see Charges up to 2 devices simultaneously. Please Creates immersive and shadowless light field. see Wireless Charging on p.20 for more details. First Time Use on p.11 for more details. -
Page 11: Back View
Isolated Power Supply System Sockets Sockets Sockets Please see Over Current Protection INT - controls the power supply for Studio’s on p.19 for more details. internal functions; EXT - controls the power supply for user devices. Please ensure both buttons are pushed for full device functionality. -
Page 12: Top View
TOP VIEW Wireless Charging Module Bridging Ports (AFTER REMOVING THE ALUMINUM SURFACE) Capable of charging two devices Bridge devices inside the chamber to the simultaneously. Please see Wireless external USB slots. Please see Data Bridging Charging on p.20 for more details. on p.22 for more details. -
Page 13: Bottom View
BOTTOM VIEW Quick Charging and Data Bridging Ports Offer fast charging ports and bridging ports for user devices. Please see USB Ports on p.21 and Data Bridging on p.22 for more details. Device Information Tag Model and safety information is here. - Page 14 First Time Use / Height Adjustment Unlock both surface locks. Slide the locks outward to unlock. Remove the surface. Gently slide the surface out until it hits the stopper, then lift it out of the rail and put it aside.
- Page 15 Find the extension feet. Press and remove the magnetic compartment caps on both sides to find the extension feet. Detach the extension feet. Rotate the feet counter-clockwise to detach them from the body.
- Page 16 Make sure the devices and equipment are disconnected and removed from the surface before adjusting the height. You can increase the height of the Studio even more by adding Middle Extension Feet (not included by default, must purchase separately). Please check hexcal.com for...
- Page 17 Slide the surface back to the deck. Slide the surface gently along the rails on the deck to seal the chamber. Lock the surface. Slide both surface locks inward and double-check if the surface is properly secured. If you have a problem with locking the surface, please (a) clear any blockage in the chamber if it has any, and (b) slide the surface slowly and horizontally to ensure...
- Page 18 Cord and Accessory Management Connect external devices to the sockets. For how to plug external devices in a more organized way, please see Power Supply on p.17 for more details. Route cords with 3D Cord Organizer Insert cords into 3D Cord Organizers by placing and routing them inside the chamber.
- Page 19 3D Cord Organization System 3D Cord Organization System is Hexcal’s patented design. It guides the cables in optimal directions to prevent kinking and organizes them in your preferred order. Surface Surface Chamber Chamber Socket Socket...
-
Page 20: Power Supply
For more information please see Over Current Protection on p.19. Plug the Studio to the wall power Input: 120V/12A/60Hz Press both buttons to access full functions. INT - controls the power supply for Studio’s internal functions. EXT - controls the power supply for user devices. - Page 21 Insert plugs/adaptors into different types of sockets. WARNING: The Studio supports up to 1,440W (120V/12A) overall power supply. Exceeding wattage limit may trigger over current Horizontal Sockets - designed for accommodating large adaptors. protection mechanism (See p.19 for more details).
-
Page 22: Over Current Protection (Ocp)
Over Current Protection (OCP) RESET Button will be released automatically when it detects an over current circumstances on the system. When a short circuit happens, the Studio automatically breaks the circuit to Button pressed: Button released: OCP ON OCP OFF protect your devices from further damage. -
Page 23: Wireless Charging
10/S10, AirPods Pro, AirPods 2, power indicators (I/II). Indicators Pixel 4 and 4XL. can only be observed when sitting in the front of the Studio. Non-Effective Device Requirement Charging Area Device case thickness should be less than 2.5mm. - Page 24 DC Power Ports Power Delivery (PD) Standard Type-C Power Port When used individually: 5V/3A ~ 9V/3A. Follow the Power Delivery protocol. When working together with the PD USB-C port, the max output of both ports will be limited to 5V/2.5A. Quick Charge (QC) Standard USB-A Power Port When used individually: 5V/3A ~ 9V/3A.
-
Page 25: Data Bridging
Data Bridging The Studio’s data bridging function allows you to quickly access your devices in the chamber from the outside, such as USB transceiver, flash storage, portable hard drive, etc. Bridging requires a strong anti-EMI (Electromagnetic interference) environment to ensure data transmission stability. -
Page 26: Light System
23 23 Light System Main Power (POWER) Save/Unsave Light (SAVE) Light Intensity (INTST) Configuration Interface Press to turn on/off the Press to save/unsave current Increase/decrease the light intensity. Clicking In Configuration Interface, these light system. light configuration. will temporarily enter the Configuration four short buttons will temporarily Interface. - Page 27 Preset Light Modes Save and Unsave Lights Unsaved Press the MODE button to cycle through preset lights The current light configuration is not saved. (Light off) to quickly anchor the start position to find your Press the SAVE button to save it to your favorite favorite lights from thousands of combinations.
- Page 28 Adjust the Light Intensity Adjust the light intensity (brightness) of the Studio’s lighting system. Press the right side ( ) to increase the intensity, press the left side ( ) to Press ( ) or ( ) to select one of 16 incremental configuration levels.
- Page 29 Adjust the Light Temperature Adjust the light temperature (warmness) of the Studio’s lighting system. Press the right side ( ) to increase the temperature, press the left side ( ) Press ( ) or ( ) to select one of 16 incremental configuration levels.
- Page 30 Upgrade and Support...
-
Page 31: Firmware Upgrade
Firmware Upgrade The Studio is designed to be fully upgradable to optimize its performance. Please register your device with its USN (unique serial number, please see p.30 for USN detail) at hexcal.com to access information about your subscription, or to extend your warranty (please see p.30 for Warranty detail). - Page 32 Gently unscrew the wireless charging screw by using a 3mm hex key (Allen Wrench) (does not come with the product), slide the module outward, and lift to remove. You have to remove the Studio’s top surface first to expose the screw indicated in the picture.
- Page 33 Activate Your Warranty Your Hexcal product will be covered for parts If you have any questions about your Hexcal for 1 year from the date of purchase, subject to appliance, visit hexcal.com and contact us the terms of the Limited Hardware Warranty with your serial number and details of where (please see next pages for more details).
-
Page 34: Limited Hardware Warranty
CUSTOMERS) AND RESELLERS. purposes. 1. Non-Hexcal-branded products and accessories. This paragraph applies if you purchase Hexcal products for resale or for commercial or professional purposes. 2. Problems that result, directly or indirectly, from: THIS WARRANTY GIVES YOU SPECIFIC LEGAL RIGHTS AND YOU... - Page 35 AGAINST HIDDEN OR LATENT DEFECTS. SOME STATES, OUR RECEIVING NOTICE OF YOUR CANCELLATION); (B) 0.1 PRODUCT IS LOCATED WITHIN THE COUNTRY IN WHICH HEXCAL PROVINCES, JURISDICTIONS OR COUNTRIES DO NOT ALLOW MULTIPLIED BY THE TOTAL PRICE; AND (C) THE COST OF ANY...
- Page 36 Hexcal system of any third-party product that was not provided by Hexcal. For Commercial customers, this limited hardware warranty may be voided by Hexcal, at Hexcal's sole discretion, if you install or use in a Hexcal system any third-party product that was not provided by Hexcal.
-
Page 37: Fcc Information
FCC Information This device complies with Part 15 of the FCC used in accordance with the instruction To comply with the FCC’s RF exposure limits for Rules. Operation is subject to the following manual, may cause harmful interference to general population/uncontrolled exposure, this two conditions: radio communications. - Page 38 Make Work Enjoyable.
- Page 40 Copyright © 2021 Hexcal...
Need help?
Do you have a question about the STUDIO and is the answer not in the manual?
Questions and answers