Table of Contents
Advertisement
Quick Links
Advertisement
Table of Contents

Subscribe to Our Youtube Channel
Summary of Contents for ROEST COFFEE ROEST
- Page 1 USER MANUAL ROEST COFFEE AS User Manual 2.0 Updated October 2021...
- Page 2 CONTENTS...
- Page 3 1 IMPORTANT SAFEGUARDS General One year guarantee Revisions Alterations service & accessories Electrical Mechanical Roasting 2 UNPACKING AND SETUP Contents of the box Roaster overview Touch screen overview Positioning the roaster Ventilation How to use hose and elbow Safety precautions and ventilation requirements Chaff drawer Setting up Sample Roaster Placing the cooling filter...
- Page 4 3 OPERATING THE ROASTER Pre-heating the Roaster Profiles Selecting profiles Downloading profiles Ready to roast Type of profiles Before roasting Start roasting During roasting End roast After the roast Automatic roasting Automatic roasting with First Crack Detection Automatic roasting without First Crack Detection Manual roasting Manual roasting with a power profile Manual roasting with an ET profile...
- Page 5 One user - One roaster One user - Multiple roasters Main Menu > Live Main Menu > Logs Log preview Compare logs Main Menu > Profiles Assigning profiles to ROEST Create new profile Autodrop for time-based profiles Precise plot Settings...
-
Page 6: Important Safeguards
IMPORTANT SAFEGUARDS... - Page 7 16. Never use the ROEST from within a cabinet. 17. Never leave the ROEST unattended during pre-heating and roasting. Also, do not leave the roaster unattended until 2 minutes after the cooling process has started, to ensure no fire is present.
- Page 8 ONE YEAR GUARANTEE This product is guaranteed for one year from the date of purchase. If any defect arises due to faulty materials or workmanship, the faulty products must be returned to ROEST for repair or replacement. The following conditions apply: 1.
- Page 9 PID mode and Power profiles Changes to incorporate firmware v10000 Changes to incorporate firmware v10003 Updated Caution warning, Overview, Operating the ROEST and Web Portal Updated Edit Profiles Small updates and added link to WIFI – STEP BY STEP setup Updated with new pictures and info about chaff drawer.
- Page 10 2. The operating environment should be clean and free from dust and sand. 3. ROEST is only for roasting coffee beans. Roasting other food/items will void the warranty. 4. After roasting has finished the roaster will return to “roasting standby mode” and will be ready to roast another batch.
-
Page 11: Unpacking And Setup
UNPACKING AND SETUP... -
Page 12: Contents Of The Box
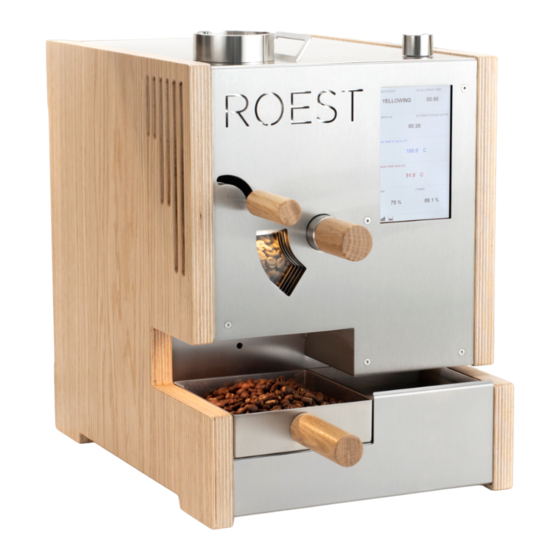
Wi-Fi antenna 80 mm Hose clamp 2x Hex keys Ventilation hose 1.5 m 4x Top plate screws After receiving the ROEST, please inspect the packaging for any damage. If you Proximity Sensor Heating Element are in doubt, please contact the shipping... - Page 13 UNPACKING AND SETUP ROASTER OVERVIEW Front overview: Hopper Bean charge handle, for dropping the beans into the drum Rotary encoder, for adjusting settings Bean drop handle, for pre-heating the drum or manually releasing the beans Bean trier Touch screen Bean cooler tray Chaff collector Back overview: Ventilation exit...
-
Page 14: Touch Screen Overview
UNPACKING AND SETUP TOUCH SCREEN OVERVIEW Development time Pre-set development time for automatic bean dropping (read more on page 35). If pressed Event button when the countdown has started the automatic This is for manually pressing “Charge”, drop is cancelled and “DROP NOW” enables. “Yellowing”... - Page 15 UNPACKING AND SETUP NEXT EVENT DEVELOPMENT TIME YELLOWING 00:50 Standard NA AUTOMATIC FC 00:57 AIR TEMP (T: 197 DIFF: 0.5) 197.5°c BEAN TEMP (RoR: 23.0) Press the time 127.7°c to enter the MAIN MENU POWER (MAX: 100%) 75 % 46.5 % PROFILES Chaff counter Number of completed roasts...
- Page 16 UNPACKING AND SETUP Profile 1 PROFILES ROEST Standard Profile 2 ROEST Kenya Profile 3 NA Standard The PROFILES-button takes you to Profile 4 the library of downloaded profiles. TW Honduras See page 52 for information about how to download profiles.
- Page 17 You can also view your current software version. RUNTIME 0000D 04:42:26 Version 17.4.3-rc1 PREVIOUS WIFI STATUS CONNECTED CLOUD STATUS ONLINE WIFI SETTINGS ROEST SERVER STATUS ONLINE WIFI MAC ADDR E0:4F:43:DB:17:82 WIFI SIGNAL STRENGTH 82 % WIFI SIGNAL QUALITY 77 % IP ADDRESS 192.168.1.40...
- Page 18 UNPACKING AND SETUP ROAST SETTINGS TOGGLE FIRST CRACK DETECTION FIRST CRACK SETTINGS BT TRESHOLD SENSIVITY 150° C TRIGGER COUNT Turn Automatic FC on or off, change the bean temperature treshold and trigger count. More info about AFC on page 31. PREVIOUS...
- Page 19 UNPACKING AND SETUP POSITIONING THE ROASTER The roaster must be placed on a flat, hard surface with a minimum of 20 cm clearance to all sides and 40 cm above the roaster. VENTILATION It is recommended to use a flameproof metal hose with a diameter of 80 mm (3 inches). The hose should be less than 3 meters to ensure proper ventilation.
- Page 20 UNPACKING AND SETUP HOW TO USE HOSE AND ELBOW Clamp Stretch and cover the ventilation exit with the hose, and tighten with the clamp included in the package. Direct fumes outside through an open window or to an internal ventilation system. If hot air from the ventilation exit hits the wall (wall is too close),...
- Page 21 Figure B: Be aware of the ventilation exit in the back. CHAFF DRAWER The ROEST Sample Roaster collects chaff in the drawer (Figure C). See page 40 for instructions. The foam placed in front of the chaff drawer is CRITICAL for functionality. Do not throw away.
- Page 22 UNPACKING AND SETUP SETTING UP THE SAMPLE ROASTER STEP BY STEP Place roaster on a flat surface with a minimum of 20 cm clearance to all sides and 40 cm above Place the cooling filter under the cooling tray area (E) - see next page Place the hopper (A), trier (C) and cooling tray (D) correctly Attach the Wi-Fi antenna (F) Attach the ventilation hose or elbow, preferrably directed out through a window...
- Page 23 Searching for Wi-Fi IMPORTANT If Wi-Fi is not sufficient/unsuccessful, profiles might be damaged when downloaded on ROEST. Subsequently, the roaster will not follow your designed profile correctly, and the roasting log might get lost and will not be stored in the web portal.
- Page 24 Hotspot: 1. TURN ON PERSONAL HOTSPOT 3. TURN ON WI-FI ON ROEST Go to Network settings on your phone and Go to Wi-Fi settings on your ROEST and turn on turn on Wi-Fi 2. CHANGE DEVICE NAME AND PASSWORD 4.
- Page 25 UNPACKING AND SETUP 5. Skip authentication on the 4. Download the app 6. Back to your ROEST “Particle IoT”, open it and bottom of your screen and touchscreen: press press “GET STARTED”. confirm. “ACTIVATE” under WIFI SETUP. 7. Set up a new device on the 8.
- Page 26 15. Your roaster will restart connect. up if you insert the wrong and connect to Wi-Fi. You password. Restart your will not be able to claim the ROEST and start this process Photon if you get an error again. message. This is okay.
- Page 27 2. Select “WIFI SETTINGS”. 3. Locate TOGGLE WIFI and the menu. press “CONNECT”. 4. Press “ACTIVATE”. Drop 5. Download the “ROEST 6. Open the app. Make sure handle must be in the open Wifi Setup” app. you activated Wi-Fi setup on position in order to enable your roaster (step 4).
- Page 28 UNPACKING AND SETUP 7. Go to network settings 8. Press “CONNECT”. 9. Press “BEGIN WIFI on your phone and choose SETUP”. “Photon - XXXXXX”. (Make sure your location is ON) 10. Select your Wi-Fi 11. FIll in your Wi-Fi’s 12. Your roaster will restart network.
- Page 29 UNPACKING AND SETUP CONNECTING TO WI-FI WITH A WEB BROWSER AUTOMATIC FC 1. Press on the time to open 3. Locate TOGGLE WIFI and 2. Select “WIFI SETTINGS”. the menu. press “CONNECT”. 4. Press “ACTIVATE”. Drop 5. Open website: https// 6.
- Page 30 13. Connect to your Wi-Fi 14. Complete setup network again. WITHOUT naming your device. The roaster will restart and your ROEST will be connected. TROUBLESHOOTING • If you enter the wrong password, the roaster will not connect - try again.
- Page 31 UNPACKING AND SETUP USING THE ROASTER WITHOUT WI-FI The Wi-Fi is disabled by default when receving TOGGLE WIFI WIFI SETUP the sample roaster. If you are connected to Wi- Disconn. ACTIVATE Fi and wish to turn it off, go to the main menu, then Wi-Fi settings and press ‘Toggle Wi-Fi - Disconn.’.
- Page 32 OPERATING THE ROASTER...
-
Page 33: Selecting Profiles
OPERATING THE ROASTER PRE-HEATING THE ROASTER Before pre-heating the roaster, make sure it is connected to Wi-Fi. When connected, push the bean drop handle to its downward position (Figure B). Now the drum is closed and pre-heating. If you are using the roaster without Wi-Fi, simply start pre-heating once the roaster is on by pushing the bean drop handle to its downward position. - Page 34 OPERATING THE ROASTER READY TO ROAST There are many possibilities when roasting with a ROEST sample roaster: you can roast fully automatic or switch to manual control with a wide variety of parameters to adjust. In this chapter you will find an overview of all phases and options available to you.
- Page 35 After pressing “YELLOWING” or after 150 degrees Celsius in bean temperature (BT), “FIRST CRACK” can be registered. This will start the Development Time countdown. IMPORTANT If your ROEST does not have FCD, you have to press this button to register FC manually.
-
Page 36: Automatic Roasting
AUTOMATIC ROASTING WITH FIRST CRACK DETECTION (FCD) After receiving ROEST, your First Crack Detection is switched off. You need to turn it ON in the “ROAST SETTINGS” > “FIRST CRACK DETECTION” > “ON” (when FCD is on, you will see AUTOMATIC FC on the main touchscreen). - Page 37 When the FCD is ON, beans are roasted from the start until the end without any action needed. Wait for the ROEST to release the beans in the cooling tray and let the beans cool down for about 90 seconds.
- Page 38 4. Select a Power profile from the library on the touchscreen 5. If you want ROEST to automatically register the First Crack turn on First Crack Detection: Go to main menu > ROAST SETTINGS > FIRST CRACK DETECTION > ON 6.
- Page 39 4. Select an Air Temperature (ET) profile from the library on the touchscreen 5. If you want ROEST to automatically register the First Crack turn on First Crack Detection: Go to main menu > ROAST SETTINGS > FIRST CRACK DETECTION > ON...
-
Page 40: Adjustable Parameters
OPERATING THE ROASTER ADJUSTABLE PARAMETERS There are many parameters you can adjust before or during the roasting process. Some you will find on the main touch screen, the rest is in the ROAST SETTINGS: PARAMETERS - MAIN SCREEN Development time NEXT EVENT DEVELOPMENT TIME You can change the development... - Page 41 OPERATING THE ROASTER IMPORTANT In temperature-based profiles; the higher the airflow, the more energy is used. Higher airflow will have an impact on the roasting time. However, the effect is not so significant as you might have experienced with traditional open drum roasters. In order to adjust the total roasting time, we suggest adjusting the temperature or power.
- Page 42 Yellowing BT threshold YELLOWING BT THRSHLD. Bean temperature which has to be 175° C reached in order for ROEST to mark Yellowing event. Note: It is set at 185 FIRST CRACK DETECTION: ON degrees Celsius by default which is valid for 100g profile. If you roast a...
-
Page 43: Machine Setup
OPERATING THE ROASTER MACHINE SETUP Bean cooling duration BEAN COOLING DURATION BEAN COOLING % Duration of increased speed after 90 SEC 90 % drop BEAN COOLING IDLE % TEMPERATURE READING Bean cooling % 50 % Percentage speed after drop BEAN COOLER LIGHT WINDOW LIGHT Bean cooling idle % Percentage speed while idling... - Page 44 MAINTENACE...
- Page 45 MAINTENANCE CHAFF COLLECTOR The chaff collector must be emptied after every 20 roasts. You can see how many roasts MACHINE SETUP you have completed on the main menu, under “CHAFF COUNTER” (Figure A). In addition, CHAFF COUNTER the Chaff collector symbol on the bottom left RESET (Figure B) will let you know, and start blinking.
- Page 46 ROEST sample roaster. Before starting, make sure to follow the safety instructions: • Let your ROEST cool down properly. • Switch off and unplug the roaster before starting DAILY...
-
Page 47: Problem Solving
PROBLEM SOLVING... -
Page 48: Troubleshooting
PROBLEM SOLVING TROUBLESHOOTING The ROEST team is always here to help. Find answers to the most common troubleshooting questions on our webpage: www.roestcoffee.com/troubleshooting If you can’t find what you’re looking for, please contact our support team: support@roestcoffee.com... - Page 49 ROASTER WEB PORTAL...
- Page 50 ROASTER WEB PORTAL After ordering the ROEST sample roaster you will receive an email with your username and password to login into the Web Portal. The Web Portal’s key features: live view of your roasting session, creating and editing profiles in your library, and backtracking roasting logs.
- Page 51 ROASTER WEB PORTAL In order to access another roaster’s menu from your list, click on the dropdown menu (the name of your roaster) and choose the roaster you wish to access.
- Page 52 ROASTER WEB PORTAL MAIN MENU > LIVE Here you can monitor the roasting process while you roast. Refresh the window before starting. The roast is streaming live – if you open this window after charging beans or loose internet connection, the beginning of the graph will be missing (the entire roast will be stored nevertheless in the “LOGS”...
- Page 53 ROASTER WEB PORTAL MAIN MENU > LOGS All valid roasts are stored in a cloud. (Invalid roast = roast missing DRYEND or DROP event) Logs in the list are grouped by roasting dates To view a specific log, click on the batch number You can delete logs which you don’t want to see listed...
- Page 54 ROASTER WEB PORTAL LOG PREVIEW On the screenshot below you can see the preview of your saved log: Breakdown of all values at the specific time of the roast Here you can view overlaying logs for comparison Download CSV file in order to import for further use Comments you made while roasting Legend of the roasting graph.
- Page 55 ROASTER WEB PORTAL COMPARE LOGS After you click on “Compare Logs” when viewing your log, it opens the list of other logs you can choose from to compare: Select parameter you want to compare Disable parameters you don’t want to display Choose the logs you want to overlay.
- Page 56 “Created by...” shows the original creator of the profile Type of profile “ENABLE SHARE” - click to make this profile shareable “SHARE URL” - click to receive the link for your profile, which can be shared with other ROEST users Editor for creating brand new profiles from scratch...
- Page 57 How to download library to your ROEST: 1. By clicking on the number (1 to 5) you are assigning the position of the profiles to be downloaded (accessed via ROEST’s touch screen) to your library. See below. 2. Connect ROEST to Wi-Fi 3.
-
Page 58: Create New Profile
ROASTER WEB PORTAL CREATE NEW PROFILE There are 3 different types of profiles you can create: Air Temperature Profile, Bean Temperature Profile, Power Profile Autodrop settings for time-based profiles Editor length - set the length of horizontal axel (time) Based on the chosen profile you have different list of parameters you can edit. - Page 59 ROASTER WEB PORTAL How to plot the curve: Choose the type of profile you want to create Choose the parameter you want to plot the graph for by choosing from the list or clicking on the specific line (On the screenshot below you can see an example of creating an Air Temperature profile and plotting its curve) Set the time and value of the point you want to create and press “ADD POINT”...
- Page 60 ROASTER WEB PORTAL Continue adding points. Curve will shape based on your added points. Continue adding points for all parameters Before saving give your profile a name. If you want the profile to be downloaded to a roaster follow instructions on page 51.
- Page 61 ROASTER WEB PORTAL AUTODROP FOR TIME-BASED PROFILES For time-based profiles you can enable Autodrop and set the time at which you wish the roaster to complete the roast. See below. PRECISE PLOT A function to deliver higher precision of your drafted graph. In the graph on the next page, the purple line is a graphical view based on algorithms.
- Page 62 ROASTER WEB PORTAL Precise Plot after adding one more point at 01:00 at 125C.
- Page 63 ROASTER WEB PORTAL SETTINGS By clicking on the user name in the main top bar you can access settings. Here you can adjust: 1. Timezone in order for Logs to be listed at the correct time of roasting 2. Temperature display: Fahrenheit or Celsius...
- Page 64 ROEST COFFEE AS Nils Hansens vei 20 support@roestcoffee.com 0667 Oslo, Norway www.roestcoffee.com...
Need help?
Do you have a question about the ROEST and is the answer not in the manual?
Questions and answers