
Summary of Contents for GUINNESS MICRODRAUGHT
- Page 1 U S E R M A N U A L This device must be used in accordance with the instructions. Guinness_MicroDraught_Booklet_FA 1 19/10/21 12:40...
- Page 2 WELCOME TO YOUR ™ MICRODRAUGHT ™ Guinness_MicroDraught_Booklet_FA 2 19/10/21 12:40...
- Page 3 Guinness Draught in the and settle that makes the comfort of your own home. unmistakeble taste of a Guinness Draught pint.
- Page 4 Guinness_MicroDraught_Booklet_FA 4 19/10/21 12:40...
- Page 5 INTRODUCTION QUICK START MENU SET UP POURING INSTRUCTIONS CRADLE INSTALLATION MAINTENANCE MENU ACCESS SAFETY INSTRUCTIONS WARRANTY / TROUBLESHOOTING Guinness_MicroDraught_Booklet_FA 5 19/10/21 12:40...
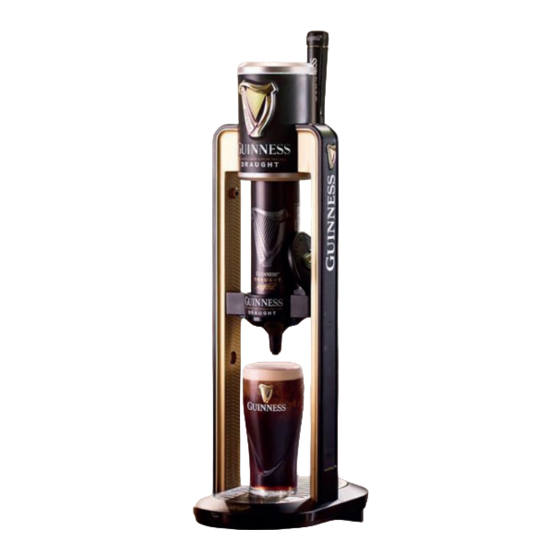
- Page 6 INTRODUCTION (A) Glasses (B) Cans (C) Transformer (D) MicroDraught unit (E) User manual Guinness_MicroDraught_Booklet_FA 6 19/10/21 12:40...
- Page 7 INTRODUCTION (1) Handle (2) Screen (3) Eject Button (4) Spout Assembly (5) Spout Chamber Lid (6) Spout Chamber (7) Drip Tray (8) Drip Tray Cover (9) Clamps (10) Power Input (11) Power Lead NOTE: DO NOT POSITION UNIT IN DIRECT SUNLIGHT / OUTDOORS AS THIS WILL AFFECT THE TEMPERATURE READING (12) Guinness_MicroDraught_Booklet_FA 7...
- Page 8 Guinness_MicroDraught_Booklet_FA 8 19/10/21 12:40...
- Page 9 SET UP Guinness_MicroDraught_Booklet_FA 9 19/10/21 12:40...
- Page 10 SET UP A. Clean Guinness™ pint glass B. Chilled can IMPORTANT: All Guinness™ glasses Remove from outer packaging. should be: Chill cans in suitable fridge for at least 24 hours. • Perfectly clean • Dried naturally i.e. never use a drying cloth •...
- Page 11 SET UP C. Clamp and connect D. Ready to pour Fix to counter and connect using the power cable supplied. Ensure ON/ OFF switch is accessible. NOTE: DO NOT POSITION UNIT IN DIRECT SUNLIGHT / OUTDOORS AS THIS WILL AFFECT THE TEMPERATURE READING (12) Counter...
- Page 12 SET UP 1. Lift the lid 2. Insert the can Use MicroDraught Can only. Angle can and insert, push top to Lift lid and hold to insert can. click in place. Condensation may impact operation, move can from fridge to unit as quickly as possible .
- Page 13 SET UP 3. First Pour, Glass angle 4. Pull the handle Place Glass at 45° with spout close If can is within temperature range to the glass. Angle glass slowly unit will pour. Gently pull handle through first pour. backwards to start. Note: if can is out of range refer to screen instructions or troubleshooting guide.
- Page 14 POURING INSTRUCTIONS 5. Return the handle 6. Allow 1st pour settle When first pour is complete, return The settle will take approximately handle to upright position. Place 60 Seconds. Refer to the screen for Glass under the spout to settle. progress.
- Page 15 POURING INSTRUCTIONS 7. Second Pour, push and hold 8. Stop at the top When prompted on screen, push and IMPORTANT: hold handle forward continue to hold the handle to top until head is level with the top up. Note: handle must be pushed of the glass.
- Page 16 POURING INSTRUCTIONS 9. Allow dome to form 10. Serve pint Liquid will continue to flow into Unit will prompt that serve is ready... the Glass creating a beautifully Enjoy! domed head. Guinness_MicroDraught_Booklet_FA 16 19/10/21 12:40...
- Page 17 POURING INSTRUCTIONS 11. Eject can 12. Recycle Press Eject button (3) and remove Cans are 100% recyclable aluminum. can top first. Note: can now has a small hole in both the top and bottom. Carry carefully to avoid spillage of any residual liquid.
-
Page 18: Unit Installation
CRADLE INSTALLATION A. Clean Guinness™ pint glass 1. Unit installation IMPORTANT: All Guinness™ glasses Remove rubber grommets and should be cleaned as follows: store safely. • Perfectly clean • Dried naturally i.e. never use a drying cloth • Stored upside down on plastic griding •... - Page 19 CRADLE INSTALLATION 2. Installation 3. Insert Guinness™ Glass Compress Cradle carefully into place Use Guinness™ pint glass in the and press firmly into position on cradle at shown angle. Glass will MicroDraught unit. automatically tilt in unit in 1st pour.
-
Page 20: Maintenance
MAINTENANCE A. Spout assembly maintenance cycle Wash regularly before and after each use in hot water. If spout/chamber is not cleaned regularly the operation of the unit will be impacted. Press eject button (3) to confirm cleaning has been completed. Spout Assembly DO NOT DISASSEMBLE... - Page 21 MAINTENANCE B. Drip tray maintenance Drip Tray should be cleaned regularly throughout the day and at least when finished using unit. Wash before and after use in hot water or in dishwasher. Empty Drip Tray regularly to avoid overflow. Press eject button (3) to confirm cleaning has been completed.
- Page 22 Customer Care Information: Consumer Careline: 0345 601 4558 www.Guinness.com Guinness_MicroDraught_Booklet_FA 22 19/10/21 12:40...
- Page 23 Please scan for more information, menu access or pouring setup. Guinness_MicroDraught_Booklet_FA 23 19/10/21 12:40...
Need help?
Do you have a question about the MICRODRAUGHT and is the answer not in the manual?
Questions and answers
not pouring first part of pint uptown the harp sign