
Subscribe to Our Youtube Channel
Related Manuals for SeaLevel 12009-001-KT

Summary of Contents for SeaLevel 12009-001-KT
- Page 1 COM Express Compact Type 6 Evaluation Board User Manual | 12009-001-KT © Sealevel Systems, Inc. 12009-001-KT Manual | SL9679 10/2022...
-
Page 2: Table Of Contents
M.2 Connector (CN1) – For Solid-State Disk ..............................18 ........................................19 DDITIONAL EATURES RTC Battery (BAT1) ....................................... 19 Onboard Status LEDs ......................................19 Switch (SW1) – Test Enable ....................................19 Switch (SW2) – AT Mode ..................................... 19 © Sealevel Systems, Inc. 12009-001-KT Manual | SL9679 10/2022... - Page 3 ........................................33 ONNECTORS ) I/O C ......................................33 ONNECTORS ) I/O C ......................................33 IGHT ONNECTORS 9457 T ..........................................34 9457 A ........................................ 35 DDITIONAL IEWS APPENDIX F – COMPLIANCE NOTICES..................................37 WARRANTY ............................................38 © Sealevel Systems, Inc. 12009-001-KT Manual | SL9679 10/2022...
-
Page 4: Introduction
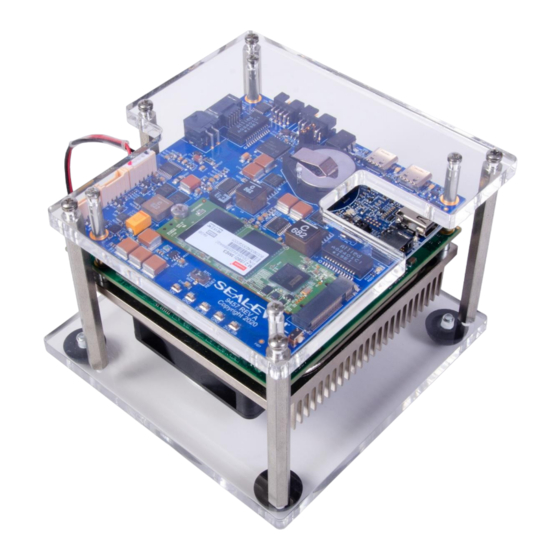
Introduction Get your COM Express project off to a fast start with Sealevel’s 12009 COM Express Compact Type 6 Evaluation Board. The 12009-001-KT supports Compact Type 6 COM Express modules and provides the smallest COM Express Type 6 footprint available. Standard features include two Gigabit Ethernet, two USB 3.0 Type C, three USB 2.0, four GPIO ports, one RS-232, one UART interface, one M.2 SATA SSD slot, and... -
Page 5: Features
Onboard LED indicators for power and COM activity • Real-time clock • 21VDC input with locking 4-position Molex Micro-Fit connector • 95mm x 95mm dimensions • Includes carrier board, DOM module, demonstration enclosure, and cables © Sealevel Systems, Inc. 12009-001-KT Manual | SL9679 10/2022... -
Page 6: Before You Get Started
What’s Included The 12009 COM Express Type 6 Evaluation Board is shipped with the following items. If any of these items are missing or damaged, please contact Sealevel at 864.843.4343 for a replacement. • Carrier board, COM module, and plexiglass demonstration enclosure •... -
Page 7: Technical Specifications
2. Weight includes the enclosure and cabling for the fan. All other cabling and power supply are not included. 3. Typical power consumption can vary depending on COM Express Module, memory capacity, OS/software activity and peripheral devices. Input power (J7) is current limited by a 5A fuse. © Sealevel Systems, Inc. 12009-001-KT Manual | SL9679 10/2022... -
Page 8: Digital I/O
2. Depends on the input voltage (J7) provided to the device. 3. Be aware of the 5A current limit on the power input (J7) because load drawn from this output will be reflected in the overall input current. © Sealevel Systems, Inc. 12009-001-KT Manual | SL9679 10/2022... -
Page 9: Technical Descriptions
Our COM Express carrier boards leverage Sealevel’s I/O and communication expertise, providing carrier board and full system solutions as rapidly as possible. Common I/O features include serial, analog and digital I/O. Sealevel’s extensive library of proven I/O circuits can be included to meet a specific I/O count, voltage range, and connector type. -
Page 10: Customer-Specified Block Diagram
P ) Ca le Connector eset ( P1) (CA 1) ( 1 ) C/ C Po er C Po er n ( ) C O T icro Fit Connector © Sealevel Systems, Inc. 12009-001-KT Manual | SL9679 10/2022... -
Page 11: Header Connectors
DC Current Rating (21V Nominal) 350 mA - 450 mA 1. May be higher depending on COM Express module, input voltage, OS, load, and connected devices. Power Connector Header (J7) Location © Sealevel Systems, Inc. 12009-001-KT Manual | SL9679 10/2022... -
Page 12: Header (P5) - Power Button & Status Leds
Header (P5) Drawing Button and Status LED Indicator Header (P5) Location Make sure that the latch on the CA775 aligns with the notch on the lefthand side of the P5 connector. © Sealevel Systems, Inc. 12009-001-KT Manual | SL9679 10/2022... -
Page 13: Header (P2) - Digital I/O & 21 Vdc
Header (P2) - Digital I/O & 21 VDC The system has four digital inputs and four digital outputs available on Molex Milli-Grid 10-pin header connector (Molex Part# 878331019). Digital I/O is addressed via Sealevel SeaMAX software. Mating connector is Molex Part# 0511101060. -
Page 14: Header (P1) - Serial Ports
Port 2 Receive (3.3V CMOS) Do not connect an RS232 device to the CMOS port. RS232 signal levels exceed that of CMOS and therefore may damage the CMOS port. Serial Ports Header (P1) Location © Sealevel Systems, Inc. 12009-001-KT Manual | SL9679 10/2022... -
Page 15: Ethernet Headers (P3 & P4) - Gigabit Ethernet
GBE0 MDI2A P GBE0 MDI2A N GBE0 MDI3A P GBE0 MDI3A N GROUND GROUND Wiring Diagram for Header (P3 & P4) Ethernet NIC Header (P4) Location Ethernet NIC Header (P3 & P4) Drawing © Sealevel Systems, Inc. 12009-001-KT Manual | SL9679 10/2022... -
Page 16: Header (J4) - Drive Voltage Level
3.3 V drive voltage on the push-pull outputs. Reference Signal Designator 5V_S0 PUSH-PULL DIGITAL OUTPUT SUPPLY VOLTAGE (VCC) 3V3_S0 Wiring Diagram for Header (J4) Drive Voltage Level Header (J4) Drawing Drive Voltage Level Header (J4) Location © Sealevel Systems, Inc. 12009-001-KT Manual | SL9679 10/2022... -
Page 17: Usb 2.0 Headers (J8, J9, & J10) - Usb2.0 Ports
SHIELD VBUS USB5B_N USB5B_P USB 2.0 Headers (J8, J9, & J10) SHIELD Drawings Wiring Diagram for USB 2.0 Headers (J8, J9, & J10) USB 2.0 Headers (J8, J9, & J10) Location © Sealevel Systems, Inc. 12009-001-KT Manual | SL9679 10/2022... -
Page 18: Port Connectors
RTC Battery. The carrier board can support type 2242, and 2260 M.2 SSD modules. The maximum capacity and throughput are dependent on the M.2 SSD module and COM Express module installed. © Sealevel Systems, Inc. 12009-001-KT Manual | SL9679 10/2022... -
Page 19: Additional Features
The switch (SW3) is used for manufacturing testing and debugging purposes. The switch is shipped in the NORMAL position. Moving the switch to RST (Reset) position will disconnect the battery from the COM Express module, thus clearing RTC/CMOS settings. © Sealevel Systems, Inc. 12009-001-KT Manual | SL9679 10/2022... -
Page 20: System Operation
System Operation Power States The 12009-001-KT is designed to operate in four Power States as defined by ACPI. S0 – Fully powered and operational S3 – Suspended to memory (known as sleep in Windows) S4 – Suspended to disk (known as Hibernate in Windows) S5 –... -
Page 21: Hardware Installation
Hardware Installation Most items for the 12009-001-KT will come pre-installed. The below cables will need to be connected and/or reconnected upon arrival: • 5V Fan with 5 Pin Molex Connector Cable Installed in Enclosure (P/N: CA807) • Molex Connector to 2 DB9 Connectors Cable (P/N: CA772) •... -
Page 22: Seamax Application Suite
SeaMAX API. To help simplify application development, the complete API documentation and code samples are automatically installed with the SeaMAX Suite and can be found in Windows by clicking Start → All Programs → Sealevel SeaMAX → Documentation. -
Page 23: Maxssd Connection Tab
Double click on the “Sea AC Lite 0” device on the right side to connect to the I/O. The Device and Digital I/O tabs will appear after connecting. © Sealevel Systems, Inc. 12009-001-KT Manual | SL9679 10/2022... -
Page 24: Maxssd Device Tab
After you have selected the “Sea AC Lite 0” device on the Connect tab, the evice and igital I/O tabs will appear. MaxSSD will automatically change to the Device tab and display the relevant Device Description. The 9457 carrier board does not offer configurable communication settings. © Sealevel Systems, Inc. 12009-001-KT Manual | SL9679 10/2022... - Page 25 Bank “1 – 2”. The status LE s will update automatically, allowing you to actively monitor external signals. The output relays can be triggered using the On/Off button below each output LED. © Sealevel Systems, Inc. 12009-001-KT Manual | SL9679 10/2022...
-
Page 26: Maxssd I/O Map
TTL Voltage-Level Output P2 Pin 1 Output Bit 2 TTL Voltage-Level Output P2 Pin 3 Output Bit 3 Open Collector Output P2 Pin 5 Output Bit 4 21V Power Output P2 Pin 7 © Sealevel Systems, Inc. 12009-001-KT Manual | SL9679 10/2022... -
Page 27: Appendix A - Troubleshooting Serial Communication Issues
Technical Support. Ensure that the Sealevel Systems SeaCOM software has been installed on the machine, so that the necessary files are in place to complete the installation. To confirm installation, click on the Windows ‘Start’... - Page 28 Change your parameters to 9600 bits per second, 8 data bits, no parity, 1 stop bit, and no flow control, as pictured below. Click ‘Apply’ and ‘OK’. In the main WinSS window, click on the ‘BERT’ tab (Bit Error Rate test). © Sealevel Systems, Inc. 12009-001-KT Manual | SL9679 10/2022...
- Page 29 Frames and Receive Frames will increase. The Tx and Rx Data Rates will show the calculated data rate. This verifies that the adapter is working properly. You can continue testing this port with different configurations or proceed with testing other ports, if necessary. © Sealevel Systems, Inc. 12009-001-KT Manual | SL9679 10/2022...
-
Page 30: Appendix B - How To Get Assistance
If possible, please have the adapter installed in a computer ready to run diagnostics. Sealevel Systems provides an FAQ section on its web site. Please refer to this to answer many common questions. This section can be found at http://www.sealevel.com/faq.asp. -
Page 31: Appendix C - Mechanical Drawing
Appendix C – Mechanical Drawing © Sealevel Systems, Inc. 12009-001-KT Manual | SL9679 10/2022... -
Page 32: Appendix D - Handling Instructions
• Keep work area free of non-conductive materials such as ordinary plastic assembly aids and Styrofoam. • Use field service tools such as cutters, screwdrivers, and vacuum cleaners that are conductive. © Sealevel Systems, Inc. 12009-001-KT Manual | SL9679 10/2022... -
Page 33: Appendix E - Board Photos
Appendix E – Board Photos Rear I/O Connectors Side (Left) I/O Connectors Side (Right) I/O Connectors © Sealevel Systems, Inc. 12009-001-KT Manual | SL9679 10/2022... -
Page 34: 9457 Top View
9457 Top View 9457 Bottom View © Sealevel Systems, Inc. 12009-001-KT Manual | SL9679 10/2022... -
Page 35: 9457 Additional Views
9457 Additional Views © Sealevel Systems, Inc. 12009-001-KT Manual | SL9679 10/2022... - Page 36 © Sealevel Systems, Inc. 12009-001-KT Manual | SL9679 10/2022...
-
Page 37: Appendix F - Compliance Notices
FCC/EMC directives. UL 94V0 All Sealevel Systems Printed Circuit boards are built to UL 94V0 rating and are 100% electrically tested. These printed circuit boards are solder mask over bare copper or solder mask over tin nickel. -
Page 38: Warranty
Sealevel's commitment to providing the best I/O solutions is reflected in the Lifetime Warranty that is standard on all Sealevel manufactured I/O products. We are able to offer this warranty due to our control of manufacturing quality and the historically high reliability of our products in the field. Sealevel products are designed and manufactured at its Liberty, South Carolina facility, allowing direct control over product development, production, burn-in and testing.
Need help?
Do you have a question about the 12009-001-KT and is the answer not in the manual?
Questions and answers