Table of Contents
Advertisement
Quick Links
Advertisement
Table of Contents

Related Manuals for BRUEL & KJAER 3660-A-20 Series


Summary of Contents for BRUEL & KJAER 3660-A-20 Series
- Page 2 2017 Copyright © Brüel & Kjær. All rights reserved...
-
Page 3: Table Of Contents
1‐module Wireless LAN Frame Type 3660‐A‐20x allows wireless connection to a LAN‐XI module. It can be used in general analysis applications as part of a PULSE™ platform setup or in NVH testing applications using a Sonoscout NVH Recorder. This Setup Guide will help you get started using your Wireless LAN Frame as part of a PULSE setup – including configuration and setup, use of the Front‐end home page and charging the battery module. WHAT’S IN THIS GUIDE? •... -
Page 4: Getting Started Basics
GETTING STARTED BASICS Configure your hardware. Power up your front end. Connect to the front end via Wi‐Fi. Install your PULSE license. Configure front end for PULSE. * This step is not necessary if you have already installed a PULSE license. Wireless LAN Frame Type 3660‐A‐20x requires LAN‐XI firmware version 2.1.0.190 or later to use. If you are using a pre‐existing LAN‐XI module with an earlier firmware version, see “Updating Front‐end Firmware” for upgrade instructions. NOTE: Type 3660‐A‐20x only supports single LAN‐XI input modules, such as Types 3050, 3052, 3053, 3056 or 3160. -
Page 5: Configure The Hardware
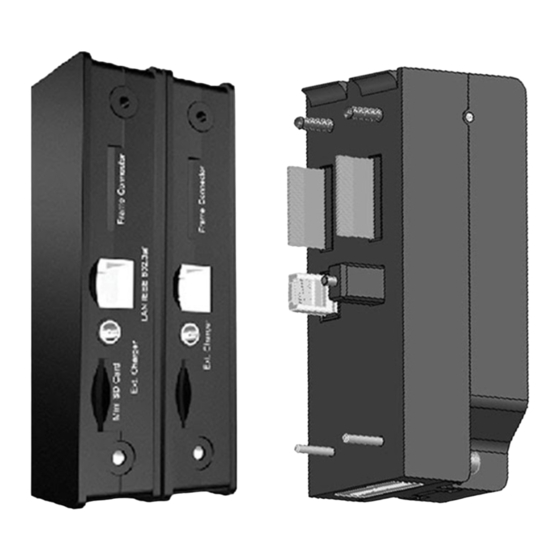
CONFIGURE THE HARDWARE Wireless connection often means that you are performing a test while on the move. For this reason, the WLAN frame has been specially constructed as a lightweight adaptor that conveniently connects your LAN‐XI module to a LAN‐XI Battery Module Type 2831‐A. With the WLAN ... - Page 6 Front-end Configuration Step 1: Connect the input module to the battery The battery provides mobile power to the front end during measurements and recording. A) Place the battery next to the input module so that the type number text on both modules are facing the same direction, and the battery is to the left of the input module (as seen from the front.) B) Remove the hex key from the input module. C) Using the hex key, locate the four spring‐loaded screws around the input module. D) Using the screws, fasten the the input module to the battery and place the hex key back into place.
- Page 7 Front-end Configuration Step 2: Connect the Frame E) If you are going to use LAN‐XI Notar™ BZ‐7848‐A (with or without Sonoscout™ BZ‐5950‐A), insert a mini‐SD card or a micro‐SD card with an adaptor (if not already done). F) Align the prongs on the frame with the holes at the back of the assembled input module and battery unit. Insert carefully. Magnets hold the frame into place. To ensure connection during use, you should screw the frame securely into place. G) At the side of the frame is a hex key, remove it and pull open the frame. H) Using the hex key, turn the captive screw in the middle of the frame until it is tightened. I) Close the frame and place the hex key back into place. With Sonoscout, use of an SD card is not mandatory. You can also stream recorded data directly to the mobile device’s internal storage.
-
Page 8: Power Up Your Front End
POWER UP YOUR FRONT END Power up the front end by moving the power switch on the battery to Active. The input module’s display will initially show an internet protocol (IP) address of 0.0.0.0. LAN‐XI input modules are pre‐ configured to use dynamic IP addressing using dynamic host configuration ... - Page 9 Resetting your module to use DHCP (dynamic IP addressing) If you are using an input module that has been previously set to a static IP address, you can reset the module to use DHCP: 1) Press and release the Control button on the front of the input module ...
-
Page 10: Connect To The Front End Via Wi-Fi
® CONNECT TO THE FRONT END VIA WI-FI What do you need? • Wireless device (PC or mobile device) in range of the front end with Apple mobile device with Windows mobile PC • Password for your frame What do you do? 1) Enable Wi‐Fi on your device. –... -
Page 11: Install Your Pulse Software License
INSTALL YOUR PULSE SOFTWARE LICENSE These instructions are for users who intend to use PULSE LabShop applications from PULSE 18 or later. For Sonoscout licenses, see the Sonoscout Setup Guide (BR 8031) for instructions. What do you need? • PULSE installed on a wireless PC with a web browser •... -
Page 12: Configure The Front End For Use With Pulse Labshop
CONFIGURE THE FRONT END FOR USE WITH PULSE LABSHOP Front‐end setup is handled by PULSE Front‐end Setup program from PULSE 18 or later. What do you need? • The front end’s serial number • Your PC (with PULSE) connected to the front end What do you do? 1) Open ... -
Page 13: Updating Front-End Firmware
UPDATING FRONT-END FIRMWARE Brüel & Kjær continually updates LAN‐XI firmware and provides the updates in zip files on the Brüel & Kjær website (www.bksv.com). Once the file is downloaded from the Internet, install the update via the front end’s home page. You ... - Page 14 USING THE FRONT-END HOME PAGE Accessing the Home Page Each LAN‐XI module has its own home page containing information about the module, including frame configuration, calibration history, self‐test, log file, etc. The home page can be accessed directly from a web browser without the need for a PULSE license. To access the home page: 1) Connect to the front end using a device that has a web browser, ...
- Page 15 Home Page Interface 1) The Main page looks similar to the one shown here with the front end’s general settings, and includes the following options: – Location: Set the physical location of the module – Contact: Enter contact information – Reboot module: Reboot the module to factory settings – Turn on module indicator: Enable the module’s LED indicators to ...
-
Page 16: Charging The Battery
CHARGING THE BATTERY To check the charge level, press the Status button on the battery. The status indicators are as shown to the left. Each LED bar is equal to approximately 2 hours of operation. Charge the battery using either: • DC charge: using Battery Charger ZG‐0858. To utilize in‐vehicle Solid LED cigarette lighters, use the included Car Utility Socket Cable 0 –... -
Page 17: Changing The Router's Security Settings
CHANGING THE ROUTER’S SECURITY SETTINGS Depending on the router’s configuration, you will use either the router’s web page or OpenWrt via Telnet Client to make changes to the settings. NOTE: It is not recommended to change the router’s default security settings. Step 1: Go to the router’s web page You ... - Page 18 Step 2: Change the security settings using Telnet Client The easiest way to make changes to the settings for a router running OpenWrt is to use Telnet Client to access the router. Telnet Client is a feature of Windows operating systems. You ...
- Page 19 Wi‐Fi is a registered trademark of Wi‐Fi Alliance ∙ Apple, iPad and Safari are trademarks of Apple Inc., registered in the U.S. and other countries ∙ Windows and Internet Explorer are registered trademarks of Microsoft Corporation in the United States and/or other countries ∙ Mozilla and Firefox are registered trademarks of the Mozilla Foundation ∙ Chrome is a trademark of Google Inc.
- Page 20 HEADQUARTERS: Brüel & Kjær Sound & Vibration Measurement A/S DK‐2850 Nærum ∙ Denmark Telephone: +45 7741 2000 ∙ Fax: +45 4580 1405 ∙ www.bksv.com ∙ info@bksv.com Local representatives and service organisations worldwide...
Need help?
Do you have a question about the 3660-A-20 Series and is the answer not in the manual?
Questions and answers