Advertisement
Quick Links
Advertisement

Summary of Contents for DECK MOUNT respirare BI-PAP
- Page 1 ISO 80601-2-12 IEC 60601-1-1 IEC 60601-1-2 Ver.1.0...
-
Page 3: Table Of Contents
TABLE OF CONTENTS Chapter 1. Introduction..................1-2 Chapter 2. System Overview..................3-4 Chapter 3. Device Setup ..................5-7 Chapter 4. Therapy Modes and Features............8-14 Chapter 5. Cleaning ,Disinfection & Sterilization.............15 Chapter 6. Warning And Cautions................16 Chapter 7. Technical Specification ..............17-18 Chapter 8 . Warranty Statement & Warranty Card...........19... -
Page 4: Chapter 1. Introduction
INTRODUCTION 1.1 KNOW YOUR DEVICE Respirare Bi-PAP is intended to provide ventilation for non-dependent, spontaneously breathing adult & pediatric patient (13 kg and above) with respiratory insufficiency with or without obstructive sleep apnea. The device is meant for non-invasive use in stationary mode —... - Page 5 1.4 CAUTION You should report unusual chest pain, severe headache or increased breathless to your physician. The following side effects may arise during the course of non- invasive ventilation with the device: Drying of nose, mouth or throat Ÿ Nosebleed Ÿ...
-
Page 6: Chapter 2. System Overview
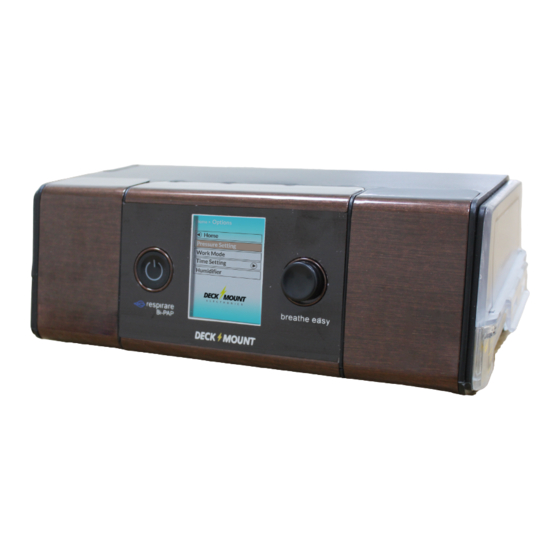
SYSTEM OVERVIEW 2.1 FEATURES Respirare Bi-PAP is a non-invasive ventilation device which augments patient breathing by supplying pressurized air through a breathing circuit. It senses the patient’s breathing behaviour by monitoring airflow in the breathing circuit and adjusts its output to assist in inhalation and exhalation. This therapy is known as Bi- level Ventilation. - Page 7 2.2 FRONT VIEW Front face of the Bi-PAP has two buttons (as shown in the picture). 1.The First button (on the left side) is meant for starting the Bi-PAP Machine. 2.Second button (on the right side) is a rotary switch for operating the settings of the machine.
-
Page 8: Chapter 3. Device Setup
DEVICE SETUP 3.1 DEVICE BREATHING CIRCUIT This device comes with a ‘Breathing Circuit’ containing Face Mask & Vented Tube. These individual parts need to be connected together to construct the breathing circuit. MASK VENTED TUBE Step -1: Connect one side of the Vented tube with the face mask. As shown in the picture below - FACE MASK WITH TUBE... - Page 9 STEP-2: Connect the other side of the Vented tube to the Air outlet port located at the rear of the device. After connecting the tube, the final arrangement should look like as shown in the picture below. With this, breathing circuit arrangement is complete. 3.2 POSITION THE DEVICE Place the Device on a flat level surface Do not operate the Device while on its side, upside-down, or in any other orientation.
- Page 10 3.4 HOW TO USE HUMIDIFIER 1.Gently pull out the Humidifier as shown 2.Open the Humidifier pulling the latch as below shown below 3.Fill RO / Purified water in the Humidifier upto Maximum Level indicator & Replace in reverse order 3.5 HOW TO SET DATE AND TIME Home Screen >>...
-
Page 11: Chapter 4. Therapy Modes And Features
THERAPY MODES AND FEATURES 4.1 THERAPY MODES The device provides Pressure Control Ventilation (PCV) for non-invasive therapy. Pressure Control ventilation delivers a prescribed pressure to the patient according to set breath rate and set inspiration time parameters. This means that each breath is controlled so that a prescribed amount of pressure is delivered to the patient. - Page 12 4.2 STARTING / STOPPING THE THERAPY Make sure your device is functioning properly each time before starting therapy. Turn off the device by pressing the power switch. Inspect the device and all the provided accessories. If there are any visible defects, the system should not be used.
- Page 13 4.3 WORKING WITH DEVICE MENU 1. The first screen, which appears after the successful boot is the “home screen". 2. The home page has three options , You can change the rotary upwards and downwards for select home screen options. You push the rotor then enter the selected options page.
- Page 14 Home Screen >> My Option >> Pressure Set A. For S, T, ST mode B. For APCV Mode...
- Page 15 Home Screen >> My Option >> Work Mode A. S Mode B. T Mode C. ST Mode D. APCV Mode...
- Page 16 7. Home Screen >> My Option >> Humidifier For ON or OFF Rotate the Rotary 8. Home Screen >> Use Report >> 9. Home Screen >> My Option >> (Shows the Machine Running Time) Tidal Volume...
- Page 17 9. Audible Alarm When an alarm condition occurs, device will raise an audible alarm . Alarm Condition: Condition-1: This is not an alarm but an audible beep will occur confirming that device started and is ready for the therapy. Condition-2: If therapy is on but mask is not fixed on the face of the patient, you will have 3 continuous buzzer beeps .
-
Page 18: Chapter 5. Cleaning ,Disinfection & Sterilization
CLEANING, DISINFECTION & STERILIZATION Face mask and tubing system are the only parts which require cleaning STAGE - I Cleaning method STEP-1: The cleaning of reusable parts usually begins soon after use. Soil is wiped from device surface with a moist sponge or towel. Masks and vented Tube, are usually placed in a basket or tray for transportation to the processing area. -
Page 19: Chapter 6. Warning And Cautions
WARNING AND CAUTIONS Do not use this device if room temperature is more than 40°C Environment because pressure unit of the device also generates heat. Temperature Do not use the device, if it is kept in direct sunlight . If you notice any unexpected changes in the performance of Improperly the device, unusual sounds, if the device is dropped or water Functioning device... -
Page 20: Chapter 7. Technical Specification
TECHNICAL SPECIFICATION Weight 1.8 kg approx. Power Consumption 60 Watt (40 Watt — Idle state) Breathe Rate 0-60 BPM (Titration Mode) Pressure Range 0-30 cm H O Waveform Flow/Pressure Max leak flow compensation 10 L/min Max Flow Rate 240 L/min Mode- Non-Invasive Mode S / ST/ T / APCV Maximum Input current... - Page 21 7.1 PRODUCT DATASHEET S / ST / T/ APCV Notification type Audio Alarms...
-
Page 22: Chapter 8 . Warranty Statement & Warranty Card
WARRANTY STATEMENT It is assured that product shall be free from defects in design material and workmanship affecting the normal operation of the product, for the specified warranty period. If we receive notice of such defects during the warranty period and the product is returned with freight prepaid, we will, at our sole option, repair or replace the defective product. - Page 23 Company Seal...
Need help?
Do you have a question about the respirare BI-PAP and is the answer not in the manual?
Questions and answers