Table of Contents
Advertisement
Quick Links
Smart Wall Switch Installation
Wall Box
1. A standard single-gang wall box sized 3 x 2 x 2 ½ cm will service Dimmer
2. Not compatible with multi or double Mud Rings.
3. When using a retrofit gang box (cut in box) you might need
to recess the ears.
Before You Begin
To avoid fire, shock, or death, turn the
power Off at circuit breaker and test to
ensure the power is Off before wiring.
Wiring Option 1
Electrical Connection
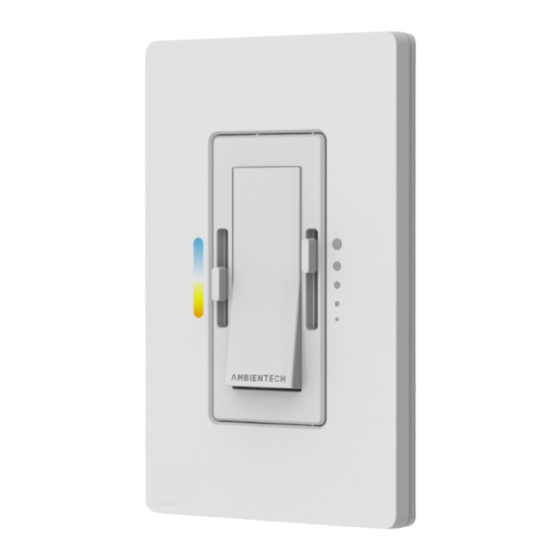
Wall Switch
(In-Wall Dimmer)
Pair /
Reset
Button
Line / Hot
Black
LED Indicator
120 V~
White
50/60 Hz
Neutral
If you are installing more than one Wall Switch unit, all
others must be switched OFF while pairing.*
1. Make sure all sliders are set to the top and the Wall Switch
is in the OFF position.
2. Switch the power ON at the circuit breaker.
3. Turn ON the Wall Switch and press its Pair / Reset button.
The green LED indicator will blink while pairing.
4. The pairing process will be completed within 15 seconds.
5. To verify that pairing was successful, move the sliders and
ensure that the connected lighting product responds
accordingly.
6. If the Wall Switch is not functioning correctly, set all Wall
Switch sliders to the top, turn ON the Wall Switch, then
press its Pair / Reset button. The connection will be
refreshed and corrected within 15 seconds.
Factory Reset
Resetting products is not required. Once the Pair / Reset button is pressed it
will override any previous sync settings.
Green
Ground
Red
LED Driver
(Load)
P/N:TONE-WSx-SA-EVO
WARM-WSx-SA-EVO
TECH-WSx-SA-EVO
Download the SmartAir App
Scan the QR code to download the smart device
app. Follow the instructions to connect your lights
to the SmartAir App.
1. Make sure that the ends of the wires from the wall box
Strip the wire insulation from each wire.
are straight (cut if needed).
2. Strip the wire insulator for each wire
inside the wall box as shown here:
Wiring Option 2
Stand-alone Wall Switch
Pair /
Reset
Button
Line / Hot
Black
LED Indicator
120 V~
White
50/60 Hz
Neutral
If you are installing more than one Wall Switch unit, all
others must be switched OFF while pairing.*
1. Make sure all sliders are set to the top and the Wall Switch
is in the OFF position.
2. Turn the power ON at the circuit breaker.
3. Press the Pair button on all drivers that will be synced to
this Wall Switch.
Please Note: You have 5 minutes from the moment the
first driver's button is pressed to complete the sync to the
wall switch before the signal times out.
4. Turn ON the Wall Switch and press the Pair / Reset button
on the Wall Switch.
5. The green LED indicator will blink while pairing.
6. Within 15 seconds your LED fixture will be paired with the
Wall Switch.
7. To verify that pairing was successful, move the sliders and
ensure that the connected lighting product responds
accordingly.
If pairing is unsuccessful, please repeat the pairing process.
*Please note: 3-way multiswitch operation is currently unavailable.
1
WWW.EVO-LITE.COM � INFO@EVO-LITE.COM � 888-887-2980 � V3922
Provided by
www.evo-lite.com
Installation Instructions
Strip 5/8"(1.6 cm)
Wall Switch
(In-Wall Dimmer)
Green
Ground
Red
LED Driver
Pair Button
(Load)
EVO-LITE, LLC. � ARVADA, COLORADO
Advertisement
Table of Contents

Summary of Contents for Evo-lite AMBIENTECH TONE-WS-SA-EVO Series
- Page 1 Resetting products is not required. Once the Pair / Reset button is pressed it If pairing is unsuccessful, please repeat the pairing process. will override any previous sync settings. *Please note: 3-way multiswitch operation is currently unavailable. EVO-LITE, LLC. � ARVADA, COLORADO WWW.EVO-LITE.COM � INFO@EVO-LITE.COM � 888-887-2980 � V3922...
- Page 2 Wall Switch / LED Driver Any reason Perform “Pairing”. Replacement Make sure all the other Wall Switches are turned Off while pairing EVO-LITE, LLC. � ARVADA, COLORADO WWW.EVO-LITE.COM � INFO@EVO-LITE.COM � 888-887-2980 � V3922...
Need help?
Do you have a question about the AMBIENTECH TONE-WS-SA-EVO Series and is the answer not in the manual?
Questions and answers