
Subscribe to Our Youtube Channel
Summary of Contents for Convotherm The MINI OES-6.08
- Page 1 Operator’s Manual Use and Care Instructions The MINI Model Number: OES-6.08 1333 East 179 Street Cleveland, Ohio 44110 Phone: (216) 481- 4900 Fax: (216) 481 - 3782 www.clevelandrange.com Part No. OES6.08-OPM Rev. A, 9/07...
-
Page 2: For Your Safety
Failure to disconnect power can result in death, injury, and property damage. ALL SERVICE MUST BE PERFORMED BY A QUALIFIED CLEVELAND RANGE AUTHORIZED TECHNICIAN. Do not connect the Combi Oven-Steamer drain connection to any drain material that cannot sustain 140 Using drain material that cannot withstand 140 equipment damage, and property damage. - Page 3 CLEVELAND RANGE agrees to repair or replace, at its option, f.o.b. factory, any part which proves to be defective due to defects in material or workmanship during the warranty period, providing the equipment has been unaltered, and has been PROPERLY INSTALLED, MAINTAINED, AND OPERATED IN ACCORDANCE WITH THE CLEVELAND RANGE OWNER’S MANUAL.
- Page 4 Cleveland Range sales representative for your free demonstration of proper operation, optimal use, and correct care of your new equipment. Consult your Customer Service Directory or call Cleveland Range at 216-481- 4900 to begin your free Start-Up Program. Your MINI in Action You can cook a variety of foods in your MINI Convotherm by Cleveland Combi/Oven-Steamer using hot air, steam, and MINI hot air and steam.
-
Page 5: Table Of Contents
CHAPTER 1 INTRODUCTION A. OPERATIONAL SAFETY B. CLEANING AND MAINTENANCE ____________________________________________ 2 C. NEVER! ________________________________________________________________ 2 D. SERVICE AND SERVICE RECORDS _________________________________________ 2 E. OPERATOR TRAINING ____________________________________________________ 2 CHAPTER 2 GENERAL OPERATION __________________________________________ 3 A. MAIN EXTERNAL POWER SWITCH __________________________________________ 3 B. - Page 6 E. DELETING A RECIPE ______________________________________________________ 29 F. CHANGING A STEP OF A RECIPE ___________________________________________ 29 G. INSERTING A STEP INTO A RECIPE _________________________________________ 30 H. ADDING A STEP TO A RECIPE ______________________________________________ 30 DELETING A STEP FROM A RECIPE _________________________________________ 30 J.
-
Page 7: Chapter 1 Introduction
CHAPTER 1 INTRODUCTION For safe use of MINIs, each operator must read, understand, and follow the instructions, and heed and obey the warnings of the Installation Manual and Operators Manual, and the labels on the MINI, accessories, and supporting products. The owner(s) and operator(s) of this equipment must keep these instructions in an easily accessible location for reference and training. -
Page 8: Cleaning And Maintenance
2. CLEANING AND DAILY MAINTENANCE – Do NOT use hoses, power cleaners or pressure washers, or harsh or abrasive cleaning agents inside OR outside the cooking compartment. 3. CLEANING AGENTS – Use only genuine Convotherm by Cleveland and Cleveland Range cleaning and descaling products. -
Page 9: Chapter 2 General Operation
The MINI cannot start unless the door is closed and latched. Cooking functions stop if the door handle is moved to the open position. The MINI Oven-Steamer can only work with a functioning door switch. If a malfunction occurs, immediately contact your qualified Cleveland Range authorized service representative. -
Page 10: Start-Up And Shutdown Instructions
C. START-UP AND SHUTDOWN INSTRUCTIONS Do NOT attempt to operate a MINI during a power failure! Death, injury, and equipment damage can result. In the event of a power failure: 1. Turn OFF the Main External Power Switch. 2. Turn OFF Control Power Service Disconnect Switch. 3. -
Page 11: Inspecting The Cooking Compartment
E. INSPECTING THE COOKING COMPARTMENT Inspect the cooking compartment before starting a cooking operation with a MINI for proper assembly and cleanliness as follows: 1. Inspect the Drain The drain in the bottom of the cooking compartment has a removable cover. The cover prevents large food particles, debris and scale from entering and blocking the drain line. -
Page 12: Core Temperature Sensor
Repeat the preheat process as needed to maintain constant oven temperature and high food • quality. b. To use pre-heating in a recipe: Pre-heating is also a programmable function. See “Pre-Heating” in Chapter 5, “Advanced Functions” for, details. c. To Pre-Heat or reheat between batches for Rethermalization: See “Retherm Mode” in Chapter 4 for times and temperatures for specific applications. -
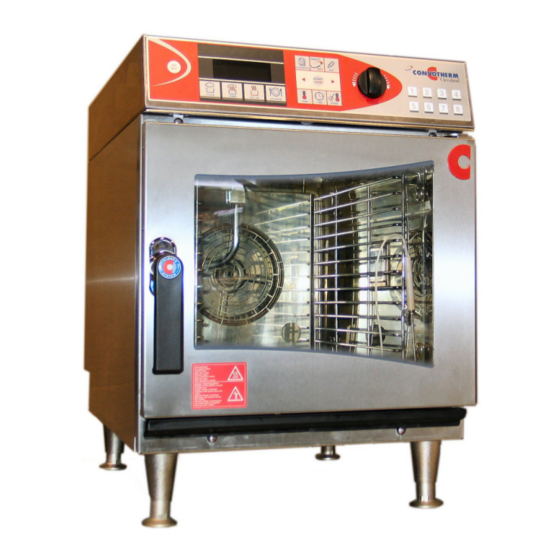
Page 13: Chapter 3 Product Views And Operation
CHAPTER 3 PRODUCT VIEWS AND OPERATION A. EXTERIOR VIEWS Control Panel 2. Oven Light 3. Door with Double Glass Panel Door Handle Notes: 1. Magnetic Door Switch If the oven door is opened during operation, the magnetic door switch automatically interrupts the •... -
Page 14: Quick Start Guide
B. QUICK START GUIDE CONTROL PANEL BASIC OPERATION Operate Controls with HANDS Only! 1. Switch on with key (1). 2. Select cooking mode with keys (2-5). 3. Press key (10) to start. 1. Press key (7) and rotate Selector Dial (15) to set oven temperature. -
Page 15: Control Panel Detail View
C. CONTROL PANEL DETAIL VIEW Item numbers correspond to numbers on the control panels in Figure 4-1 Operate controls with hands only! 1. ON/OFF When the MINI is turned ON: Self-diagnosis is performed. • Oven light turns on. • Steam generator fills and heats (OEB and •... -
Page 16: Chapter 4 Cooking With The Mini
CHAPTER 4 COOKING WITH THE MINI Some foods drip juices. Use a solid catch pan under perforated pans when cooking food that drips juices. Dripping juices can cause burns and clog the drain. Do NOT use hanging shelf racks that are bent or otherwise damaged in any way. -
Page 17: Using Steam Mode
A. Steam Mode. PRE-HEAT countertop models for 10-15 minutes and floor models for 30 minutes at 10-20% • HIGHER than the cooking temperature before cooking. SET COOKING TEMPERATURE 10-20% LOWER THAN TRADITIONAL COOKING METHODS. • Maximum Combined Weight of Food and Containers or Accessories is 33 pounds per shelf. •... -
Page 18: Using Combi Mode
B. Combi Mode PRE-HEAT countertop models for 10-15 minutes and floor models for 30 minutes at 10-20% • HIGHER than the cooking temperature before cooking before cooking. • Pre-heat floor models with the pre-heat bridge or the trolley in place. SET COOKING TEMPERATURE 10-20% LOWER THAN TRADITIONAL COOKING METHODS. -
Page 19: Hot Air Mode
C. Hot Air Mode PRE-HEAT countertop models for 10-15 minutes and floor models for 30 minutes at 10-20% • HIGHER than the cooking temperature before cooking. Pre-heat floor models with the pre-heat bridge or the trolley in place. • SET COOKING TEMPERATURE 10-20% LOWER THAN TRADITIONAL COOKING METHODS. •... -
Page 20: Retherm Mode
D. Retherm Mode This mode allows you to rethermalize prepared dishes on plates or platters in a short time. NOTE: This Manual uses the term “rethermalize” for both the reheating cooking containers and for “regenerate,” meaning reheating plates or platters. PRE-HEAT countertop models for 10-15 minutes and floor models for 30 minutes at 10-20% •... - Page 21 Using Rethermalization Mode Turn the MINI on with the ON/OFF key. 1. Press the Retherm key. a. The display shows the last nominal values selected or the default values for rethermalizing. b. To start immediately, press the Start/Stop key. 1. Press the Temperature key. The oven temperature appears on the display.
-
Page 22: Measuring The Core Temperature
E. Measuring the Core Temperature Core Temperature Sensor may be HOT Handle with caution to help avoid burns. Core Temperature Sensor is SHARP. Use caution to avoid stabbing yourself or others. The Core Temperature Sensor is a precision instrument. Use the Core Temperature Sensor only to measure core temperature. •... - Page 23 Measuring the Core Temperature (CONTINUED) 7. Read the actual oven temperature and the nominal core temperature by pressing the relevant key either once or twice as needed. 8. When the set core temperature has been reached, the Signal Tone sounds and the recipe ends. 9.
-
Page 24: Delta-T Cooking
F. Delta-T Cooking Delta – T cooking requires use of the Core Temperature Sensor The higher the Delta-T temperature, the greater the loss in weight and the darker the browning. • When using Delta-T cooking: use of the Core Temperature Sensor is required, because the oven •... -
Page 25: Cook & Hold
G. Cook & Hold NEVER Add cold food to the MINI for rethermalization while hot food is being held! IMPORTANT: Cook and hold requires use of the Core Temperature Sensor • For more information on the Cook Phase and entering recipe names See Chapter 7 •... -
Page 26: Lt Cooking
The principle of Cook & Hold This example shows Cook & Hold used with the Core Temperature Sensor. Cook phase Start Switchover from Oven Cook to Hold chamber Preheated NEVER Add cold food to the MINI for rethermalization while hot food is being held! H. -
Page 27: Chapter 5 Advanced Functions
CHAPTER 5 ADVANCED FUNCTIONS With Extra Functions, your Convotherm by Cleveland enables you to maximize productivity in the food preparation processes and cooking processes. Introduction to Advanced Functions Advanced Functions can be activated with the Smart Key. • Extra functions and their symbols appear only if they are compatible with the selected cooking mode. •... -
Page 28: Tray Timer
B. Tray Timer The MINI oven must be ON and operating in a cooking mode before the Tray Timer can be set. • • The Tray Timer function provides up to twenty (20) timers for mixed oven loads to keep track of the optimum finish for each different dish. -
Page 29: Pre-Heat
C. Pre-Heat The Pre-Heat function heats the oven to the desired temperature before loading food, and helps • ensure consistency and quality. 1. Press the Smart Key. 2. Various options appear in the display. 3. Use the Selector Dial to select Pre-Heat 4. -
Page 30: Add Moisture Manually
10. Press the keys to be locked one after the other. 11. Lock selection can be changed to unlocked by pressing the desired key again BEFORE pressing the Start/Stop key. 12. The display shows “lock” or “unlock." 13. Press the Start/Stop key. 14. -
Page 31: Overnight Cooking
I. Overnight Cooking 1. Press the Smart Key. 2. Use the Selector Dial to select Overnight Cooking 3. Press the Smart Key. 4. Confirm “Yes” if needed. 5. Press the Smart Key. 6. Three icons appear Medium 7. Use the Selector Dial to select one of the icons. 8. -
Page 32: Chapter 6 Using Multi-Step Recipes
CHAPTER 6 USING MULTI-STEP RECIPES Use Recipes to simplify the preparation of dishes. • • Save and store Recipes in the Cookbook Use Recipes to adjust popular or complex dishes until the results are perfect. • A. Creating a Multi-Step Recipe A Recipe combines up to twenty (20) individual steps and can include cooking modes, nominal •... - Page 33 To START Recording: Use the Edit key, NOT the Smart Key to navigate this function. 1. Press the Edit key. Various options appears in the display. a. Use the Selector Dial to select “recording”. b. Confirm by pressing the Edit key. c.
-
Page 34: Chapter 7 Using The Cookbook
CHAPTER 7 USING THE COOKBOOK Combine up to 20 steps to make a recipe, save the recipe under its own name in the Cookbook, and • call it up and start it as needed. Use recipes in the Cookbook for regularly prepared dishes or ones prepared by semi-skilled staff. •... -
Page 35: Integrating Pre-Heating Into A Recipe
C. Integrating Pre-Heating into a Recipe 1. Press the Edit key. Various options appear in the display. 2. Use the Selector Dial to select “new recipe” 3. Confirm by pressing the Edit key. 4. The cooking mode keys flash and the display shows 01/01. 5. -
Page 36: Inserting A Step Into A Recipe
G. Inserting a Step into a Recipe If a recipe already has 20 steps, no more steps can be added. • The new step is inserted BEFORE the selected step. • 1. Press the Cookbook key. The saved recipes appear in the display. 2. -
Page 37: Save Recipes To Memory
7. Press the Smart Key. Various options appear in the display. 8. Select “delete step” 9. Confirm by pressing the Smart Key. 10. Confirm “yes” by pressing the Smart Key. 11. The selected step is deleted. 12. All subsequent steps are re-numbered accordingly. 13. -
Page 38: Adding An "Action" Prompt To A Recipe
L. Adding an “ACTION” Prompt to a Recipe The Action prompt reminds the Operator to take the needed manual action such as stirring, • turning, or basting, between steps in a cooking program. Add the Action prompt to the program step that follows the needed manual steps. •... -
Page 39: Chapter 8 Using Press & Go
CHAPTER 8 USING PRESS & GO Recipes saved in the Cookbook and cleaning procedures can be assigned to Press & Go keys. • • Start a Recipe or cleaning process with just one touch of a Press & Go key. A. -
Page 40: Chapter 9 At The End Of The Day Or Shift
MINI oven chamber. h. Do NOT spray water into a hot oven chamber. Use only genuine Convotherm by Cleveland and Cleveland Range cleaning products. Follow the instructions and heed and obey the warnings on the labels. Other products can cause injury, present heath hazards, and damage the MINI. - Page 41 4) Make sure that the hanging pan racks do not become bent; otherwise grills, racks, containers and accessories will no longer be safely supported. If U-Shaped racks become bent then remove the Combi from service and contact your qualified Cleveland Range authorized service representative at once.
-
Page 42: Semi-Automatic Cleaning Of The Oven Chamber
• set, or the addition of a water treatment system is required. To remove this deposit, use vinegar and a soft cloth. Ask your qualified Cleveland Range authorized service representative about adding or • setting a water treatment system. B. Semi-Automatic Cleaning of the Oven Chamber NOTE: Do NOT press the Start/Stop key while using the Semi-automatic Cleaning process. - Page 43 b) If the oven temperature is still above 158° F then wait 15 more minutes and check the oven chamber temperature. Repeat this step as needed until the oven chamber temperature is at or below 158° F and then go to Step 4. 4.
-
Page 44: Chapter 10 Mini Setup
CHAPTER 10 MINI SETUP NOTES: The various setup options are described in detail below. You can exit the menu at any time by pressing the Start/Stop key. To use the Setup Menu: 1. Press the Smart Key. 2. Various options appear in the display. 3. -
Page 45: Date
D. Date To set the Date from the Setup Menu: • If the power is off for more than three days, the date must be re-entered 1. Select “Date” with the Selector Dial. 2. Confirm by pressing the Smart Key. 3. -
Page 46: Factory Default Settings
Factory Default Settings Cooking Mode Oven Temperature G. Temperature Display To select temperature display in ° C or ° F for temperature in the Setup Menu: 1. Select “temperature in °C,” 2. Confirm by pressing the Smart Key. 3. Select “yes” for ° C and “no” for ° F 4. -
Page 47: Chapter 11 Troubleshooting
MINI from service. Use of the MINI with these two icons lit can cause injury or equipment damage. Call your qualified Cleveland Range authorized service representative at once. If an error cannot be rectified with the aid of these tables, contact your qualified Cleveland Range authorized service representative at once;... -
Page 48: Error Messages And Remedies (Table)
B. Error Messages and Remedies Error Message on display Not enough water Connection area temperature too high Connection area fan malfunction E11/E32 Excess temperature in oven or oven sensor failure E15/E36 Excess temperature of condenser or condenser sensor failure Core Temperature Sensor faulty Ground connection of sensor E80/E95/E96... - Page 49 Operating Irregularities not having Error Messages (Continued) Error Water inside the oven Steam or water running out of base of appliance (condenser). White or black marks inside oven Possible cause Drain blocked Drain connection blocked or covered Drain blocked Incorrect cleaning agent Water hardness too high Remedy Descale...
-
Page 50: Chapter 12 Emergency Operation
“Emergency Operation” function is available. This allows you to use at least some of the appliance functions despite a malfunction. • • Call the Service Department at Cleveland Range at 216-481-4900 immediately. NOTES: Cooking times can be longer. -
Page 51: Emergency Operation Methods
B. Emergency Operation Methods Error Message on display Not enough water Connection area temp. too high Connection area fan malfunction Excess oven temperature Excess temperature of condenser Core temp. sensor faulty Condenser sensor failure E 29 Error in ground connection ID error Program memory error Working parameter...
Need help?
Do you have a question about the The MINI OES-6.08 and is the answer not in the manual?
Questions and answers