Table of Contents
Advertisement
Dimensions:
NOTE: This portion of the
8.5 inch (width) x 11 inch
document should not appear
Booklet
on produced Labels or IFUs.
Stryker Instruments
Print Location:
(269) 323-7700
(800) 253-3210
Print Center
DSGN-fm-50366 rev. None
Effective: July 1, 2008
Color/Material/Finish:
Four Color Graphics on White Background;
20# Bond or Equivalent
Suppliers/Services:
N/A
Label Stock:
N/A
Description/Type:
Instructions For Use
Part Number:
0406-900-702
Page 1 of 1
Rev.
E
Advertisement
Table of Contents

Subscribe to Our Youtube Channel
Summary of Contents for Stryker RF MultiGen 0406-900-000
- Page 1 8.5 inch (width) x 11 inch Four Color Graphics on White Background; document should not appear Booklet 20# Bond or Equivalent Description/Type: on produced Labels or IFUs. Instructions For Use Stryker Instruments Print Location: Suppliers/Services: Part Number: Rev. (269) 323-7700 (800) 253-3210 Print Center 0406-900-702 DSGN-fm-50366 rev.
- Page 2 Interventional Spine (IVS) RF MultiGen Generator ® 0406-900-000 Instructions For Use Software Version ENGLISH (EN) 2014-05 0406-900-702 Rev-E www.stryker.com...
-
Page 4: Table Of Contents
To Change System Settings: Display Settings .....................................37 To Change System Settings: Sound Settings ......................................38 To Change System Settings: Date and Time Settings ..................................39 To Change System Settings: Language Settings ....................................40 To Change System Settings: Procedure Default Settings ...................................41 To Edit Procedure Default Settings ........................................41 www.stryker.com... - Page 5 Appendix B - Maximum Frequency and Maximum Stimulation Width Graphs ............................52 Appendix C - Relative Lesion Sizes and Shapes (parallel bipolar only) ..............................52 Appendix D - DualWave Waveform ..........................................54 Appendix E - Radio Frequency Output Plot ........................................54 Appendix F - Factory Default Values ..........................................55 Software License Notice ..............................................55 www.stryker.com...
- Page 6 Figure 40 Language Settings Screen ..........................................40 Figure 41 Set Procedure Default Screen ........................................41 Figure 42 Typical Edit Procedure Default Settings Screen ..................................41 Figure 43 Fuse Replacement ............................................44 Figure 44 Hand Controller Features ..........................................49 Figure 45 Maximum Frequency vs. Stimulation Width Graph ..................................52 www.stryker.com...
- Page 7 Figure 49 Non-contiguous Lesions 4.4 mm x 7.5 mm (width x length) 5.0 mm x 8.2 mm (width x length) ....................53 Figure 50 Non-contiguous Lesions 4.7 mm x 8.5 mm (width x length) 5.1 mm x 8.2 mm (width x length) ....................53 Figure 51 DualWave Waveform ............................................54 Figure 52 RF Output Plot ...............................................54 www.stryker.com...
-
Page 8: Introduction
• Apply dry gauze as required to avoid skin-to-skin contact between the patient’s arms and body. If additional information, especially safety information, or in-service training is required, contact your Stryker sales representative or call Stryker • DO NOT allow the patient to come in contact with metal parts that are customer service. grounded or have a large capacitance with respect to ground (operating User/Patient Safety table, supports). -
Page 9: Indications For Use
3 (PCL3) compatible. Printers using versions of PCL greater than 3 may also work. See your printer manual for compatibility information. Incompatible printers will not work with the generator. Trademarks not the property of Stryker Corporation are the property of their respective owners. www.stryker.com... -
Page 10: System Overview
RF energy. Therefore, the time Figure 1 Block Diagram required to reach the set temperature value during the pulse mode may be longer than during the thermal mode. NiTRODE is a trademark of the Stryker Corporation. www.stryker.com... -
Page 11: Features
Allows installation of the RF Hand Controller. Alternating Current (AC) RS-232 Data Port (back panel) Type BF Applied Part Allows for software service updates installed by a Stryker-approved technician. Printer Cable Port (PCL3) Parallel Printer Cable Port (back panel) Allows the installation of a PCL3 compliant printer. -
Page 12: System Components
RF Hand Controller Provides basic remote control of the generator. See Appendix A - RF Hand Controller Instructions section. NOTE: The designated applied parts as defined by the manufacturer. See the Product Safety Certification standards listed in the Specifications section. www.stryker.com... -
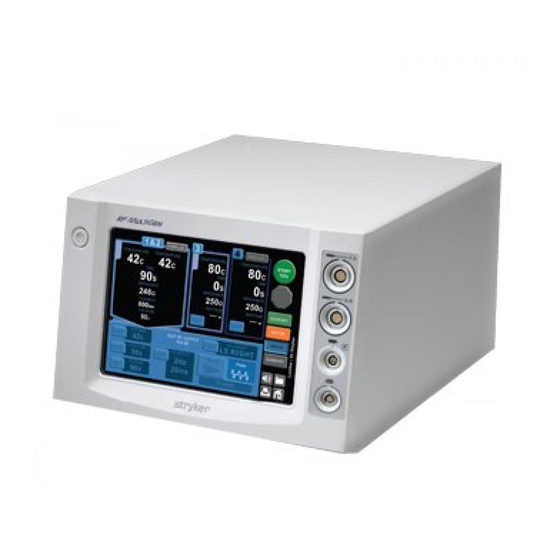
Page 13: Screen Layout
See Modes of Operation and Color Codes section. Touch the summary button to access procedural summary information. A visually depressed button indicates the current mode of operation. System Navigation Buttons Area Touch to load and SAVE files, PRINT procedure information or access the HOME screen. www.stryker.com... -
Page 14: Software Button Definitions
Touch the START button in the dashboard area to apply energy. Touch to remove energy from active electrode(s). During lesion creation ALL STOP STOP (ALL) will appear on the button to indicate the use of more than one electrode. www.stryker.com... -
Page 15: Instructions
1. Align the dot on the black end of the cable with the dot on the generator port and connect the cable to the generator. 2. Use the electrode port symbol as reference and match the color-coded black band on the port with the black cable strain relief. www.stryker.com... -
Page 16: To Connect A Ground Pad (Monopolar Only)
3. Place the pad portion of the ground pad onto the patient, in proximity to the treatment site (see figure 6). The entire pad should adhere to the patient's body. Figure 6 Pad Placement www.stryker.com... -
Page 17: To Select A Procedure Configuration
Monopolar and a MultiGen Cable (0406-900-100) MultiGen Cable (0406-900-100) Ground Pad Cable 7 and 9 Parallel Bipolar (0406-850-200) MultiGen Cable (0406-900-100) MultiGen Cable (0406-900-100) Two Concurrent MultiGen Cable (0406-900-100) MultiGen Cable (0406-900-100) Ground Pad Cable Monopolar and a (0406-850-200) Parallel Bipolar www.stryker.com... -
Page 18: To Configure A Monopolar Procedure Or A Parallel Bipolar Combination Procedure Using Multigen Cable(S)
3. See To Attach Cable Identification Tags section. 4. See To Connect a Ground Pad (monopolar only) section. 5. See To Connect a Printer (optional) section. 6. See To Connect a RF Hand Controller (optional) section. Figure 7 Monopolar or Monopolar and Parallel Bipolar Configuration www.stryker.com... -
Page 19: To Configure A Parallel Bipolar Combination Procedure Using A Multigen Cable
3. See To Attach Cable Identification Tags section. 4. See To Connect a Ground Pad (monopolar only) section. 5. See To Connect a Printer (optional) section. 6. See To Connect a RF Hand Controller (optional) section. Figure 8 Monopolar or Monopolar and Parallel Bipolar Combination Configuration www.stryker.com... -
Page 20: To Configure A Parallel Bipolar Procedure Using Multigen Cable(S)
1. See To Perform Initial Setup section. 2. See To Connect Electrode Cable(s) section. 3. See To Attach Cable Identification Tags section. 4. See To Connect a Printer (optional) section. 5. See To Connect a RF Hand Controller (optional) section. Figure 9 Parallel Bipolar Configuration www.stryker.com... -
Page 21: To Start A Procedure
Touch to access the SELECT FOLDER screen to create or edit a procedure settings file. Create or edit up to five folders with five files in each folder. From the FILE SETTINGS screen, touch the ACCEPT button to start the procedure. www.stryker.com... -
Page 22: To Edit Sensory Or Motor Stimulation Settings
Ω Ω AMPLITUDE AMPLITUDE AMPLITUDE AMPLITUDE 0.00 0.00 0.00 0.00 SENSORY MOTOR EDIT EDIT EDIT LESION MOTOR STIM SUMMARY FREQUENCY PLACEMENT EDIT EDIT L2 LEFT AMPLITUDE EDIT 0.00 WIDTH 1.00 EDIT Figure 12 Typical Stimulation Motor Screen - INACTIVE www.stryker.com... -
Page 23: Figure 13 Typical Stimulation Screen - Inactive
Once selected, the anatomical location NEW VALUE Window is displayed in the window. This information cannot be modified Displays the value entered using the keypad buttons. after the START button is touched. See To Choose a Placement Region section. www.stryker.com... -
Page 24: To Perform Sensory Or Motor Stimulation
• If no electrodes are connected, the IMPEDANCE tab value will display “- - -.” If an electrode is connected to any port, but the value exceeds its limit, the value displayed will be “HIGH” for all tabs. • Stimulation cannot be conducted if impedance is outside the range of 35 to 1800 Ω impedance. www.stryker.com... -
Page 25: To Edit Rf Output Settings
Displays the value entered using the keypad buttons. EDIT PLACEMENT Button/Window Touch to enter the electrode placement information. See To RANGE Area Choose A Placement Region section. View the acceptable range of values that may be entered for this setting. www.stryker.com... -
Page 26: Figure 20 Rf Output Screen In Pulse Mode - Inactive
PULSE Button Touch the PULSE RF mode button to select the PULSE RF mode of operation. This mode of operation provides pulsed or bursts of RF energy to stimulate the target tissue with a minimum temperature elevation. www.stryker.com... -
Page 27: To Control Rf Output
View the designated port(s) information where RF energy output will be applied. START Button Touch to confirm the application of RF energy output to the designated electrode(s). CANCEL Button Touch to prevent the confirmation and application of RF energy output. www.stryker.com... -
Page 28: Figure 23 Rf Output Screen Thermal Mode - Active
Touch to remove the application of RF energy output from all WATTAGE Tab Value active electrodes. • Available in the THERMAL mode only, continuously displayed during active RF energy output and represents the approximate power output. • If no electrode is connected, output is not active, or output is less than 0.1 W, the window will display “----W”. www.stryker.com... -
Page 29: To Start Multiple Electrodes - Concurrently
EDIT EDIT MOTOR LESION RF OUTPUT - THERMAL SET TEMP EDIT PLACEMENT SUMMARY EDIT L4 LEFT HOLD TIME EDIT Thermal Pulse Figure 25 RF Output Screen THERMAL mode - INACTIVE - SELECTED AND LOCKED ELECTRODES 1, 2, and 3 www.stryker.com... -
Page 30: To Perform A Parallel Bipolar Procedure
RF OUTPUT RF OUTPUT SET TEMP SET TEMP PLACEMENT PLACEMENT L4 LEFT L4 LEFT HOLD TIME HOLD TIME Figure 26 RF Output Screen THERMAL mode - PARALLEL BIPOLAR ACTIVE Figure 27 RF Output Screen PULSE mode - PARALLEL BIPOLAR ACTIVE www.stryker.com... -
Page 31: To Choose A Placement Region
Touch to access the lumbar/sacrum region dashboard. position in the spine. • S1, S2, etc., represent each sacrum vertebra and its numeric position in the spine. RIGHT and LEFT Regions Indicates the right and left side of the placement region (spine). PLACEMENT Location Window Displays the selected placement location information. www.stryker.com... -
Page 32: To View A Procedure Summary
Date and Time Window - Left/Right Arrow Buttons Touch to scroll through and view the date and timestamp SAVE Button information captured during data collection. The procedure values Touch to save the procedure file setting information. associated with each date/timestamp will be displayed. www.stryker.com... -
Page 33: To Name (And Create) A Printout, Folder Or File
Touch the appropriate arrow key to move the cursor to the left or SHIFT Key Touch to enter the & [ampersand] and - [dash] characters. The right. New characters will be inserted at the cursor. key toggles on and off when touched. www.stryker.com... -
Page 34: To Save Or Access Saved Procedure Settings
From the Procedure screens, touch the SAVE button (diskette) to save the procedure settings. From the Home screen, touch the SELECT SAVED PROCEDURE button to access a saved procedure settings file in a folder (see figure 32). SELECT FOLDER HOMER STRYKER EDIT NAME OPEN BACK... -
Page 35: Figure 33 Select File Screen
0406-900-702 Rev-E Instructions To Save or Access Saved Procedure Settings (continued) From the Select Folder screen, touch the OPEN button to access the Select File screen (see figure 33). SELECT FILE HOMER STRYKER EDIT NAME PARALLEL OPEN BACK CREATE DELETE... -
Page 36: To Create Or Access File Settings
IMPEDANCE IMPEDANCE IMPEDANCE IMPEDANCE Ω Ω Ω Ω AMPLITUDE AMPLITUDE AMPLITUDE AMPLITUDE SENSORY MOTOR EDIT EDIT EDIT LESION SENSORY STIM SUMMARY FREQUENCY PLACEMENT 50.0 EDIT EDIT AMPLITUDE EDIT 0.00 WIDTH 1.00 EDIT Figure 35 Typical Edit File Settings Screen www.stryker.com... -
Page 37: To Change System Settings: Registration
From the Home screen, touch the SYSTEM SETTINGS button to modify system and procedure default setting values (see figure 36). Registered To: REGISTRATION REGISTRATION EDIT DISPLAY SOUND Stryker Interventional Spine RF Generator DATE & TIME Hardware Revision: x.x Serial Number: LES-xxxx Software Revision: x.x.x.x LANGUAGE Service Information: Stryker Customer Service 800-253-3210;... -
Page 38: To Change System Settings: Display Settings
Follow the instructions on the screen to assist in the calibration process. NOTE: DO NOT touch any part of the screen except the center of the red box during calibration. Calibrating Touch Screen... Please touch the center of the box in the upper-left corner. www.stryker.com... -
Page 39: To Change System Settings: Sound Settings
(except the amplitude adjustment) is touched on the screen. arrow button is touched and held. BEEP SPACING Switch Touch to select a [1 SECond] beep spacing or a [5 SECond] beep spacing during RF energy output. NOTE: For safety reasons, the beep sound cannot be turned off. www.stryker.com... -
Page 40: To Change System Settings: Date And Time Settings
Touch to enter a new year value using the keypad buttons. The new value will appear in the window. new value will appear in the window. SECond Button/Window Touch to enter a new second value using the keypad buttons. The new value will appear in the window. www.stryker.com... -
Page 41: To Change System Settings: Language Settings
Language Settings screen (see figure 40). In the future, the screen language may be changed to one of several languages. SELECT LANGUAGE REGISTRATION English DISPLAY Français SOUND DATE & TIME Italiano LANGUAGE Deutsch PROCEDURE Español DEFAULTS FACTORY DEFAULTS Figure 40 Language Settings Screen www.stryker.com... -
Page 42: To Change System Settings: Procedure Default Settings
TIME TIME IMPEDANCE IMPEDANCE IMPEDANCE IMPEDANCE WATTAGE WATTAGE WATTAGE WATTAGE SENSORY EDIT EDIT EDIT MOTOR LESION RF OUTPUT SET TEMP EDIT PLACEMENT SUMMARY EDIT L4 LEFT HOLD TIME EDIT Thermal Pulse Figure 42 Typical Edit Procedure Default Settings Screen www.stryker.com... -
Page 43: Inspection And Testing
NOTE: Maintenance documentation for this equipment is available upon Specifications section. request to Stryker-authorized service personnel only. To ensure the longevity, performance and safety of this equipment, use To Perform Check-in Procedure (optional) of the original packaging material is recommended when storing or Perform these procedures to check the accuracy of the generator's transporting this equipment. -
Page 44: Troubleshooting
0406-900-702 Rev-E Troubleshooting WARNING: DO NOT service this equipment. If you require service, contact your Stryker sales representative or call Stryker customer service. Outside the US, contact your nearest Stryker subsidiary. PROBLEM CAUSE ACTION The generator does not power The generator is either not connected to facility... -
Page 45: To Replace The Fuses
The electrode or MultiGen cable is/are damaged. Replace the electrode and/or MultiGen cable. If the error persists, contact Stryker customer service. A rapid decrease in The electrode is not fully inserted into the cannula. Ensure the electrode is fully inserted into the cannula. -
Page 46: Specifications
Maximum Set Temperature (Thermal mode): 50 °C Maximum Set Temperature (Pulse mode, 2 Hz/ 20 ms, 20 Hz/ 10 ms): Maximum Set Temperature (Pulse mode, 2 Hz/ 100 ms): 60 °C Maximum Set Temperature (Pulse mode, unless specified otherwise): 80 °C www.stryker.com... - Page 47 The RF MultiGen (generator) REF 0406-900-000 is suitable for use in all establishments CISPR 11 other than domestic establishments and those directly connected to the public low-voltage power supply network that supplies buildings used for domestic purposes. Harmonic emissions Class A IEC 61000-3-2 Voltage fluctuations/flicker Complies emissions IEC 61000-3-3 www.stryker.com...
- Page 48 Power frequency magnetic fields should be at levels characteristics of a typical location in a typical commercial or hospital environment. (50/60 Hz) @ 50 Hz magnetic field CRT 1 A/m IEC 61000-4-8 NOTE: U is the a.c. mains voltage prior to application of the test level. www.stryker.com...
- Page 49 NOTE 1: At 80 MHz and 800 MHz, the separation distance for the higher frequency range applies. NOTE 2: These guidelines may not apply in all situations. Electromagnetic propagation is affected by absorption and reflection from structures, objects and people. www.stryker.com...
-
Page 50: Disposal/Recycle
STIM ADJUST FAST Buttons Touch to quickly increase or decrease a stimulation setting value. STIM ADJUST SLOW Buttons Touch to slowly increase or decrease a stimulation setting value. NEXT Button Touch to access the next screen or close a popup. www.stryker.com... - Page 51 4 to electrode identifier 3, etc.) DECREASE FAST Press to select a saved procedure No function Press to increase the amplitude value (0.01) INCREASE SLOW Press to select a saved procedure No function Press to decrease the amplitude value (0.01) DECREASE SLOW www.stryker.com...
- Page 52 INCREASE SLOW Press to lock/unlock an No function Press to select the previous file Press to select NO button in electrode during a multiple or folder a pop up requiring a YES/NO electrode procedure response DECREASE SLOW www.stryker.com...
-
Page 53: Appendix B - Maximum Frequency And Maximum Stimulation Width Graphs
Figure 45 Maximum Frequency vs. Stimulation Width Graph Figure 47 Contiguous Lesion 4.2 mm x 5.8 mm (width x length) 6 mm Figure 46 Maximum Stimulation Width vs. Frequency Graph 6 mm Figure 48 Contiguous Lesion 7.8 mm x 9.6 mm (width x length) www.stryker.com... -
Page 54: Figure 49 Non-Contiguous Lesions 4.4 Mm X 7.5 Mm (Width X Length) 5.0 Mm X 8.2 Mm (Width X Length)
Figure 49 Non-contiguous Lesions 4.4 mm x 7.5 mm (width x length) 5.0 mm x 8.2 mm (width x length) 14 mm 14 mm Figure 50 Non-contiguous Lesions 4.7 mm x 8.5 mm (width x length) 5.1 mm x 8.2 mm (width x length) www.stryker.com... -
Page 55: Appendix D - Dualwave Waveform
Appendix E - Radio Frequency Output Plot (see figure 52) Average Power and Peak Voltage vs. Impedance RF MultiGen Generator at Maximum Output 1000 1200 1400 1600 1800 2000 Impedance (ohms) Average Power (W) Vpk (V) Figure 52 RF Output Plot www.stryker.com... -
Page 56: Appendix F - Factory Default Values
SOUND DEFAULT VALUES Any license granted by Stryker Corporation to use the software contained in Beep On Touch Option its products does not give the licensee the right to copy, alter, disassemble,... - Page 57 ES, DE, FR, IT, NL, PT 0406-900-713 JA, ZH, KO 0406-900-720 Manufactured by: Synergetics, Inc. 79 Hubble Drive Suite 105-109 Dardenne Prairie, MO 63368 (USA) Manufactured for: Stryker Instruments 4100 E. Milham Kalamazoo, Michigan 49001 (USA) (269) 323-7700 (800) 253-3210 2014-05 0406-900-702 Rev-E www.stryker.com...
Need help?
Do you have a question about the RF MultiGen 0406-900-000 and is the answer not in the manual?
Questions and answers
how to sterilize Venom Multi Gen Electrodes after cleaning