Advertisement
Features of your Blueprint Cycle Timer, BCT-1
• Controls pumps, fans and other devices using
adjustable on/off cycles
• Photocell control allows day, night or 24-hour operation
• On time range: 15 seconds to 5 hours
Off time range: 15 seconds to 13 hours
• Precise timing accuracy
• Wall-mountable
• 3-year warranty
• ETL Listed
Specifications
Input Voltage: 120V
Maximum Amperage: 14.5A @ 120V
Timing Accuracy: ± 5% of fixed scale
Timing Repeatability: ± .3%
Dimensions: 3" x 6" x 3.5"
Installation
• Plug the Cycle Timer into a NEMA 5-15 wall outlet with a
120V power supply. To install the Cycle Timer permanently,
secure the mounting tab at the top of the unit to the wall.
• Plug the device to be controlled by the Cycle Timer into the
receptacle on the front of the Cycle Timer. Ensure the
device being connected to the Cycle Timer has the proper
voltage and will not exceed the maximum amperage rating
of the Cycle Timer.
CAUTION
Do not expose the Cycle Timer to water.
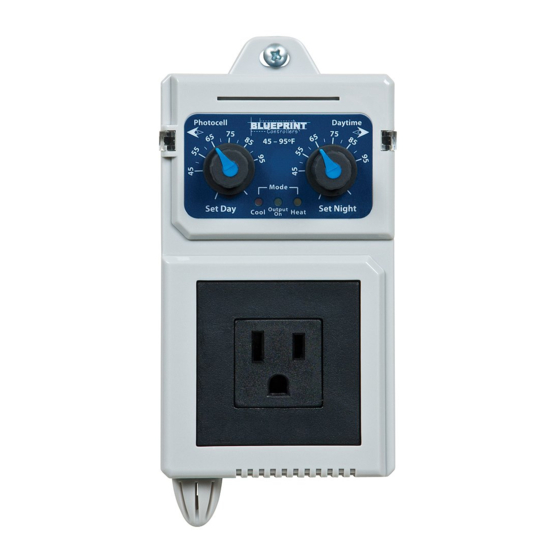
Selecting the Timer Mode
Select between Day, Night and 24-Hour modes using the knobs
on the front of the unit. The built-in photocell senses the light
level and activates the Cycle Timer based on the selected
mode.
Day Mode
To select Day mode, rotate both knobs fully counterclockwise.
After a few seconds, the LEDs on the front of the unit will flash.
When they stop flashing, the LED labeled "Day" will remain illu-
minated to indicate the mode has been set.
Night Mode
To select Night mode, rotate both knobs fully clockwise. After a
few seconds, the LEDs on the front of the unit will flash. When
they stop flashing, the LED labeled "Night" will remain illumi-
nated to indicate the mode has been set.
Thank you for choosing to grow with Blueprint Controllers!
Your satisfaction and success are important to us.
For best results, carefully read the following instructions
before using your Blueprint Cycle Timer.
24-Hour Mode
To select 24-Hour mode, rotate
the left knob fully counterclockwise
and the right knob fully clockwise.
After a few seconds, the LEDs
on the front of the unit will flash.
When they stop flashing, the LEDs
labeled "Day" and "Night" will
remain illuminated to indicate the
mode has been set.
Setting Timer Cycles
The timer cycles can be set after
the timer mode is selected. Rotate
the "On Time" knob to the set-point corresponding with the
length of time the unit is to remain on. Rotate the "Off Time"
knob to the set-point corresponding with the length of time the
unit is to remain off.
FAQ
• How do I know if the photocell is working correctly?
The LED labeled "Daytime" on the top right edge of the unit
will illuminate when the photocell is in Day mode. The photo
cell changes status on a 20-second delay.
Troubleshooting
• The timer cycle settings do not seem to be correct.
Because the Cycle Timer allows very precise timer cycles
to be programmed, a small adjustment to the set-points may
result in a significant change in the timer settings. Use another
timing device to ensure the desired intervals have been
accurately set, and make small adjustments to the knob
positions until the timer cycles are satisfactory.
• The connected device is not being powered.
Ensure the device to be controlled is working correctly by
plugging the device into a reliable power source. Verify the
Cycle Timer is being supplied the correct voltage.
• The Cycle Timer intermittently fails to turn on or off.
Verify that the correct timer mode is selected. Ensure
enough light or darkness is present to change the status of
the photocell from night to day.
rev:12013
Advertisement
Table of Contents

Related Manuals for Blueprint Controllers BTC-1

Summary of Contents for Blueprint Controllers BTC-1
- Page 1 Thank you for choosing to grow with Blueprint Controllers! Your satisfaction and success are important to us. For best results, carefully read the following instructions before using your Blueprint Cycle Timer. Features of your Blueprint Cycle Timer, BCT-1 24-Hour Mode • Controls pumps, fans and other devices using To select 24-Hour mode, rotate adjustable on/off cycles the left knob fully counterclockwise • Photocell control allows day, night or 24-hour operation and the right knob fully clockwise. • On time range: 15 seconds to 5 hours After a few seconds, the LEDs Off time range: 15 seconds to 13 hours on the front of the unit will flash. • Precise timing accuracy When they stop flashing, the LEDs • Wall-mountable labeled “Day” and “Night” will • 3-year warranty remain illuminated to indicate the • ETL Listed mode has been set. Specifications Setting Timer Cycles Input Voltage: 120V The timer cycles can be set after Maximum Amperage: 14.5A @ 120V the timer mode is selected. Rotate Timing Accuracy: ± 5% of fixed scale the “On Time” knob to the set-point corresponding with the Timing Repeatability: ± .3% length of time the unit is to remain on. Rotate the “Off Time”...
- Page 2 Blueprint 3-Year Limited Warranty All Blueprint Cycle Timers are protected against manufacturer defect by a limited 3-year manufacturer’s warranty. Limited 3-Year Warranty Terms Sunleaves Garden Products warrants that the Blueprint Cycle Timer will remain free from appearance of defects in workmanship and materials for 3 years from date of original retail purchase. This warranty is sub- ject to the following limitations: (a) manufacturer’s liability is limited to the replacement or repair of the unit, as decided by the manufacturer; (b) a defective unit must be returned, prepaid, with proof of purchase to the point of purchase or as instructed below; and (c) this warranty does not apply to defects resulting from the alteration, abuse, accidental damage, unauthorized repair or misuse of the unit. This warranty is given in lieu of all other warranties, guarantees and conditions on manufacturer’s part, and the manufacturer shall have no tortious or other liability in respect to this Blueprint Cycle Timer. Blueprint Cycle Timer Warranty Is Void If: • NOT ACCOMPANIED BY THE ORIGINAL PROOF OF PURCHASE. • BLUEPRINT CYCLE TIMER HAS BEEN USED IN A NONSTANDARD WAY, INCLUDING GENERAL MISUSE AND OUTDOOR USE.
Need help?
Do you have a question about the BTC-1 and is the answer not in the manual?
Questions and answers