
Related Manuals for Stirling STR-E15BDG


Summary of Contents for Stirling STR-E15BDG
- Page 1 Espresso Machine with Grinder Model Number STR-E15BDG INSTRUCTION MANUAL tempo.org/support AFTER SALES SUPPORT 1300 112 534 MODEL: STR-E15BGD PRODUCT CODE: 708548 10/2022...
-
Page 2: Welcome
Welcome Congratulations on choosing to buy a STIRLING product. ® All products brought to you by STIRLING are manufactured to the highest ® standards of performance and safety and, as part of our philosophy of customer service and satisfaction, are backed by our comprehensive 3 Year Warranty. -
Page 3: Table Of Contents
Contents 02 Welcome 04 Warranty Details 05 General Safety Instructions 09 Product Overview 12 Getting Started 18 Instructions 26 FAQs and Troubleshooting Guide 28 Other Useful Information 35 Repair and Refurbished Goods or Parts Notice AFTER SALES SUPPORT tempo.org/support 1300 112 534 MODEL: STR-E15BGD PRODUCT CODE: 708548 10/2022... -
Page 4: Warranty Details
Espresso Machine with Grinder Warranty Details REGISTER YOUR PURCHASE AT www.aldi.com.au/en/about-aldi/product-registration/ TO KEEP UP-TO-DATE WITH IMPORTANT PRODUCT INFORMATION The product is guaranteed to be free from defects in workmanship and parts for a period of 36 months from the date of purchase. Defects that occur within this warranty period, under normal use and care, will be repaired, replaced or refunded at our discretion. -
Page 5: General Safety Instructions
General Safety Instructions READ CAREFULLY AND KEEP FOR FUTURE REFERENCE Read this manual thoroughly before first use, even if you are familiar with this type of product. The safety precautions enclosed herein reduce the risk of fire, electric shock and injury when correctly adhered to. Keep the manual in a safe place for future reference, along with the completed warranty card, purchase receipt and carton. - Page 6 General Safety Instructions (Cont.) • Disconnect: Switch off the appliance and unplug it from the power supply in the following circumstances: - after use, and if anything unusual occurs during the coffee-making process - before cleaning, servicing or moving it (allow it to cool beforehand) - before putting on or taking off parts (allow it to cool beforehand) - if you will not use it for an extended time (e.g.
- Page 7 General Safety Instructions (Cont.) • Work surface: Place the machine on a stable and flat surface to avoid interrup- tion of airflow underneath the appliance. Place it on a heat resistant surface, in a dry environment, away from water. Do not operate it on an inclined plane. •...
- Page 8 General Safety Instructions (Cont.) • CAUTION: Hot Liquids! Exercise extreme caution and do not attempt to move the appliance containing hot liquids. Allow it to cool completely before moving. • CAUTION: High Pressure and Hot Steam! The portafilter is under pressure during use.
-
Page 9: Product Overview
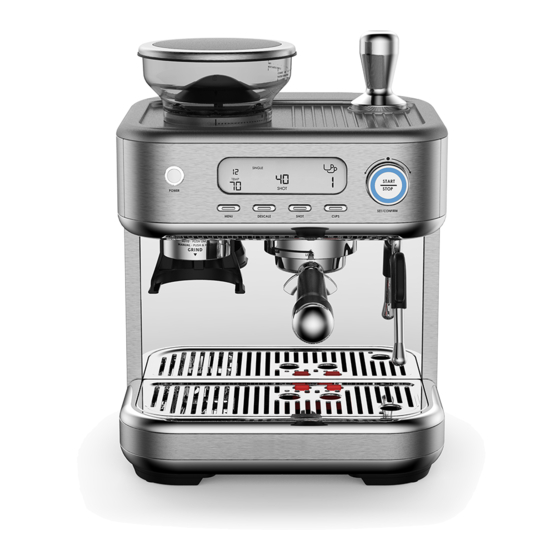
Product Overview Scope of delivery Espresso machine Drip tray Tamper Lid of bean hopper 10 Water tank cover (back) Bean hopper 11 Water tank (back) Hot plate for cups 12 Brewing head Control panel (see page 11 for details) 13 Portafilter Grinder switch 14 Steam nozzle cover Grinder holder... - Page 10 Product Overview (Cont.) Accessories: 17 Milk jug (not pictured) 18 Filter for single espresso 19 Filter for double espresso 20 Cleaning tool (located underneath the drip tray) 21 Brush Other inclusions (not pictured) Instruction manual Coffee guide Warranty certificate NOTE: Due to continued product improvement, images and illustrations in this manual may vary slightly from the product purchased.
- Page 11 Product Overview (Cont.) Control panel (Fig. 1) POWER button: used to switch the espresso machine on and off. This appliance requires time to pre-heat - after turning it on, the power button will flash. Wait for it to illuminate before use. To ensure the correct temperature is reached, run a blank shot through the machine before pulling an espresso (see page 18).
-
Page 12: Getting Started
Getting Started Before first use • Unpack the appliance and keep the original packaging carton in a safe place. It will help prevent any damage if the product needs to be transported in the future, and you can use it to store the appliance when it is not in use. In the event that the carton is to be disposed of, please recycle it where possible. - Page 13 Getting Started (Cont.) Filling the water tank IMPORTANT! • Ensure there is water in the tank before you start extracting espresso or frothing milk. • Monitor the water level during use to ensure there is always some water in the tank. If you leave refilling until the tank is empty, the pump may start sucking in air from the empty water tank.
- Page 14 Getting Started (Cont.) 5. Plug the machine into an appropriate electrical outlet, then press the POWER button. The MENU, DESCALE, SHOT, CUP and START/STOP button will start to flash. The LCD display will be blank. 6. Press any button (MENU, DESCALE, SHOT or CUPS) to start priming the circuit.
- Page 15 Getting Started (Cont.) Grinding Function Fig. 4 Upper shaft Base shaft Using the grinder Fig. 5 The two “I” symbol onto base shaft and upper shaft should be aligned. Rotate the upper shaft until they are aligned (Fig. 4). Check and make sure the two arrows on the grinding mill are aligned [ ] (Fig.
- Page 16 Getting Started (Cont.) Open the lid of the bean hopper and pour in the fresh coffee beans. Insert the preferred filter (single shot or double shot) into the portafilter. Please take care when putting the filters into the portafilter as it takes a bit of strength. Press the CUP button to select the corresponding cup size (i.e.
- Page 17 Getting Started (Cont.) Grind selection Your coffee grinder has 15 grind size options. To adjust the grind size, rotate the bean hopper and adjust from fine to coarse depending on the type of coffee you are brewing. Grinding Amount of Default Grinding time Level...
-
Page 18: Instructions
Instructions Pulling an espresso The secret to a great-tasting espresso is all about achieving a perfect balance of taste, temperature and mouthfeel. To help you achieve that perfection, make sure all parts of your machine (including the pumping system) are clean and preheated, the water tank is filled with fresh, cold tap water, and your coffee is fresh and appropriately roasted and ground for espresso. - Page 19 Instructions (Cont.) Fig. 12 Run a blank shot to preheat the cup and portafilter. Press the START/STOP button (Fig. 12). This will stream hot water (a blank shot) to warm the cup and portafilter, and then the START/STOP button light will turn off. Add coffee.
- Page 20 Instructions (Cont.) b. Single shot volume (default - 40 mL) (see Fig. 13): press the MENU button until "1" is visible under the cup section on the right. Press the SHOT button and turn the START/STOP knob to choose between 30, 35, 40, 45 and 50 mL.
- Page 21 Instructions (Cont.) 18. Remove the filter basket. Once the filter basket is empty, take it out of the portafilter. To more easily remove it, you can use the other basket to leverage out the inserted basket (see Fig. 14). Fig. 14 19.
- Page 22 Instructions (Cont.) Frothing milk Your new espresso machine is equipped with a steam wand for easy production of textured milk for Italian-style milk coffees (cappuccino, caffè latte), or for hot chocolate. It is equipped with a silicone tag for handling the hot steam wand. For best results •...
- Page 23 Instructions (Cont.) Transition to steam. Press the MENU button until only the steam [ symbol is visible (Fig. 15). It will start flashing and illuminate solid when the temperature is achieved and steam is built. Fig. 15 Purge the steam wand. Press the START/STOP button. Make sure the steam wand is over the drip tray.
- Page 24 Instructions (Cont.) Straight after texturing milk, wipe the steam wand with a damp cloth. Take care to avoid getting burnt, the metal parts are very hot. Use the silicone tab to swivel the wand back over the drip tray. IMPORTANT! To avoid milk building up inside the steam wand, purge the steam wand after every use.
- Page 25 Instructions (Cont.) Adjusting the preset temperature The espresso machine is preset to provide espresso at 70°C. If you want to adjust this preset temperature, please proceed as follows: 1. Press the POWER button to switch off the machine. Once it is off, simultaneously press the MENU and SHOT buttons for at least two seconds.
-
Page 26: Faqs And Troubleshooting Guide
FAQs and Troubleshooting Guide PROBLEM POSSIBLE CAUSE SOLUTION Ensure there is enough water in No water in the water tank, or the the tank, and press it down firmly tank is incorrectly assembled. so it is correctly positioned. Coffee grind is too fine. Choose a grind that is less fine. - Page 27 FAQs and Troubleshooting Guide (Cont.) PROBLEM POSSIBLE CAUSE SOLUTION Cups, filters and portafilter are Run a blank shot to preheat cups, cold. portafilter and filter. Ensure you do not use chilled water The water is too cold in the Coffee is too in the water tank - use fresh, room water tank.
-
Page 28: Other Useful Information
Other Useful Information Cleaning and care WARNING! • Before cleaning the espresso machine or removing parts, ensure it is disconnected from the power supply and has cooled down completely. • To avoid the risk of electric shock, never immerse the appliance in water or other liquid. - Page 29 Other Useful Information (Cont.) Steam wand and water dispenser Fig. 17 • Clean the nozzle thoroughly. If required, use the supplied cleaning pin to clear any deposits. Insert the pin’s larger wire into the nozzles to clear blockages in the nozzles (Fig.
- Page 30 Other Useful Information (Cont.) Water tank • Remove the water tank and turn it upside down over a sink to discard any water left inside. We recommend you empty the water tank between uses and before cleaning the appliance. • Rinse the water tank thoroughly before filling it with fresh water for use. •...
- Page 31 Other Useful Information (Cont.) Long descale 1. Put a container of at least 2.3 L underneath the portafilter and steam wand. Alternatively, use two smaller containers (one underneath the portafilter, the other underneath the steam nozzle) and empty them as the machine alternates its water dispersal.
- Page 32 Other Useful Information (Cont.) Storage Store the clean and dry appliance in a clean and dry place, out of children's reach. We recommend you store the appliance, together with all accessories, in the original packaging carton, which will protect it from dust. Service, repair and spare parts If your espresso machine fails to work as expected, or you experience problems that you cannot solve using the information provided on the previous pages, please...
- Page 33 Other Useful Information (Cont.) Responsible disposal Packaging materials are recyclable. Please dispose of them responsibly for recycling. At the end of its working life, do not throw this appliance out with your household waste. Electrical and electronic products contain substances that can have a detrimental effect on the environment and human health if disposed of inappropriately.
- Page 34 This page has been left blank intentionally. tempo.org/support AFTER SALES SUPPORT 1300 112 534 MODEL: STR-E15BGD PRODUCT CODE: 708548 10/2022...
-
Page 35: Repair And Refurbished Goods Or Parts Notice
Espresso Machine with Grinder Repair and Refurbished Goods or Parts Notice Unfortunately, from time to time, faulty products are manufactured which need to be returned to the supplier for repair. Please be aware that if your product is capable of retaining user-generated data (such as files stored on a computer hard drive, telephone numbers stored on a mobile telephone, songs stored on a portable media player, games saved on a games console or files stored on a USB memory stick) during the process of... - Page 36 Please read the manual It will help you get the best out of your product. Still have questions? Call after sales support 1300 112 534 Or visit www.tempo.org Warranty returns Should you for any reason need to return this product for a warranty claim, make sure to include all accessories with the product.
Need help?
Do you have a question about the STR-E15BDG and is the answer not in the manual?
Questions and answers
I've followed the instructions to factory reset my coffee machine as outlined in the manual - however the buttons just keep flashing and I'm unable to get it to turn back on normally.
If the buttons on your Stirling STR-E15BDG coffee machine keep flashing after a factory reset, this indicates that the machine has successfully reverted to first-time use status. This is normal behavior and shows that the reset was successful.
This answer is automatically generated