Advertisement
Quick Links
Advertisement

Summary of Contents for Bonny Doon Classic Pro
- Page 1 HYDRAULIC PRESSES AND TOOLING Classic Pro Manual 20-Ton Press with Handpump...
- Page 2 Owners Manual and Safety Instructions READ ALL SAFETY, ASSSEMBLY AND OPERATING INSTRUCTIONS BEFORE ASSEMBLING OR OPERATING THE PRESS. FAILURE TO DO SO CAN RESULT IN SERIOUS or LIFE-THREATENING INJURIES. Save this manual: Keep this manual for the safety warnings and precautions, assembly, operating, inspection, cleaning and maintenance procedures.
-
Page 3: Tools Needed
Identify all Parts 1/4” T-handle Hex key Flange for mounting Cylinder in press frame. (remove from plywood packaging) 5/16” hex key for Hand Pump Cap head screws with 1.25” tooling bolt Bolts(2), nuts(4), and hex key for clamps for mounting flange to edge of table or for bolting through... -
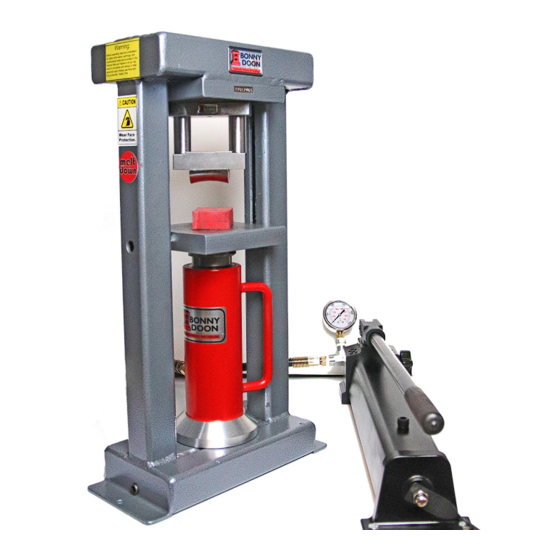
Page 4: Connecting The Hose
Pro Manual Hand-pump gauge pump handle pressure release knob reservoir fill plug threaded end w/ teflon 6ft hose with quick connect included Connecting the Hose Start by turning the handpump on its side so the hex plug is facing up as shown. You may want to use some rags to put under the handpump so it wont tip over. -
Page 5: Installing The Cylinder
Once the hose has been Carefully thread the end of Remove the plug so that threaded in a few turns the hose w/ teflon into the you can now connect the you can use your fitting. You will need to turn hose. - Page 6 Use your flathead screwdriver to pry up the press platen so you can place the hydraulic cylinder. Make sure to place the tip of the screwdriver under the platen bolt. Do not ever remove or loosen this bolt. Notice on the underside of the platen will be two threaded holes.
- Page 7 Push the two ends of the quick While pushing them together Make sure that the fitting is connect together. thread the sleeve on the tight and that there is no gap cylinder end over the threads in between them. Do not use on the hose end.
- Page 8 The Classic press allows for up to 7” of space between the two platens, the MKIII allows for 10” between the two platens. This accommodates many of the large Bonny Doon tools such as the bracelet formers and the deep-draw kits. On the MkIII you will want to use the riser block for most operations.
- Page 9 It is normal to have Pressure Release small amounts of oil Knob - open and around the cylinder close only 1/2 here. You may even get turn some small droplets of oil on your workbench. IMPORTANT! Before first use, check for proper hydraulic oil level in the pump. It should be filled no more than 1/2” below the level of the Oil Filler hole.
- Page 10 Tips for Using your Hydraulic Press ALWAYS WEAR SAFETY GLASSES OR A FACE SHIELD. Things can always break under the pressures that you are working with. Cast Acrylic will withstand incredible pressure if it is fully supported on the back side, but if it is hanging over the edge, and the urethane pad starts to bend the area that is hanging over it is sure to break.
Need help?
Do you have a question about the Classic Pro and is the answer not in the manual?
Questions and answers