Table of Contents
Advertisement
Available languages
Available languages
Quick Links
Advertisement
Table of Contents

Summary of Contents for DONE WATCHES MECHANICA ME1A
- Page 1 INSTRUCTIONS & GARANTIE INSTRUCTIONS & WARRANTY...
- Page 3 Pages Français Instructions..........03 - 14 Garantie........... 15 - 16 English Instructions..........17 - 28 Warranty..........29 - 30 www.donewatches.ch...
- Page 4 Nous vous félicitons d’avoir porté votre choix sur une montre DONE et nous vous remercions de votre confiance. Fondée en 2016, DONE WATCHES ouvre une nouvelle voie parmi les marques horlogères indépendantes. Sortant des principes de la distribution classique, elle a la volonté de servir ses clients en direct, sans aucun intermédiaire, afin d’être au plus proche de ses ambassa-...
- Page 5 INSTRUCTIONS Que faire pour garantir le bon fonctionnement de votre montre? Champs magnétiques : Évitez de placer votre montre à proximité de champs magnétiques. Ces sources peuvent provenir d’un haut-parleur, d’un réfrigérateur, de tablettes, d’ordinateurs ou d’appareils médicaux. En effet ceux-ci peuvent générer de puissants champs magnétiques pouvant perturber la bonne marche de votre garde-temps.
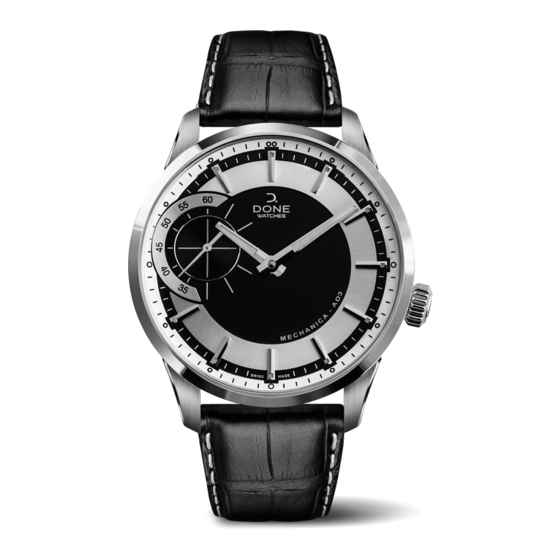
- Page 6 MODÈLES À REMONTAGE MANUEL Les instructions ci-dessous sont valables pour les modèles de la collection MECHANICA classique ME1A. Aiguille des minutes Aiguille des secondes Couronne de remontoir Aiguille des heures 1. REMONTAGE DE LA MONTRE Tournez la couronne dans le sens des aiguilles d’une montre en position «T1» jusqu’au remontage complet du mouvement.
- Page 7 2. MISE À L’HEURE Tirez délicatement sur la couronne jusqu’à sa position «T2» et réalisez la mise à l’heure. Une fois le réglage effectué, repoussez la couronne en position «T1». 3. ÉTANCHÉITÉ Votre montre est certifiée étanche à 10 ATM, correspondant à une immersion statique à 100m de profondeur (330 ft).
- Page 8 MODÈLES À REMONTAGE MANUEL Les instructions ci-dessous sont valables pour les modèles de la collection MECHANICA squelette B02. Aiguille des minutes Aiguille des secondes Couronne de remontoir Aiguille des heures 1. REMONTAGE DE LA MONTRE Tournez la couronne dans le sens des aiguilles d’une montre en position «T1» jusqu’au remontage complet du mouvement.
- Page 9 2. MISE À L’HEURE Tirez délicatement sur la couronne jusqu’à sa position «T2» et réalisez la mise à l’heure. Une fois le réglage effectué, repoussez la couronne en position «T1». 3. ÉTANCHÉITÉ Votre montre est certifiée étanche à 10 ATM, correspondant à une immersion statique à 100m de profondeur (330 ft).
-
Page 10: Modèles Automatiques
MODÈLES AUTOMATIQUES Les instructions ci-dessous sont valables pour les modèles de la collection MECHANICA automatique ME2A. Aiguille des secondes Aiguille des minutes Couronne de remontoir T1 T2 T3 Aiguille des heures Affichage de la date 1. REMONTAGE DE LA MONTRE Vous possédez une montre automatique qui se remonte toute seule grâce aux mouvements du porteur. -
Page 11: Réglage De La Date
2. RÉGLAGE DE LA DATE Tirez délicatement la couronne dans sa première position «T2» et tournez ensuite le remontoir à l’inverse des aiguilles d’une montre pour régler la date. Une fois le réglage effectué, repoussez la couronne dans sa position initiale «T1». 3. - Page 12 MODÈLES AUTOMATIQUES Les instructions ci-dessous sont valables pour les modèles de la collection MECHANICA automatique ME3A. Aiguille des secondes Aiguille des minutes Couronne de remontoir T1 T2 T3 Aiguille des heures Affichage de la date 1. REMONTAGE DE LA MONTRE Vous possédez une montre automatique qui se remonte toute seule grâce aux mouvements du porteur.
- Page 13 2. RÉGLAGE DE LA DATE Tirez délicatement la couronne dans sa première position «T2» et tournez ensuite le remontoir à l’inverse des aiguilles d’une montre pour régler la date. Une fois le réglage effectué, repoussez la couronne dans sa position initiale «T1». 3.
- Page 14 MONTAGE D’UN BRACELET NATO Tous nos bracelets sont interchangeables et peuvent facilement être montés pour s’adapter à chaque occasion. Afin de fixer un bracelet Nato, suivez les instructions mentionnées ci-dessous. 1. Tout d’abord munissez-vous de votre tête de montre (a) , de la paire de barrettes (b) fournie à...
- Page 15 3. Faites rentrer le brin long du bracelet Nato dans la première barrette placée à 12h (e) et faites-le ensuite rentrer dans la deuxième barrette (f) placée à 6h. 4. Une fois le bracelet inséré, repliez le brin long à l’intérieur de la boucle (g) dépassant du côté...
-
Page 16: Garantie Internationale
Tous services ou réparations effectuées sur votre montre DONE WATCHES doivent être effectués par les ateliers de DONE WATCHES en Suisse ou par un centre agrée par la marque. Si ces conditions ne sont pas remplies, la garantie internationale de votre montre ne... - Page 17 Ne sont pas couverts par la présente garantie: a) L'utilisation incorrecte de la montre et le non-respect des indications du mode d'emploi. b) L'usure normale de la montre et son altération dans le temps. c) Les dégâts provoqués sur la montre découlant d'une mauvaise utilisation; les chocs, les griffures, les bris des verres saphirs et les rayures sur les glaces ou sur les traitements anti-reflets.
- Page 18 Congratulations you have chosen a DONE watch, we thank you for the trust you place in our brand and in our products. Founded in 2016, DONE WATCHES opens a new path among independent watch brands. Leaving the principles of classic distribution, it wants to serve its customers directly, without any intermediary in order to be as close as possible to its ambassadors and to be able to offer a sale price adapted to each.
- Page 19 INSTRUCTIONS What must i do to ensure my watch is perfectly functionning? Magnetic fields: Avoid placing your watch near magnetic fields. These sources can come from a speaker, refrigerator, tablet, computer, or medical device. Indeed, these can generate strong magnetic fields which can disrupt the smooth running of your timepiece. Temperature: Avoid exposing your watch to extreme temperatures (higher than 60 °...
- Page 20 MANUAL WINDINGS MODELS The instructions mentionned here below are available for the following models ME1A, of the MECHANICA classic collection. Minute hand Second hand Crown Hour hand 1. WINDING YOUR WATCH Turn the crown clockwise «T1» until the complete winding of your watch. For a constant functionning of your watch we recommand to wind your tiempiece every day.
-
Page 21: Setting The Time
2. SETTING THE TIME Gently pull the crown in position «T2» then turn the crown to set the minute and hour hands in their correct positions. Once the time is set, push back the crown in the initial position «T1». 3. - Page 22 MANUAL WINDING MODELS The instructions mentionned here below are available for the following models B02, of the MECHANICA skeleton collection. Minute hand Second hand Crown Hour hand 1. WINDING YOUR WATCH Turn the crown clockwise «T1» until the complete winding of your watch. For a constant functionning of your watch we recommand to wind your tiempiece every day.
- Page 23 2. SETTING THE TIME Gently pull the crown in position «T2» then turn the crown to set the minute and hour hands in their correct positions. Once the time is set, push back the crown in the initial position «T1». 3.
-
Page 24: Automatic Models
AUTOMATIC MODELS The instructions mentionned here below are available for the following models of the MECHANICA automatic collection ME2A. Second hand Minute hand Crown T1 T2 T3 Hour hand Date window 1. WINDING YOUR WATCH You have an automatic watch that automaticly winds itself with the movements of the wearer. To manually wind your watch turn the crown in position «T1»... -
Page 25: Setting The Date
2. SETTING THE DATE Gently pull the crown in the first position «T2», then turn the crown anticlockwise to set the correct date. Once the date is set push back the crown in the initial position «T1». 3. SETTING THE TIME Gently pull the crown in the last position «T3», turn the crown to set the minute and the hour hands. - Page 26 AUTOMATIC MODELS The instructions mentionned here below are available for the following models of the MECHANICA automatic collection ME3A. Second hand Minute hand Crown T1 T2 T3 Hour hand Date window 1. WINDING YOUR WATCH You have an automatic watch that automaticly winds itself with the movements of the wearer. To manually wind your watch turn the crown in position «T1»...
- Page 27 2. SETTING THE DATE Gently pull the crown in the first position «T2», then turn the crown anticlockwise to set the correct date. Once the date is set push back the crown in the initial position «T1». 3. SETTING THE TIME Gently pull the crown in the last position «T3», turn the crown to set the minute and the hour hands.
- Page 28 NATO STRAP ASSEMBLY All our straps can easily be changed to fit every occasion. In order to fix a NATO strap on your watch please follow the steps presented here below : 1. First grab your watch head (a), the two spring bars (b) inside your DONE box and your NATO strap (c).
- Page 29 3. Fold the long strand of the Nato bracelet into the first springbar at 12 o'clock (e) and then enter the second bar (f) placed at 6 o'clock. 4. Once the bracelet is inserted fold the long strand inside the loop (g) of the short side. Long strand Step 3 Step 4...
-
Page 30: International Warranty
All services or repairs carried out on your DONE WATCHES watch must be carried out by DONE WATCHES workshops in Switzerland or by a center approved by the brand. If these conditions are not met, the international guarantee of your watch will no longer be valid. - Page 32 Because the adventure is never truly done www.donewatches.ch...
Need help?
Do you have a question about the MECHANICA ME1A and is the answer not in the manual?
Questions and answers