Advertisement
Quick Links
Electrical Specications:
Inputs:
EMERGENCY, UTILITY and SWITCHED
0-10V controls (ELCD-D/FD model)
Fire Alarm
Max Load Requirements:
LED, Ballast, Tungsten, Incandescent:
Standby Power Consumption:
Dielectric Strength:
Mechanical Specications:
Size:
1.73"W x 1.28"D x 2.72"H
Weight:
4.5 oz.
Color:
RAL9003 White
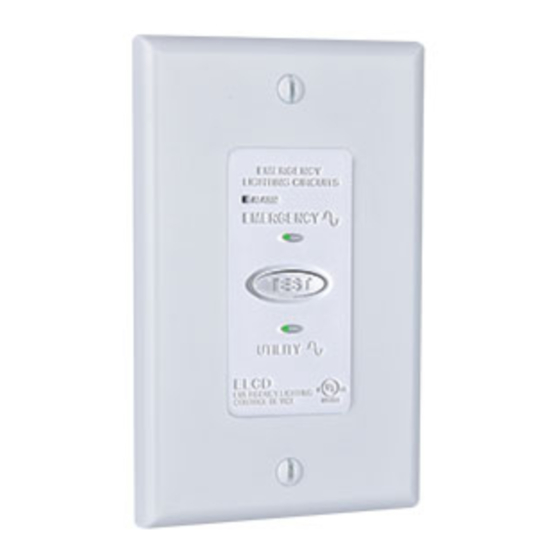
Indicators:
LED's - EMERGENCY (Green), UTILITY (Green), ALARM (Red)
User Controls:
Test Button
Mounting:
Standard electrical box or xture mount
Breakaway tabs for mounting congurations
Environment:
0-50 deg. C
Connections:
Flying Leads – Pre-Tinned
12AWG for EMERGENCY INPUT (Blue) and LOAD (Yellow)
18AWG for UTILITY (Black), SWITCHED (Red),
UTILITY NEUTRAL (White), EMERGENCY NEUTRAL (Gray)
20AWG Teon for Fire Alarm (Red), 0-10V Dimming (Violet)
Programming Mode – Changing the Time Delay function
The ELCD has 5 pre-programmed time intervals which allows the user to extend the relay's "on time" when returning from an Emergency condition.
The factory default time interval is set to 2 seconds and can be eld modied to either No Delay, 1, 5, or 15 Minutes.
To change the time interval, press and hold the TEST button for at least 15 seconds to enter the programming mode. Once the programming mode is
entered, the ALARM LED will illuminate solid red until the TEST button is released. Once the TEST button is released, a blinking pattern between the
EMERGENCY LED and the ALARM LED will start. Blinking will alternate between the ALARM and EMERGENCY LED's followed by a pause and then
repeated continuously. The quantity of blinks on the green EMERGENCY LED indicates which time interval is currently selected. To advance the time
interval to a different pre-programmed setting, simply press the TEST button again. The Programming mode is a continuous loop so that if the button
is pressed too many times, it will go back to the starting location. Once the desired time interval has been selected, press and hold the TEST button
for at least 5 seconds until the ALARM LED is OFF to exit the programming mode.
Programming Mode Sequence 1)
One Blink = No Delay
Programming Mode Sequence 2)
Two Blinks = 2 Second Time Interval (Default)
Programming Mode Sequence 3)
Three Blinks = 1 Minute Time Interval
Programming Mode Sequence 4)
Four Blinks = 5 Minute Time Interval
Programming Mode Sequence 5)
Five Blinks = 15 Minute Time Interval
QUICK GUIDE - PROGRAMMING PROCEDURE
(for details – see PROGRAMMING MODE description)
Step 1 – Enter the Programming mode
Press and Hold
TEST
(15+ Seconds)
Step 2 – Momentarily press the TEST button to advance to the desired Time Interval
***NOTE***
Count the blinks on the Green
TEST
EMERGENCY LED
after the Red Alarm
Step 3 – Exit the Programming mode
Release TEST Button
Press and Hold
TEST
After ALARM LED is OFF
120-277VAC, 47-63 Hz
0-10V DC, 200mA maximum
12-24V AC/DC
20A @ 120/277V
0.25W@120V, 0.60W@277V
1550 VAC between ALL Inputs
Warranty:
5 Year full replacement
Conformance:
UL-924, NEMA 410, IEC 6100-4-5,
NEC, OSHA, NFPA
Press TEST Button
momentarily to advance
to new sequence
ALARM
ReleaseTEST Button
LED
After ALARM LED is ON
3 Blinks = 1 Min.
2 Blink = 2 Sec.
EMERGENCY
1 Blink = No Delay.
LED
5 Blink = 15 Min.
4 Blinks = 5 Min.
ELCD / ELCD-D / ELCD-F / ELCD-FD
Emergency Ligh ng Control Device
Installa on / Opera on Manual
UL-924 Listed for Emergency Ligh ng
Factory Calibrated Zero-Cross switching
reduces relay arcing and inrush current up to 5X
compared to conven onal relays
Industries lowest standby power consump on
is less than 0.25W @120V
120 - 277 VAC Universal Input
NEMA 410 Tested
IEC 61000-4-5 Surge Tested
A rac ve standard faceplate - single or
mul -gang box
Breakaway tabs for mul ple moun ng
configura ons
User Programmable Time Delay up to 15 min.
IMPORTANT SAFEGUARDS
When using electrical equipment, basic safety precau ons should always
be followed including the
following:
READ AND FOLLOW ALL SAFETY INSTRUCTIONS
This product can be used with LED Drivers, Fluorescent Ballasts, Incandescent,
/Quartz and general use loads
Tungsten
Servicing shall be performed by qualified service personnel
Ensure all wiring complies with applicable standards such as NFPA, NEC, and
local codes
This product is not intended for use in wet loca ons – seal appropriately when
using outdoors
Do not mount near gas or electric heaters
Do not use this equipment for other than intended use
The use of accessory equipment not recommended by the manufacturer may
cause an unsafe condi on
WARNING
TURN POWER OFF BEFORE INSTALLATION,
ONLY QUALIFIED
ELECTRICIANS SHOULD INSTALL
SAVE THESE INSTRUCTIONS
Z410153 Rev A
Advertisement

Summary of Contents for Evenlite ELCD
- Page 1 Programming Mode – Changing the Time Delay function The ELCD has 5 pre-programmed time intervals which allows the user to extend the relay’s “on time” when returning from an Emergency condition. The factory default time interval is set to 2 seconds and can be eld modied to either No Delay, 1, 5, or 15 Minutes.
- Page 2 WALL SWITCH CAN BE REPLACED WITH CONTACTOR, OCCUPANCY SENSOR, TIME CLOCK, ETC. When using the ELCD-D or ELCD-FD models, ensure that the emergency xtures go to full brightness when the TEST button is pressed and also ensure the VIOLET SIGNAL PATH IS OPEN DURING EMERGENCY MODE FOR FULL BRIGHTNESS ON EMERGENCY FIXTURE dimmer has full control of normal and emergency xtures during normal mode.
Need help?
Do you have a question about the ELCD and is the answer not in the manual?
Questions and answers