Table of Contents
Advertisement
Quick Links
Advertisement
Table of Contents

Related Manuals for Saswell SEA801-Tuya Zigbee

Summary of Contents for Saswell SEA801-Tuya Zigbee
- Page 1 SEA801 -Tuya Zigbee INSTRUCTION SEA801 -Tuya Zigbee INSTRUCTION...
- Page 2 Content Controller Introduction Adapter Introduction Controller Settings Link APP Recovery Factory Setting/ Exit network...
-
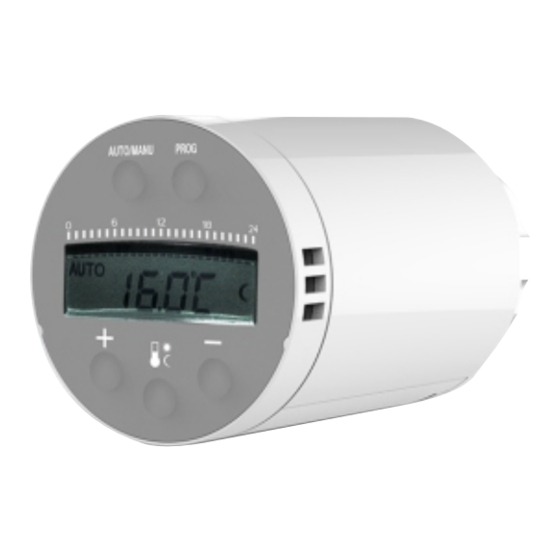
Page 3: Controller Appearance
Button description Controller Appearance Model switch button:switch work mode, automatic mode or manual mode,automatic Model Programmable mode is programming run. switch button button Programmable button:short press the button to enter the programming interface;press the UP button DOWN button button for more than 3 seconds to enter the time setting interface. -
Page 4: Specifications
Specifications Controller Power Method Power source:2 AA baterry Open protection cover (Don’t use the rechargeable battery) After install battery then put protection cover Battery lifetime:1year Temperature setting range:5℃~30℃ Temperature setting accuracy:0.5℃ Temperature display range:0℃~50℃ Operation temperature range:0℃~50℃ 2AA battery Shipping & storage temperature:-10℃~60℃ Frequency:2.400GHz Attention Wireless transmit range:Open distance 70M... -
Page 5: Controller Installation
Controller Installation Adapter Selection Put battery in battery Display show Pls confirm valve diameter compartment flushing Danfoss 3/4 valve 1/2 valve long plunger (RA) (RAV) Install controller with When push road is M30*1.5 screw thread flush with base Interface of valve . Tighten the copper ring Caleffi... -
Page 6: Adapter Installation
Adapter Installation 1/2 valve (RA) Caleff 1/2 valve Adapter, please put directly on the valve, forced to press the accessories and valves can be stuck. Giacomini 3/4 valve(RAV) 1/2 valve Danfoss 3/4 valve need install long Giacomini 1/2 valve need install short plunger at plunger at the buttom of controller. - Page 7 Controller Default Setting Weekly Period Setting Long press “PROG” button to choose month/date/ Short press “PROG” button to enter the year,press “+” “-” to set ,when set finished will during programming setting ,press “+” “-” to select week , controller display interface . when finish set, press “PROG”...
-
Page 8: Time Setting
Time Setting Temperature Setting Press “+” “-” button to select the period of time ,short Press “+”or “-” to adjust the temperature ,short press press the “PROG” button to switch to the temperature “PROG” and switch to the time setting in the next setting in the period of time. - Page 9 Link APP-Login Link APP-Add devices Download: Add gateway: Click App store or Android application market to Enter the “HOME” interface download “Smart Life”APP. of the app,Click the “+” in the upper right corner . Click the list bar “Others”, Select the gateway (ZigBee) in the right Registration and Login: device list.
- Page 10 Add controller: Click “Connect”,automatically Click the “Zigbee Gateway” you have added at the“HOME” search the device and wait a interface. few seconds until the search progress is 100% Click “Add sub-device”for Click “Completed”,it means enter the device list. the gateway added successfully.
- Page 11 Link APP-Temperature Setting After the controller is added successfully,we can control the device through the APP. long press controller “AUTO/MANU”and“ +” until the screen show “----”. Press slip the circular arc for increase or decrease of the temperature. Tips Under the controller Click “Confirm indicator opening programming rapidly blink”on APP, and...
- Page 12 Link APP-Pown On/Off Setting Link APP-Programming Setting Click “>> Slide off ” and drag to the right to achieve Click the programming to enter the programming interface. “slipping for power off ”or “slipping for power on”. Selecting the period of time of 7-day programming,press “...
- Page 13 Link APP Link APP -Multi-day Programming Setting -Temporary Stay-out Setting Enter the programming interface If you need to stay out and then click the “7-day” key. temporarily,please click “ ” key. The temperature can remain Click the date to be edited and at 16℃,the energy-saving icon confirm it.
- Page 14 Recovery Factory Setting/Exit network Long press “+”and “PROG” at the same tine for 3-5s,and the controller show “ ” ,it means recover factory setting/ exit network successfully. AUTO...
Need help?
Do you have a question about the SEA801-Tuya Zigbee and is the answer not in the manual?
Questions and answers