Table of Contents
Advertisement
Quick Links
Advertisement
Table of Contents

Summary of Contents for S.E.A. Group RESCUE Intellitech DeconFilter Pro S
- Page 1 DeconFilter™ Pro S – Manual Installation, user instructions and service...
-
Page 2: Table Of Contents
Content 2 General Description and Safety 2.1 To the user 2.2 Safety regulations 2.3 Limited Warranty 2.4 Limitation of Liability 3 Technical data 3.1 Installation drawing 3.1 Installation drawing – Wall Mount 4 Installation 4.1 Mounting the filter rack 4.2 Pressure gauge 4.3 Tank installation 4.4 Filter cartridge installation 5 Operation... -
Page 3: General Description And Safety
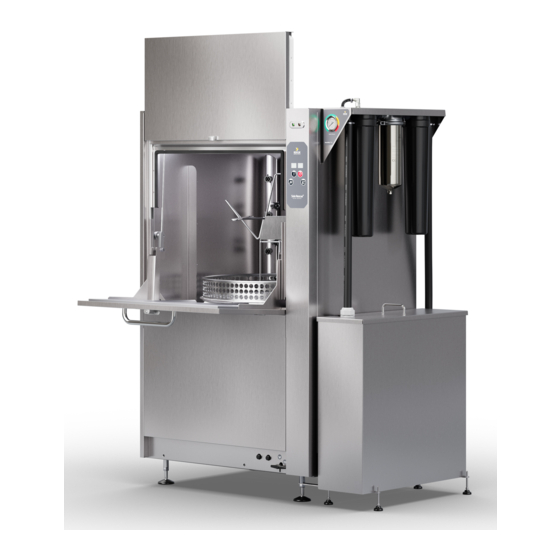
2 General Description and Safety 2 General Description and Safety 2.1 To the user The DeconFilter™ Pro S is designed with the express purpose of being used together with the Solo Rescue® Decon Washer and shall not be used in any other context. It serves the purpose of filtering the contaminated wash water from the Solo Rescue before flushing it out the drain. -
Page 4: Limitation Of Liability
2 General Description and Safety without limitation, the implied warranties of merchantability, title and/or fitness for a particular purpose. The express limited warranty above is ONLY valid if the DeconFilter™ Pro S is installed by an authorized representative of RESCUE Intellitech. If a DeconFilter™ Pro S would be installed, repaired or otherwise modified by someone other than an authorized representative of RESCUE Intellitech, the limited warranty shall immediately lapse. -
Page 5: Installation Drawing
3 Technical data 3.1 Installation drawing A. Drain outlet/hose connection B. Pressure gauge 1340 mm / 52,8" 955 mm / 37,6" Decon washer max Designed by Checked By Checked Date Additional Information Status Scale Projection method GIS number Sheet 1:10 Date 2021-10-19 Drawing number... -
Page 6: Installation
4 Installation 4 Installation 4.1 Mounting the filter rack For filters mounted on the Solo Rescue – go to section 4.1.1 For wall mounted filters – go to section 4.1.2 (Option, accessory needed) 4.1.1 Mounted on the Solo Rescue® NOTE: Not applicable for Solo Rescue® 32-series, Figure 1 use wall mount accessory instead. - Page 7 4 Installation 4.1.2 Mounted on the wall Use wall mount accessory article number 27305. IMPORTANT NOTE: Use suitable fastening (screws and plugs) based on the construction of the wall (not included in kit). Filter racks in operation weigh approximately 30 kg (66 Ibs). Remove the filter rack securing bolts (Fig.
-
Page 8: Pressure Gauge
4 Installation 4.2 Pressure gauge Without removing the pressure gauge from its position, gently pierce a small hole in the rubber cap on the top. (Fig. 8 & 9). Figure 8 Figure 9 4.3 Tank installation On the right hand side of the Solo Resce®, loosen the nuts on the levelling feet and position the tank. - Page 9 4 Installation 3. Once it is level, tighten the nuts on the tank feet (Fig. 12). 4. Connect the included drain pipe connections between the Solo Rescue® drain outlet and the tank inlet (Fig. 13). 5. Place the provided submersible pump in the tank and make sure the arrows on the anti- rotation plate points to the front of the tank (Fig.
- Page 10 4 Installation 6. Cut the provided hose to suitable length from pump outlet to filter inlet at filter housing #1 (Fig. 15 & 16). Connect the hose to the pump outlet and secure it with one of the provided hose clamps (Fig.
- Page 11 4 Installation 10. Connect the hose to the inlet of filter housing #1 secure it with one of the provided hose clamps (Fig. 19) 11. Use the remaining hose to connect the filter system to the drain on site. Cut to suitable length if needed.
-
Page 12: Filter Cartridge Installation
5 Operation 4.4 Filter cartridge installation Unscrew the filter sumps and fit the filter cartridges in their correct positions as displayed in Fig. 22. Each filter housing and corresponding filter cartridge is marked with identical numbers to indicate its correct position. -
Page 13: Service & Maintenence
6 Service & Maintenence 6 Service & Maintenence IMPORTANT NOTES: The DeconFilter™ Pro S may contain hot, contaminated water. It may contain hazardous toxic chemicals and carcinogens. Never user other filter cartridges than the RESCUE Intellitech Replacement Cartridges together with the DeconFilter™ Pro S. During filter changes and while performing service and maintenance...: •... -
Page 14: Replacement Cartridges
6 Service & Maintenence 6.2 Replacement Cartridges Replacement cartridges are provided by RESCUE Intellitech dealers only. Contact your local dealer for more information. 6.3 Replacement of Filter Cartridges Disconnect the power to the submersible pump by disconnecting the DeconFilter™ Pro S from the electrical socket. - Page 15 6 Service & Maintenence 6.5 Cleaning pump intake (every 12 months) Pull off the intake cage from the housing and remove the impeller cover by loosening all six Phillips head screws. 2. Clean and rinse the intake cage, impeller and the impeller cover with clean water (Fig.
-
Page 16: Spare Parts List
7 Spare parts list 7 Spare parts list Item Denomination Part Number Pump complete 90041 Manometer 28078 Filter housing #1 complete 90042 Filter housing #2 complete 90043 Filter housing #3 complete 90044 Pump restrictor 27454 Lint filter 27128 O-ring kit for Filter Housing 1–3 90051... - Page 17 SAFETY EQUIPMENT AUSTRALIA 35/1 Jubilee Avenue WARRIEWOOD 2102 Private Bag 1001 MONA VALE 2103 Tel: 02 9910 7500 Free Call: 1800 655 129 Fax: 02 9979 5364 E-mail: sea.enquiries@sea.com.au Website: www.sea.com.au We take decontamination seriously. You should too! Research and statistics all tell us the same story. Today’s firefighters are being exposed to dangerous toxic chemicals that cause long term health problems, and even deaths.
Need help?
Do you have a question about the RESCUE Intellitech DeconFilter Pro S and is the answer not in the manual?
Questions and answers